WELCOME
Welcome to Mariana - a cutting-edge software bass synthesizer from Moog Music designed for the modern production environment and capable of reaching the deepest depths of low-end tone and weight.
Welcome to Mariana - a cutting-edge software bass synthesizer from Moog Music designed for the modern production environment and capable of reaching the deepest depths of low-end tone and weight.
Moog has long been a pioneer in electronic bass, from the iconic Minimoog Model D to the Taurus Bass Pedals, Sub Phatty, and Minitaur. Mariana continues this tradition in the form of an innovative software synthesizer for iOS, macOS, and Windows. Optimized for dynamic bass sounds that sit perfectly in the mix, Mariana is a versatile tool for artists and musicians across all genres and workflows.
Mariana is a dual-layer synthesizer, allowing you to mix together two completely different synthesizer sounds that can dynamically complement each other or be played duophonically. Each layer is built around two oscillators with precise and inventive controls to make your bass tone punch through a mix and stand out from the rest, with a sub-oscillator adding even more low-end weight. Two resonant Moog filters and a third filter specifically for the sub-oscillator let you shape your sound, adding warmth while rolling off high frequencies or pushing up the resonance for added bite. With stereo oscillators and crossover filter functionality, Mariana is optimized for quickly fine-tuning stereo content while simultaneously preserving a powerful mono bass foundation.
Warm tube, tape, and overdrive saturation and a tight compressor add heaviness and glue to your bass lines while an illuminating real-time metering section lets you monitor your sounds and dial them in to a professional standard. Flexible built-in delay and chorus effects operate on separate layers and can expand the stereo image of your sounds while preserving a solid mono signal with high-pass filters. Mariana comes with more than 200 professionally designed presets to use as a starting point or inspire you to create your own unique bass tones.
Mariana’s intuitive user interface is designed for quick and efficient workflow while being fully equipped with three LFOs, three envelopes, and two random generators per layer. Combined with a creative and extremely deep modulation editor, Mariana excels at in-depth sound design and sounds that dynamically evolve over time. Nearly every parameter of Mariana can be modulated internally via MIDI, MPE, and virtual CV to build an interconnected ecosystem right in your DAW (digital audio workstation). With an optimized resizable user interface, expressive on-screen keyboard for iPad and desktop versions, and seamless integration into any DAW, Mariana is the most accessible way to add the unmistakable Moog bass sound to your productions.
Mariana is compatible with macOS 11.7 Intel/Apple Silicon (or newer), standalone and plug-in formats VST3, AudioUnits, Pro Tools AAX and Windows 10 64-bit Intel systems (or newer), standalone and plug-in formats VST3, and Pro Tools AAX
A sister application is available for 64-bit iPad devices and requires iOS 14.4 or higher.
TIP: For optimum performance on any iOS device, be sure to disable Wi-Fi or activate Airplane Mode.
TIP: Keep your battery charged above 50%, or CPU performance may be reduced by the operating system, which can result in choppy UI and/or audio crackles.
TIP: On iOS devices without a home button, the iOS home indicator overlays on top of the keyboard and can result in the app being swiped away accidentally. We recommend activating Guided Access through iOS Settings > Accessibility in order to use Mariana without unwanted interactions.

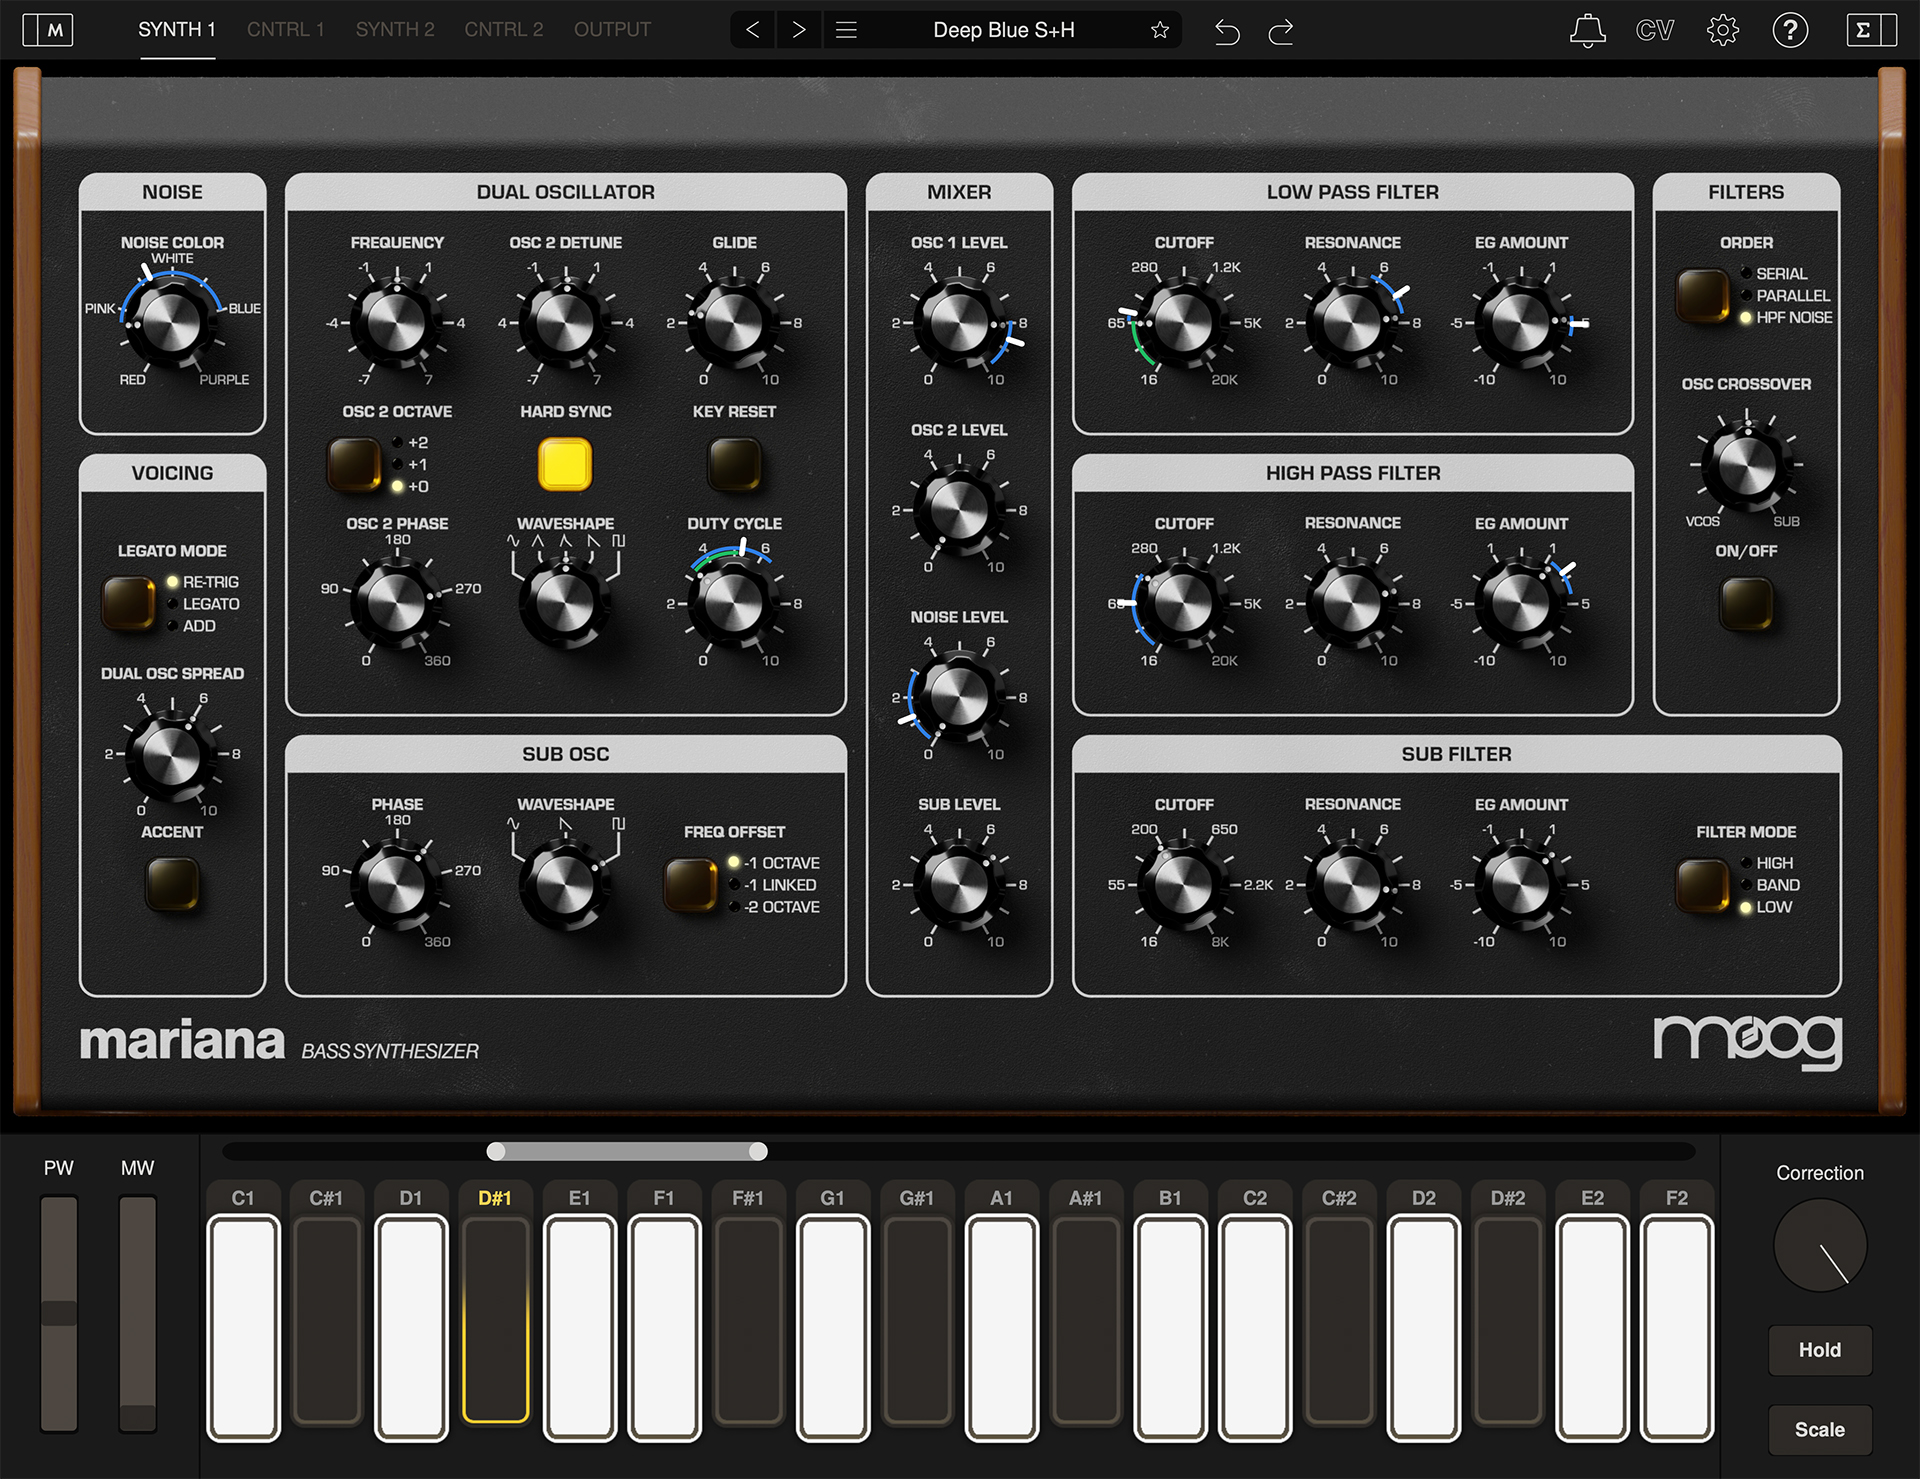
Mariana’s TOUCH KEYS feature note VELOCITY, which is determined by where a key is struck from top to bottom. After a note is pressed, the held key will illuminate. Finger movement toward the top of a key will cause the outline of the key to increasingly illuminate, representing an increase in PRESSURE amount.
TIP: Using a typing keyboard, notes can be played using the middle row of typing keys. Refer to the Keyboard Shortcuts section for details.
The KEY SPACING CONTROL shifts the keyboard to display lower or higher notes in a scale. It also permits stretching or shrinking the number of keys displayed. To shift the keys, press and drag the center of the control. To increase or decrease the number of keys displayed, press and drag the end tab. Tapping to the left or the right of the control, shifts the keyboard downwards or upwards by an octave.
PITCH and MOD wheel strips are assignable in the Modulation Editor.
Correction sets pitch correction between keys. At maximum, full correction occurs. Set halfway, rocking your finger side to side will allow for vibrato and pitch bend effects. At minimum, there is no pitch correction between keys and therefore Mariana's keys function as a continuous ribbon controller.
The HOLD button will sustain notes indefinitely.
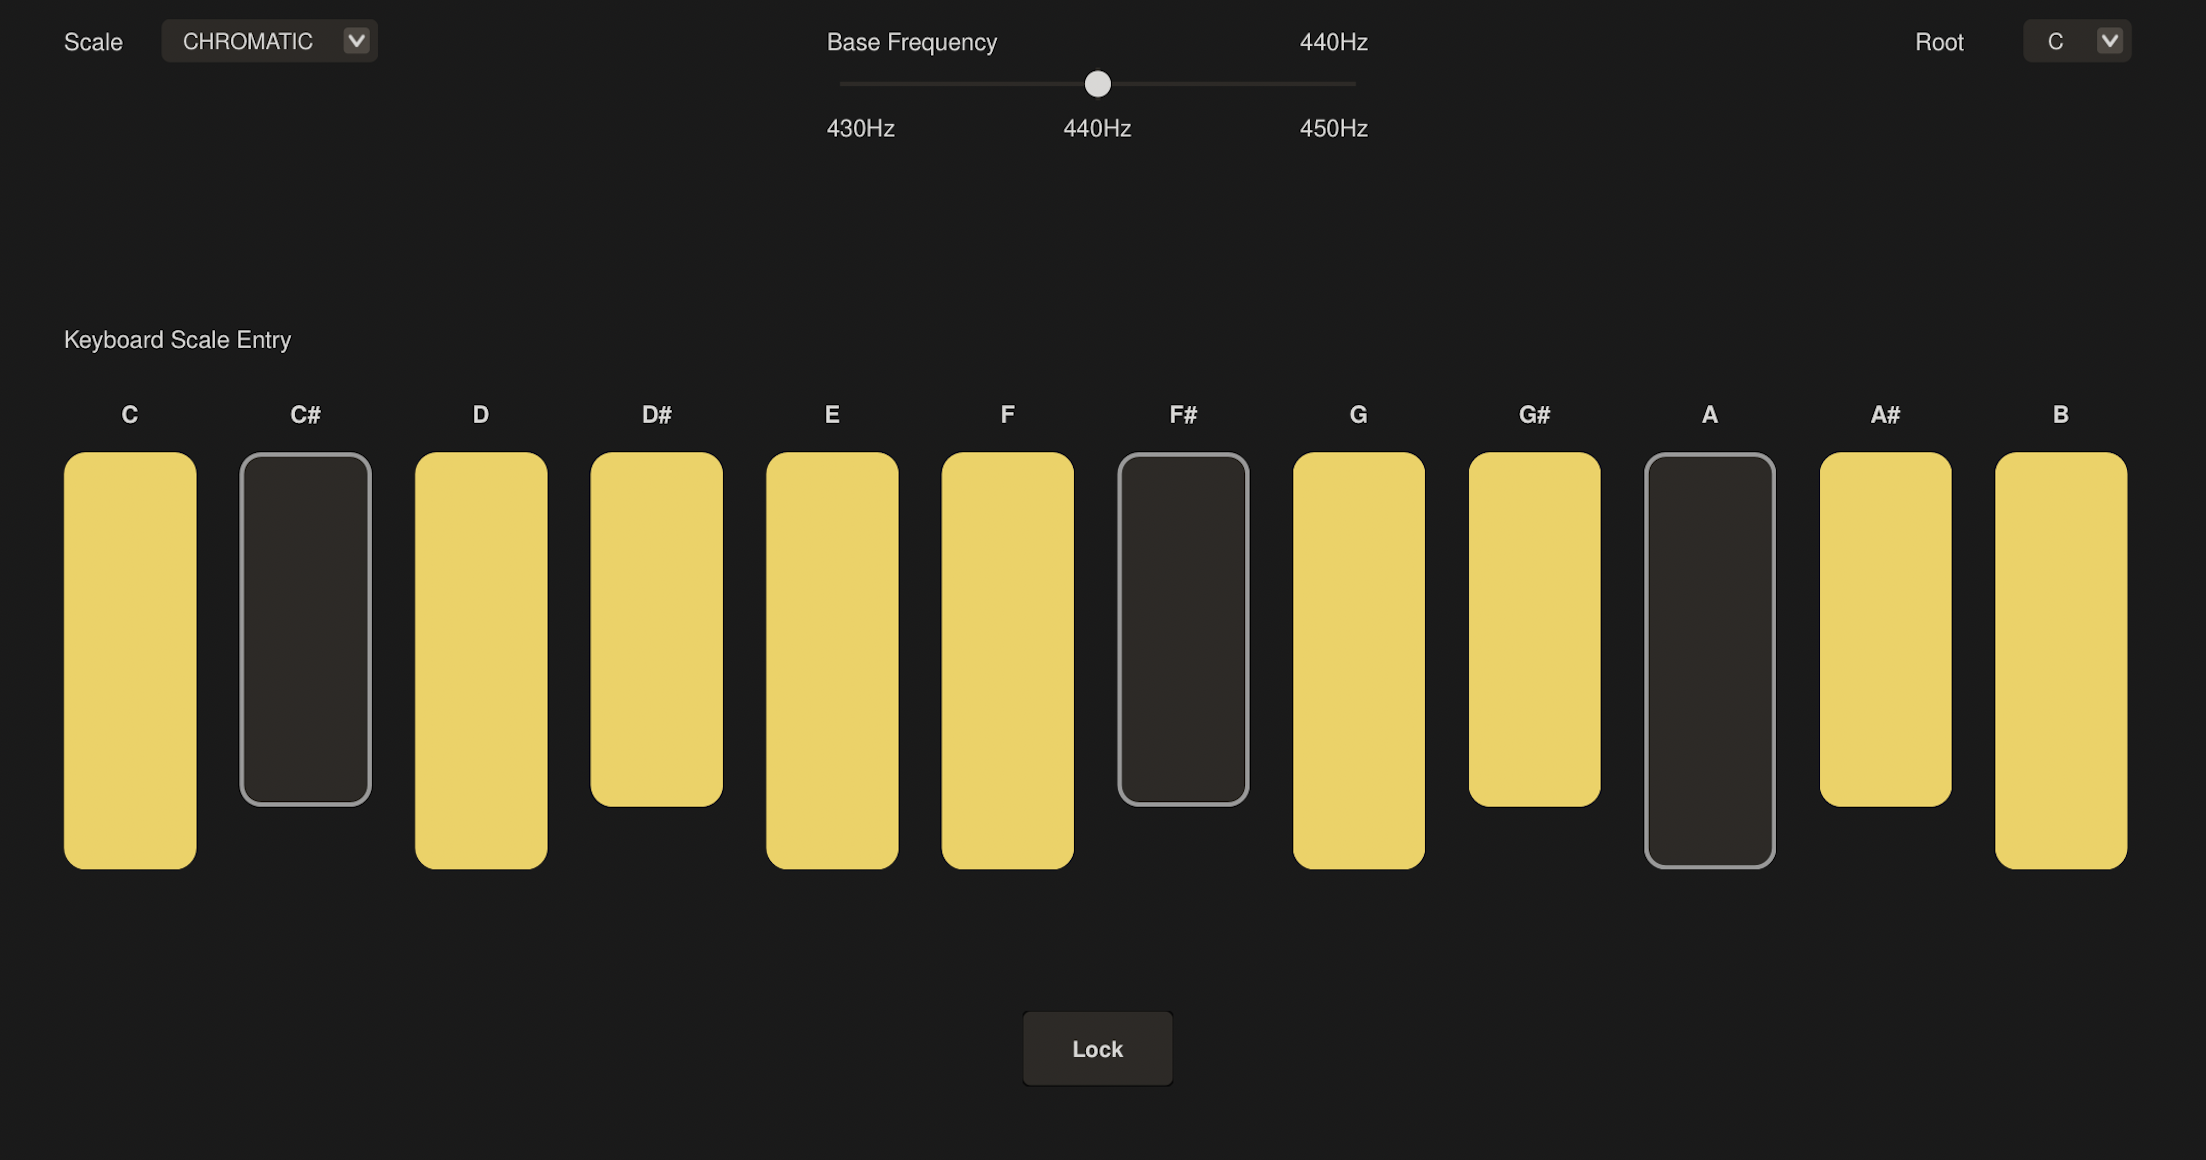
Touch the SCALE button in the keyboard area to access settings related to keyboard SCALE SELECT, ROOT NOTE, BASE FREQUENCY, and more.
Touch the SCALE drop-down to display a list of pre-defined scales. Select the desired scale, and the keyboard display will update to reflect the notes included in the scale.
Notes can be added and removed from any scale by touching the keys in the keyboard display.
The ROOT is the first note used in a scale. Touch the ROOT button to display the list of notes. Selecting a ROOT will change the starting note of the scale that's generated by the SCALE SELECT function.
Sets the base tuning frequency - with 440 Hz representing concert pitch.
SCALE LOCK maintains the currently specified keyboard scale when changing presets.
Mariana comes equipped with over 200 presets spanning all genres and styles with many more available in the STORE.

The LEFT and RIGHT buttons will move forward and backward through all currently filtered presets. Click the STAR to identify a preset as a favorite.
UNDO will undo your most recent change, while REDO will reapply any change you undid.
Clicking the drop down icon will bring up the preset menu:
INIT PRESET – Loads an initialized preset.
SAVE PRESET – Saves your current sound - overwriting the loaded preset or prompting you for a name if using an initialized preset. You can only overwrite user presets
SAVE PRESET AS – Prompts you for a name for your new preset and saves it.
DELETE CURRENT PRESET – Deletes the current preset. You many only delete user presets.
COPY SYNTH 1 -> 2 – Copies all of the panel settings from SYNTH 1, CNTRL 1 over to SYNTH 2, CNTRL 2.
COPY SYNTH 2 -> 1 – Copies all of the panel settings from SYNTH 2, CNTRL 2 over to SYNTH 1, CNTRL 1.
SWAP SYNTH 1 & 2 – Swaps all of the panel settings from SYNTH 1, CNTRL 1 with SYNTH 2, CNTRL 2 and vice versa.
IMPORT STATE... - Imports all settings of Mariana from a .marianaPreset file on your desktop.
EXPORT STATE... - Exports all current parameters of a Mariana patch to a file on your desktop for sharing with friends.
OPEN PRESETS FOLDER – Opens the folder on your computer where your presets are stored. A Mariana preset is saved as a file with extension .marianaPreset OPEN MANUAL – Opens this manual
CONTACT US FOR HELP – Get in touch with us if you need any help with your Mariana!
Click the preset name found at the top center of Mariana to bring up the preset library.
Click the Filter drop down to filter presets by TAGS or GROUPS. Multiple TAGS and GROUPS can be selected simultaneously. Use the search bar next to the Filter drop down to search presets by name.

You can sort the listed presets by Preset Name (ascending or descending), any TAGs you’ve created, or by Author.
As you scroll through presets you can click the PLAY button in the lower left-hand corner to automatically audition presets as you scroll through.
Presets can be marked as a FAVORITE by clicking the ★ next to the preset name.
Click on a preset to load that preset as well as bringing up its details - allowing you to edit the name, add notes and tags, send it to a friend by clicking send icon or delete it by clicking delete icon.
Click on the + icon to bring up an initialized preset.
To the left of the preset browser you can access the preset store by clicking STORE. Here you can acquire new sounds and other enhancements to Mariana.
This area will change as new content is added, so be sure to check in often and see what’s new!
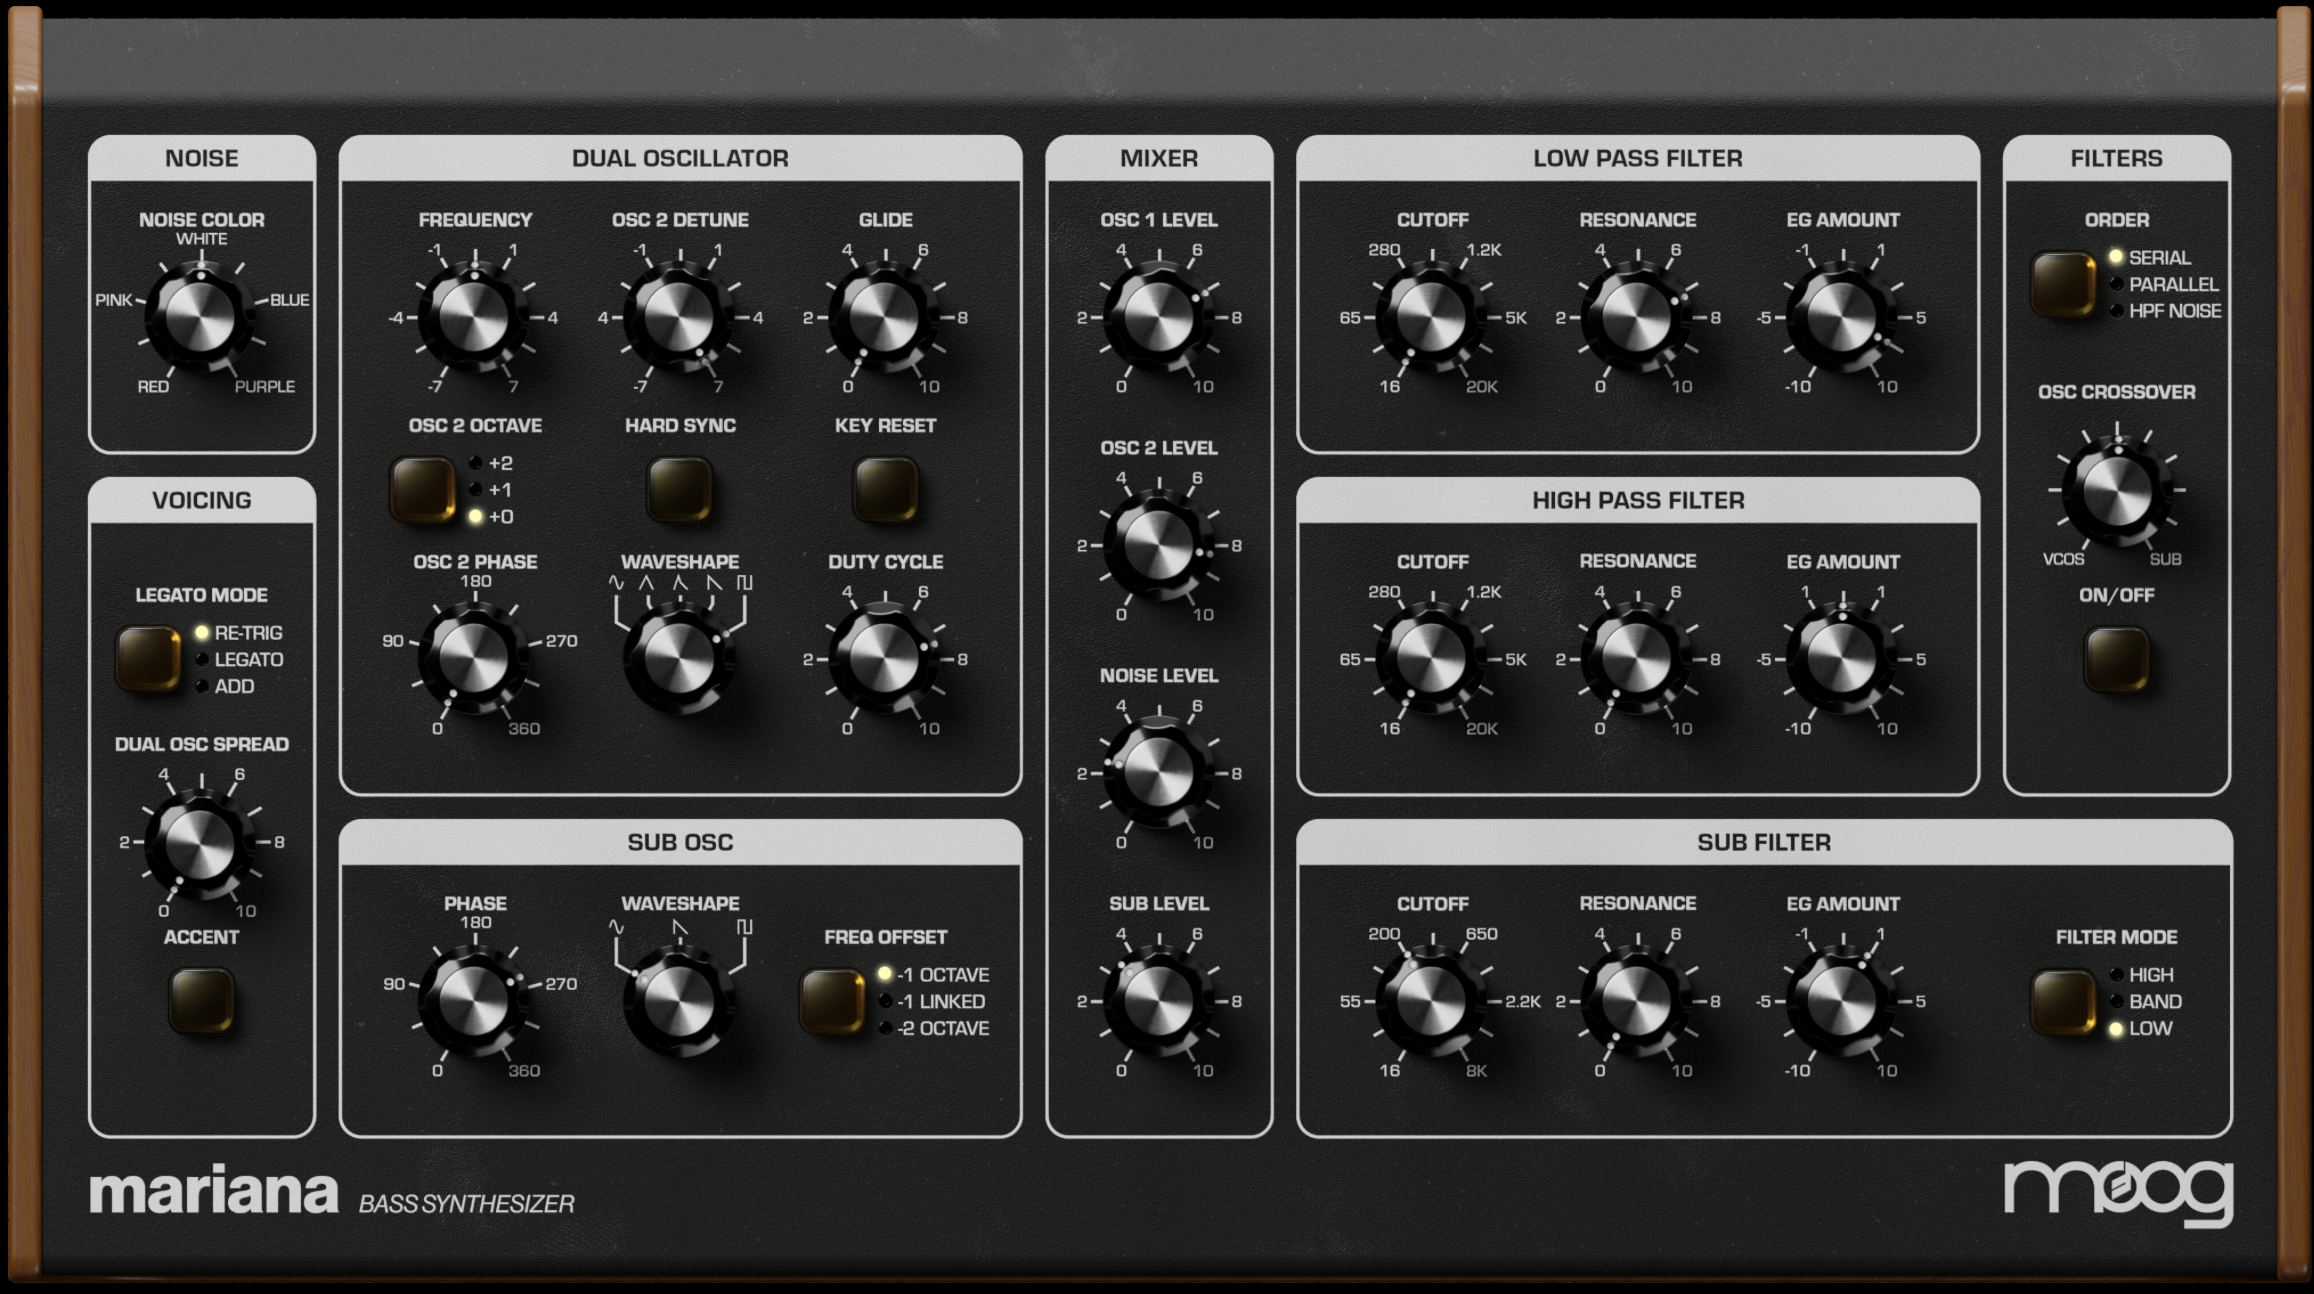
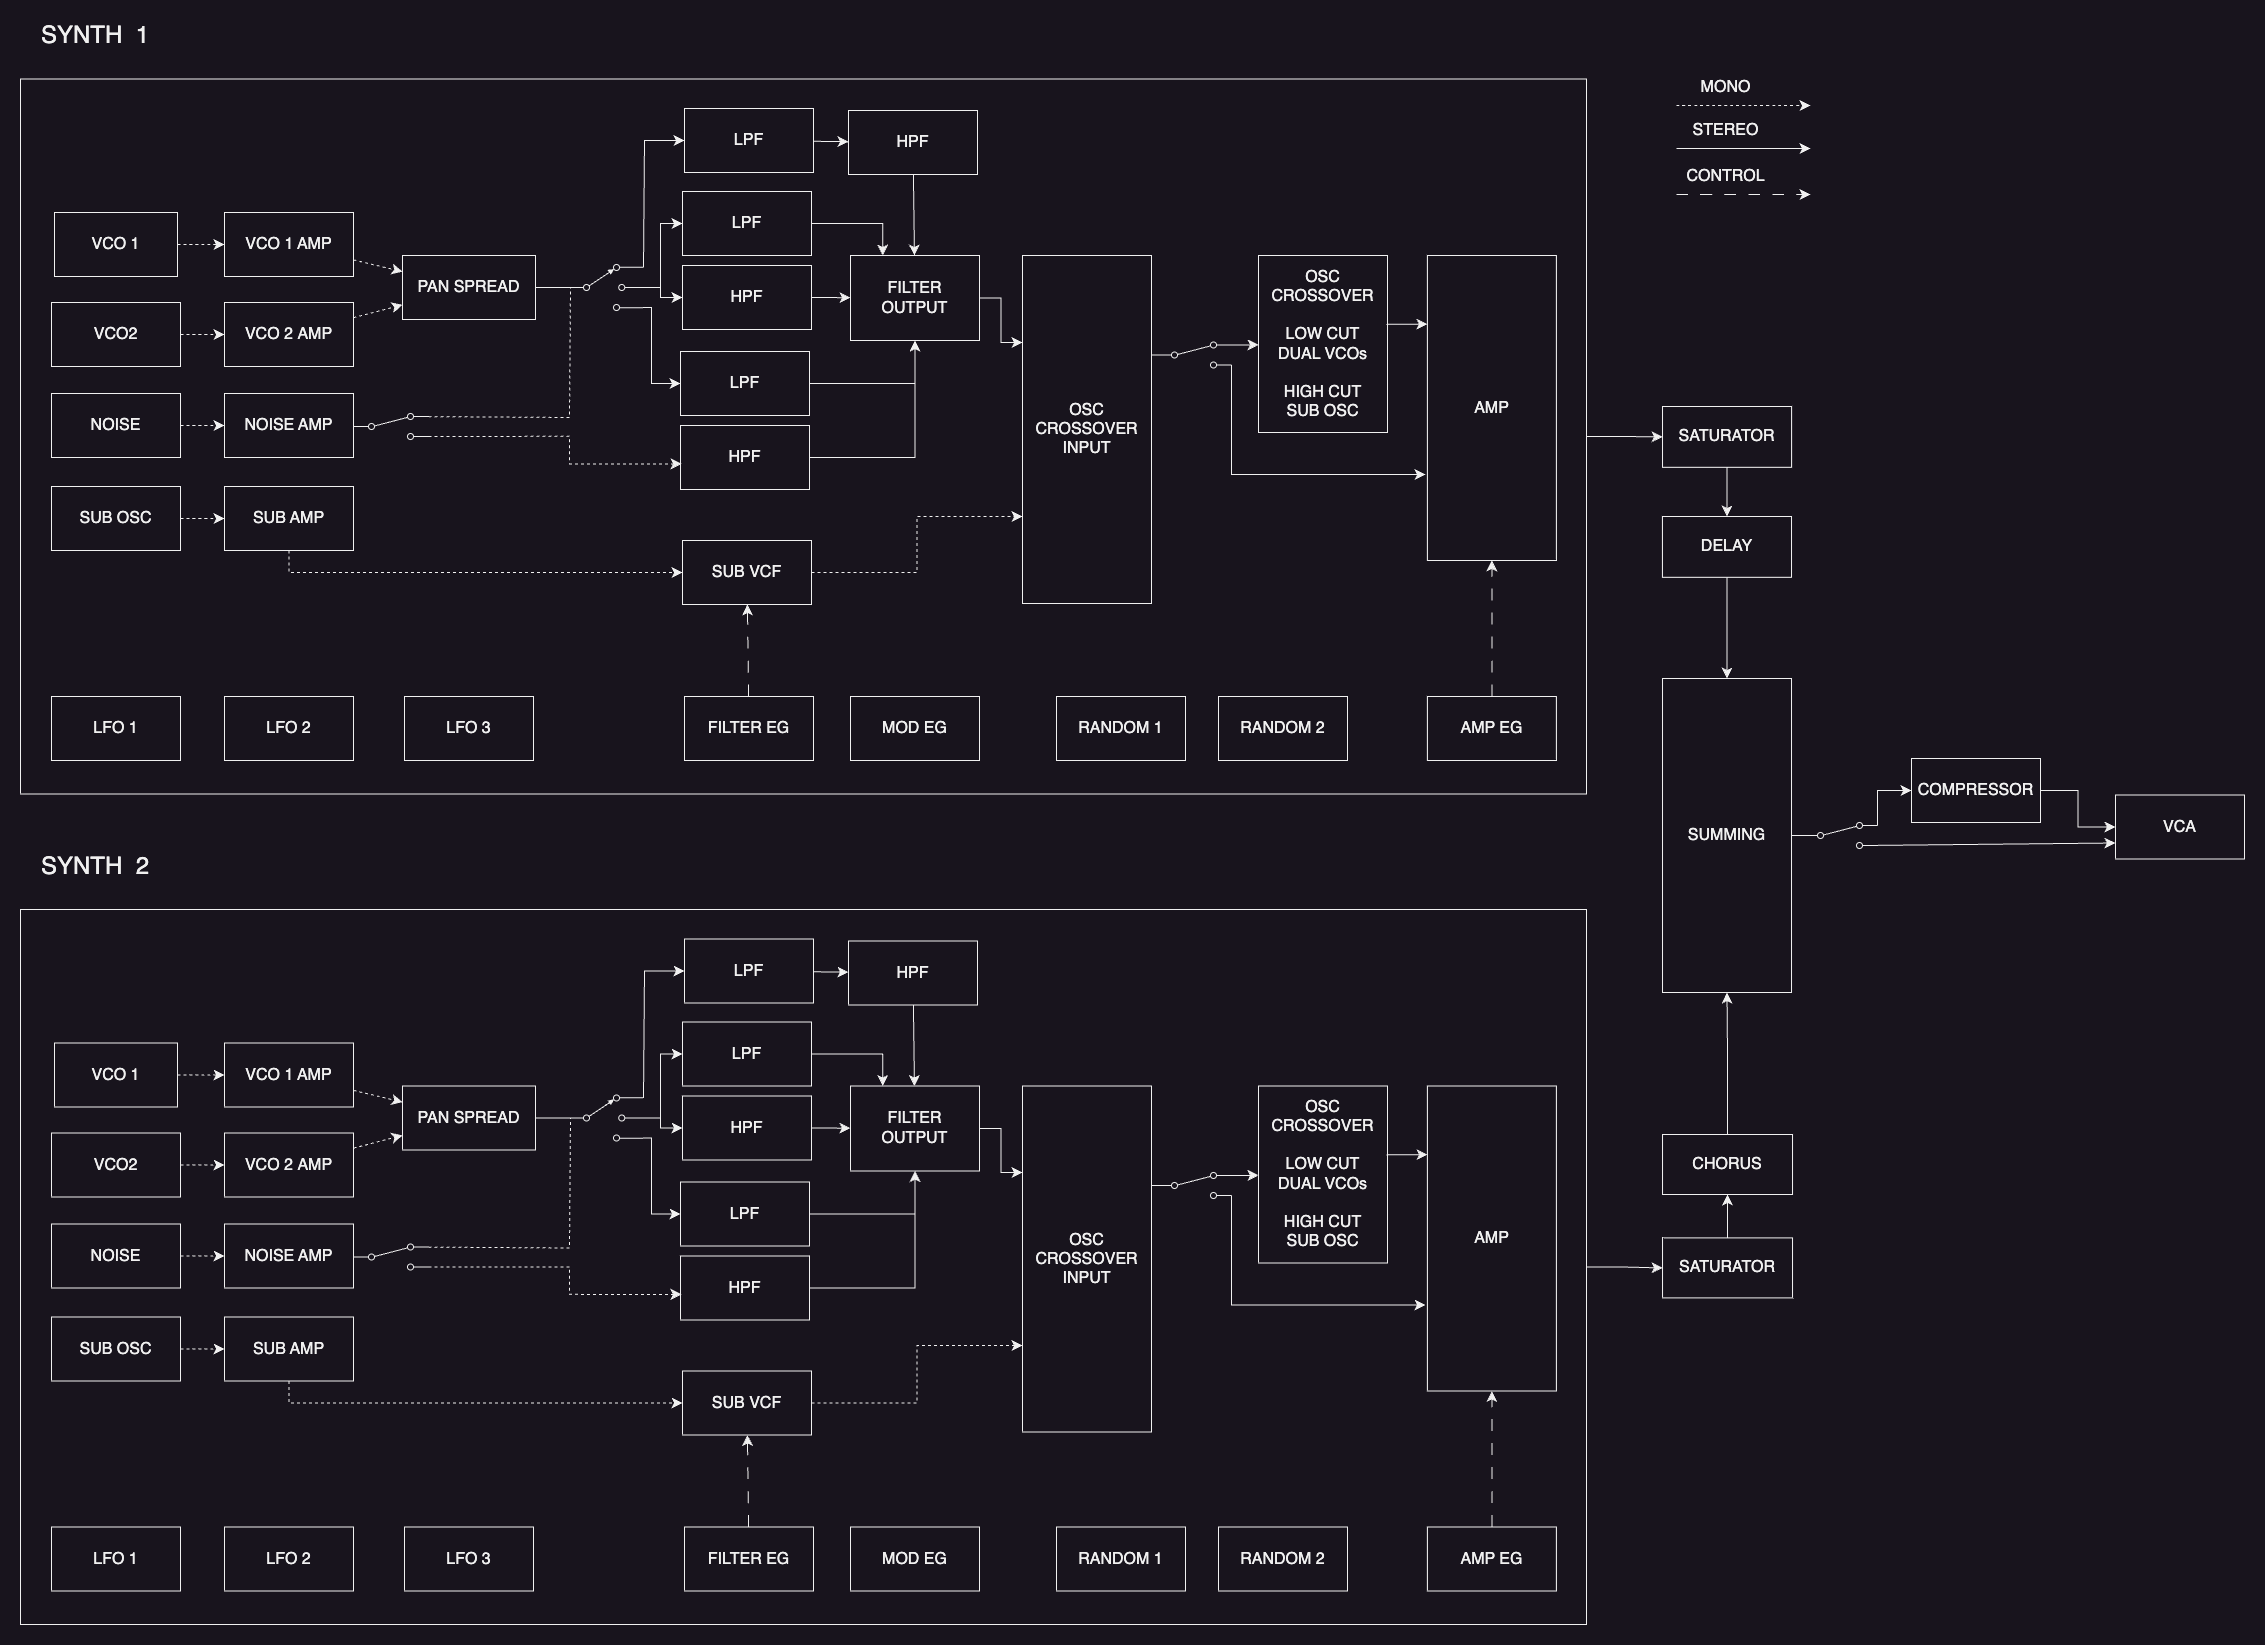
The SYNTH view is where you will find the main modules corresponding to Mariana’s synthesizer engine. Mariana is a dual-layer synthesizer comprising of two completely independent layers called SYNTHs. Each SYNTH has its own panel for sound design – SYNTH 1 and SYNTH 2 – as well as a panel for modulators and controllers – CNTRL 1 and CNTRL 2 - and the two synths can be mixed together in the OUTPUT view.
TIP: You can easily switch between the different Mariana panels by using keyboard keys 1-5, which respectively switch between SYNTH 1, CNTRL 1, SYNTH 2, CNTRL 2 and OUTPUT. The other panels are accessible with keys 6-0, opening respectively CV, SETTINGS, PRESETS, MOD EDITOR and MOD SUMMARY.
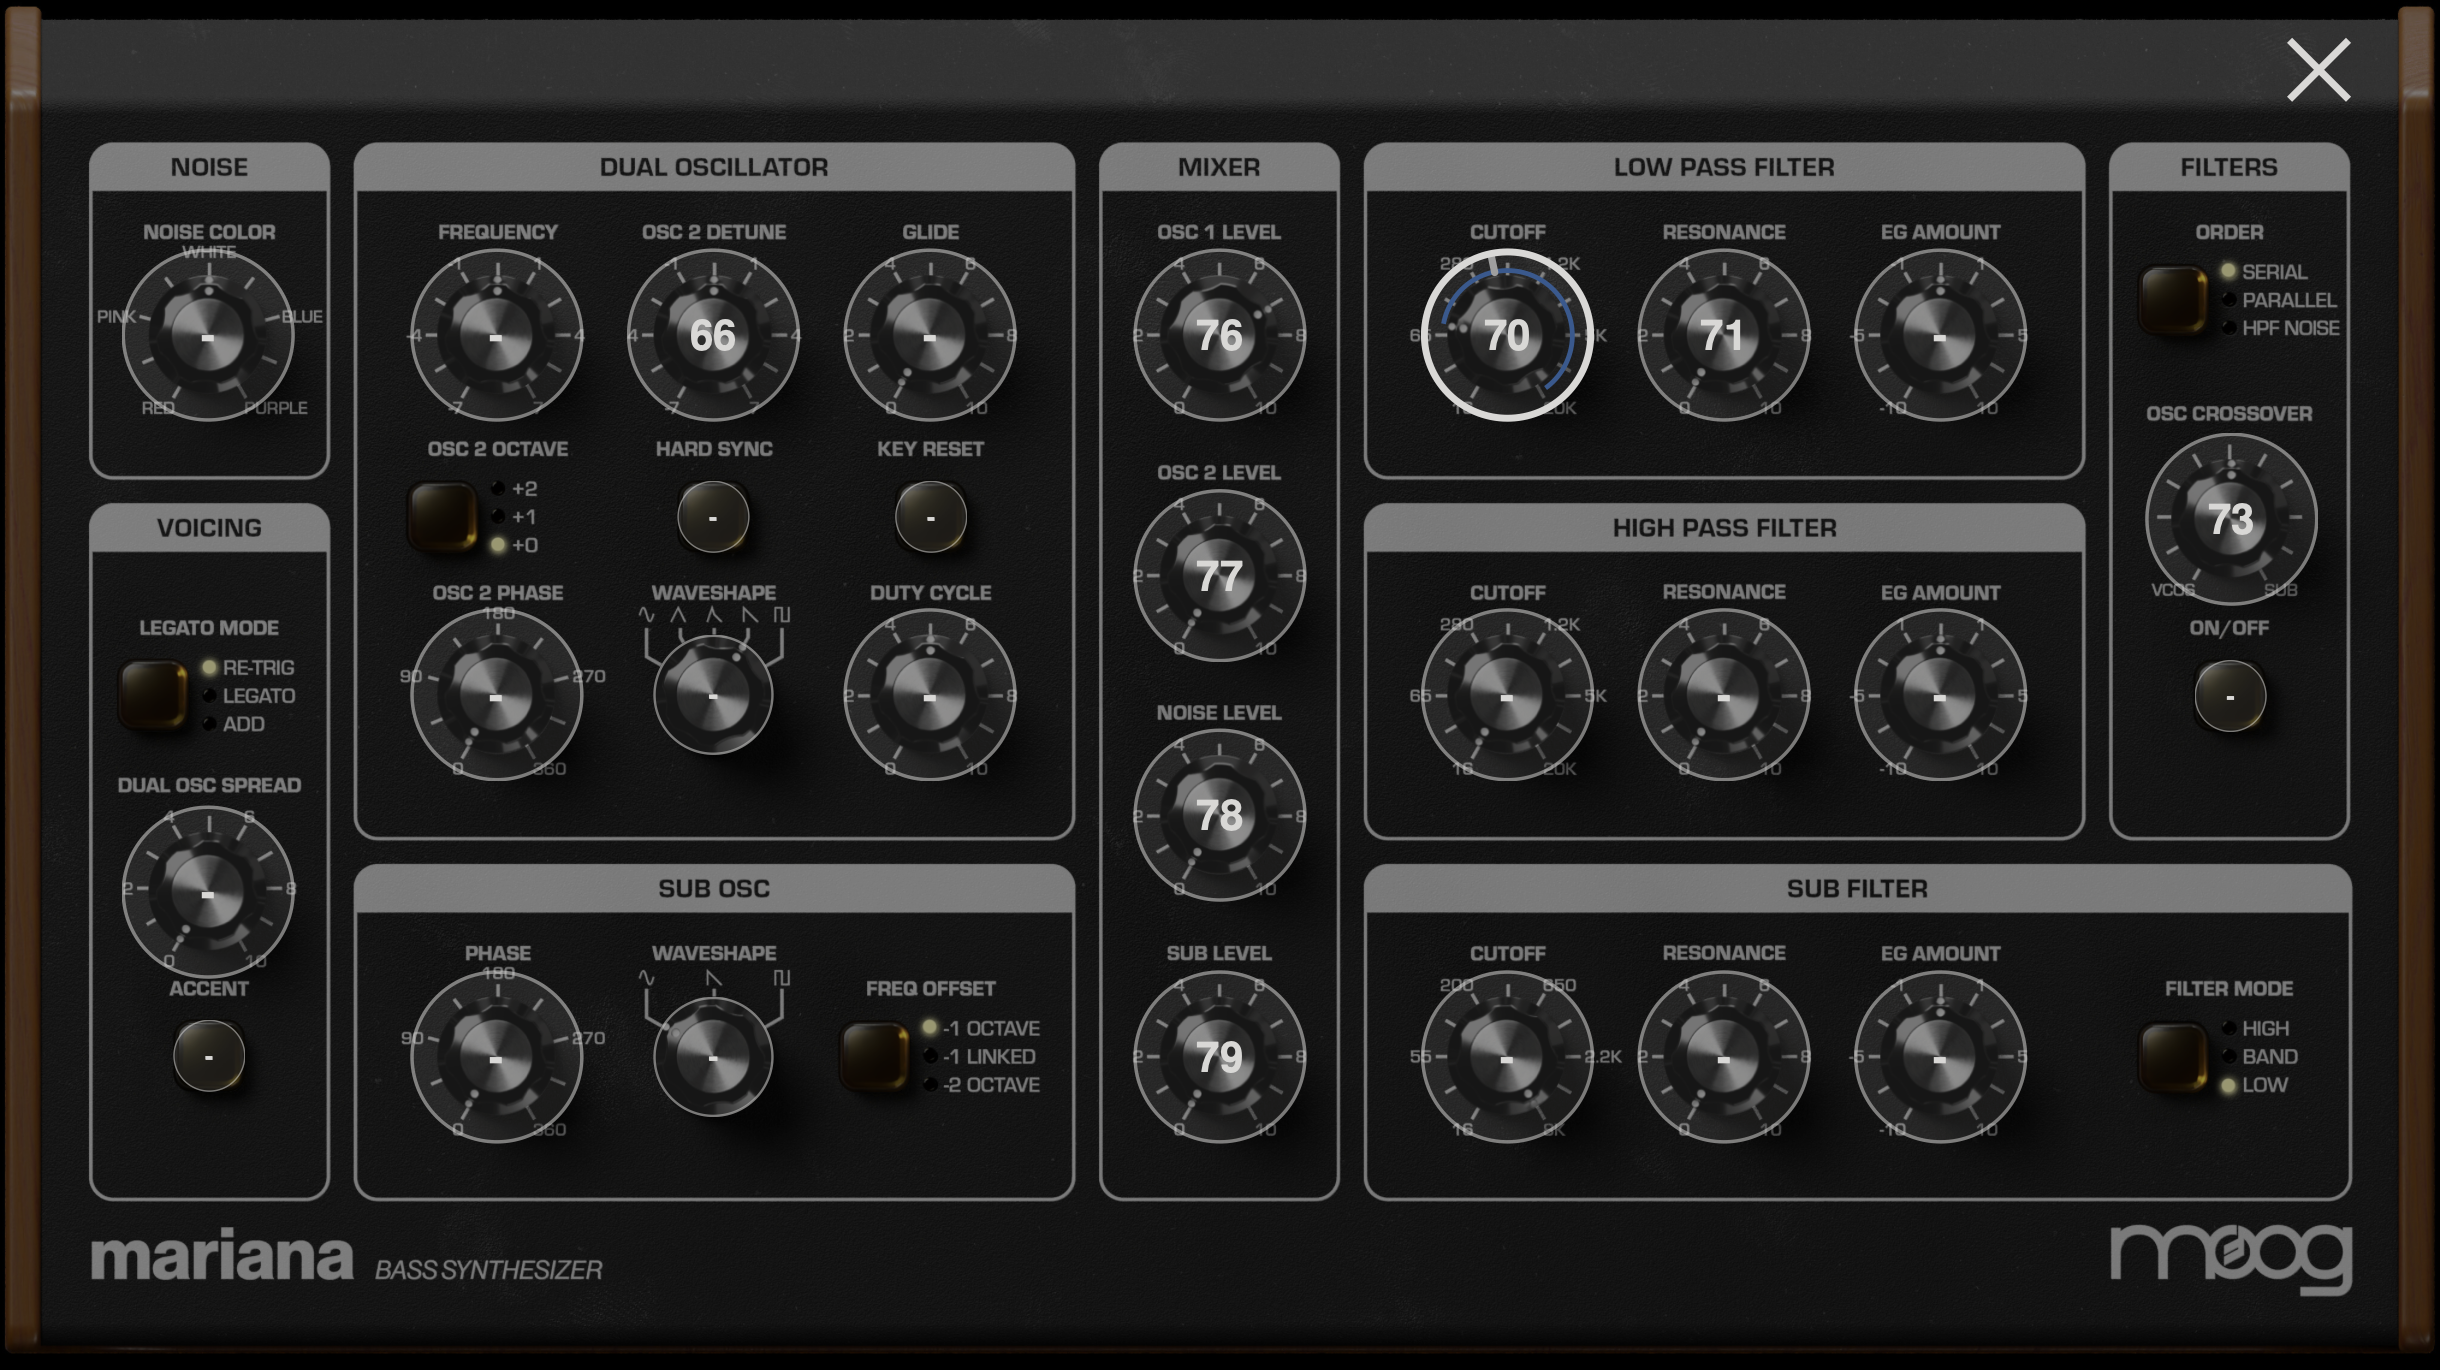
Mariana’s synthesis engine consists of a dual oscillator with controls for waveform, detuning, phase, and more. Mariana also contains a dedicated sub-oscillator for deeper bass tones and a noise generator for adding texture. The mix of OSC 1, OSC 2, and the NOISE generator is sent to two filters: a high-pass and a low-pass filter with a switch to determine their routing. The SUB OSC is sent to its own dedicated multi-mode filter. Finally, a crossover filter provides a spectral crossfade between the dual oscillators and the sub-oscillator.
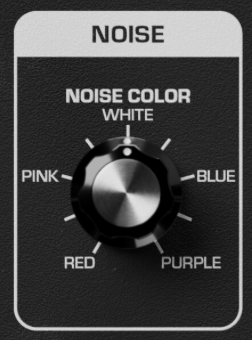
Noise is a very useful tool in the synthesist’s toolbox – allowing you to add grainy texture, crisp high end, or low and deep rumbling to a sound. Noise is great for synthesizing metallic elements of drum tones, simulating breath on a woodwind, or creating far out sound effects.
NOISE COLOR - Tilts the NOISE generator from WHITE (flat frequency response) to more low-frequency weighted noise colors counter-clockwise (RED through PINK) or more high-frequency weighted colors clockwise (BLUE through PURPLE).

Mariana is primarily a monophonic instrument in line with Moog’s hardware bass offerings, though its two layers can achieve duophony (two distinct notes at a time) with its separate SYNTH layers. The VOICING section of Mariana enables you to control how it reacts to situations where more than one note is played at a time and how the envelope generators react when multiple keys are held down simultaneously.
LEGATO MODE – Switches how Mariana responds to legato playing (playing a new note before releasing the key of the old note).
RE-TRIG: Retriggers the envelope generators when a new note is played in legato style
LEGATO: Updates the oscillators to the new note when a new note is played in legato style, but does not retrigger the envelope generators
ADD: Uses the current envelope value as the baseline for retriggering.
DUAL OSC SPREAD – Pans the two oscillators from the DUAL OSCILLATOR section in stereo. Both oscillators are centered when DUAL OSC SPREAD is fully counter-clockwise and are hard panned (OSC 1 hard left, OSC 2 hard right) when fully clockwise.
TIP: Modulate this control with an envelope to increase the stereo spread over the duration of a note!
ACCENT – Will drive the envelope generators harder when enabled and when note velocity exceeds 96 – creating an accented note when playing harder and unaccented notes when playing softer. Can be used as a source or controller in the modulation editor for further accented possibilities (see MODULATION EDITOR).
NOTE: The default accent behavior can be disabled in advanced settings.
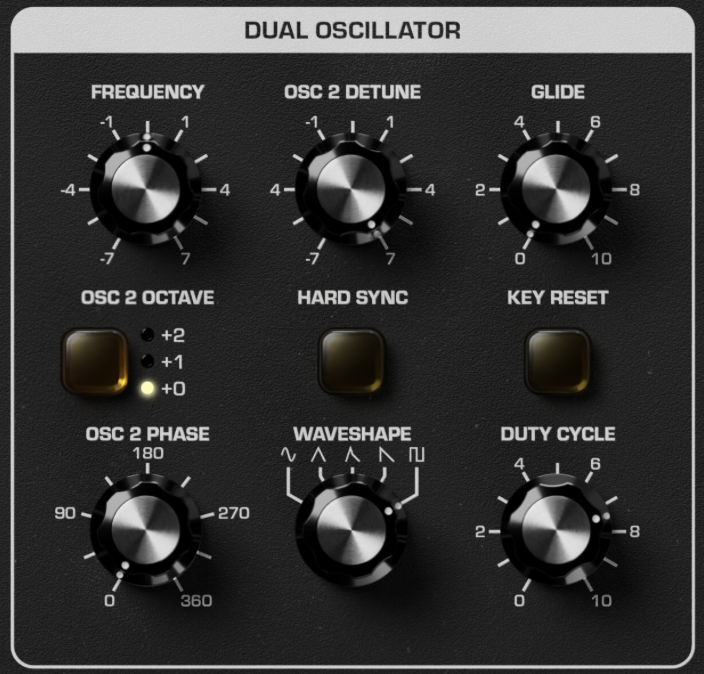
An Oscillator is the primary source of sound in any synthesizer – the basic building block of a tone which the filters and amplifiers shape later on. Mariana contains two oscillators which share timbral controls (WAVEFORM, DUTY CYCLE) but which can be detuned and phase offset from each other for precise control of your sound.
FREQUENCY – Adjusts the frequency of both oscillators. Tuned to the played note at noon – can be detuned up to 7 semitones (a perfect 5th) above or below the played note.
TIP: Route an LFO here via the MODULATION EDITOR with very low modulation amount for vibrato that both oscillators will follow!
OSC 2 DETUNE – Detunes OSC 2 from OSC 1 – from 7 semitones below fully counter-clockwise to 7 semitones above fully clockwise.
TIP: Detune OSC 2 slightly above or below noon for a thicker bass tone!
GLIDE - Produces a smooth, continuous change in pitch between notes as you transition from one note to the next with longer glide times as you increase GLIDE.
NOTE: Glide can be restricted to only operate on legato playing via advanced settings.
OSC 2 OCTAVE – Sets octave of OSC 2 relative to OSC 1. OSC 2 can be set to either +2 octaves above OSC 1, +1 octave above, or the same (+0).
HARD SYNC – Will synchronize OSC 2 to OSC 1 – resetting the waveform of OSC 2 every time OSC 1 completes a single cycle. Can be used to eliminate beat frequencies between the two oscillators when they are in tune with each other or can be used to create complex timbres when the oscillators are detuned from one another.
KEY RESET – Will reset both oscillators when a new note is played. Especially when using low frequencies, KEY RESET will help ensure a consistent sound with every note played by forcing the oscillators to start at the same phase every time.
OSC 2 PHASE – Will phase shift OSC 2 from OSC 1 from 0 degrees (in phase) all the way through 180 degrees (fully out of phase) to 360 degrees (back in phase). Allows for deeper control over beat frequencies and timbral effects between the two oscillators.
TIP: Modulating phase at audio rate can create unique phase modulation timbres!
WAVESHAPE - Selects the waveshape of both oscillators, which can be sine, triangle, sharktooth (a mix of triangle and sawtooth), sawtooth, or square.
DUTY CYCLE – Adjusts the duty cycle of all waveforms, preserving their character and frequency but allowing for timbral changes just as the DUTY CYCLE control adjusts the pulse width of pulse waves. This unique control allows for interesting timbres that are impossible to achieve with traditional sine, triangle, sharktooth, and sawtooth waveshapes.
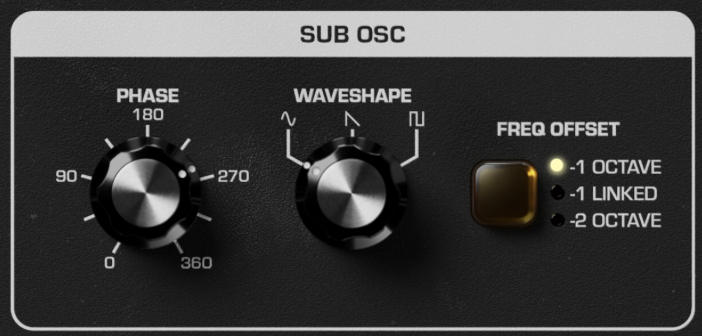
A Sub-Oscillator is an additional Oscillator that sits an octave below the primary oscillators, thickening up a sound and adding hefty low end. Mariana’s SUB OSC goes even further – able to be set 2 octaves below and with independent waveforms and phase controls for earth-shaking rumble.
PHASE – Controls the phase of the sub-oscillator relative to OSC 1, from 0 degrees (in phase) all the way through 180 degrees (fully out of phase) to 360 degrees (back in phase).
TIP: Carefully play with the PHASE control for subtle reinforcement or cancellation of harmonics.
WAVESHAPE – Selects the waveshape of the sub-oscillator, which can be either sine, sawtooth, or square.
FREQ OFFSET – Controls the octave of the sub-oscillator – either one (-1 OCTAVE) or two (-2 OCTAVE) octaves below the played note. The sub-oscillator's pitch will be set by whatever note is sent via MIDI, but if set to (-1 LINKED) it will be linked to the dual oscillators and detuned if the dual oscillators are detuned via their FREQUENCY control.
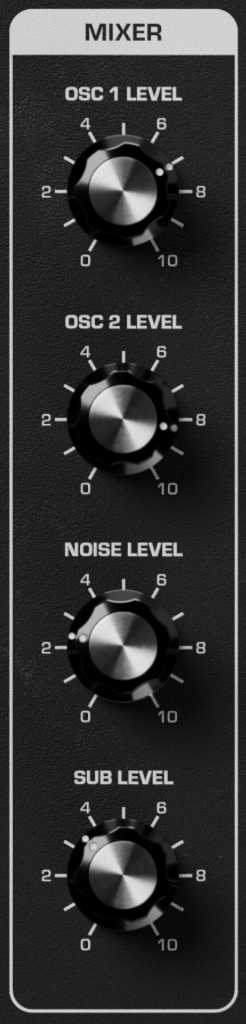
The MIXER brings together all three oscillators as well as the noise generator and allows us to set their volumes relative to each other. Like the classic Moog CP-3 mixer, Mariana’s MIXER will add saturation when a channel is turned all the way up. The first three channels (OSC 1, OSC 2, NOISE) are summed and sent to the LOW PASS/HIGH PASS FILTER while the SUB OSC is sent to its own dedicated SUB FILTER.
As the first stage of gain staging throughout Mariana, the MIXER is far more than simply volume knobs. Driving the MIXER hard and turning down the OUTPUT level, for example, will lead to a much different sound than the reverse by driving the filters harder.
OSC 1 LEVEL – Sets the volume level of OSC 1 – begins to overdrive slightly above 7.
OSC 2 LEVEL – Sets the volume level of OSC 2 – begins to overdrive slightly above 7.
NOISE LEVEL – Sets the volume level of the NOISE generator – begins to overdrive slightly above 7.
SUB LEVEL – Sets the volume level of the SUB OSC – begins to overdrive slightly above 7.
TIP: Modulate any of these with an LFO for tremolo effects!

The LOW PASS FILTER is used to remove high frequencies from your sound and is a critical component for creating bass tones. Waveforms such as PULSE and SAW are full of bright high end, but by filtering them with the LOW PASS FILTER and adding some envelope modulation via EG AMOUNT you can build classic electronic bass tones.
CUTOFF – Controls the cutoff frequency of the low-pass filter, passing all frequency content below the filter cutoff and filtering out all frequencies above the cutoff.
RESONANCE – Controls the amount of filter output fed back into the input – creating a resonant peak at the low-pass filter CUTOFF frequency.
EG AMOUNT – Controls the amount of modulation from the FILTER ENVELOPE to the low-pass filter CUTOFF. FILTER ENVELOPE moves the filter CUTOFF higher when EG AMOUNT is set above noon and moves the filter CUTOFF lower when EG AMOUNT is set below noon.
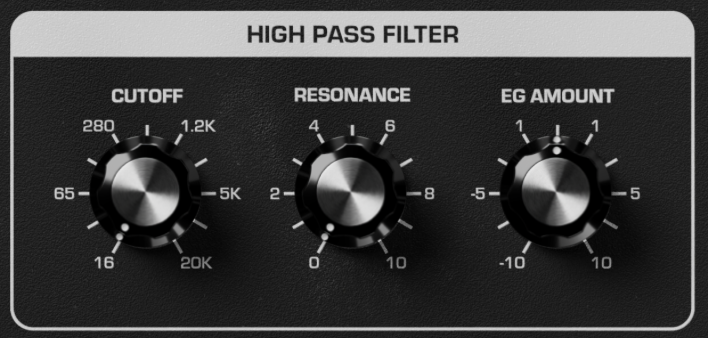
The HIGH PASS FILTER is used to remove low frequencies from your sound. For bass tones where you typically want a lot of low end, the HIGH PASS FILTER can be used to make evolving bass sounds, carve out space for the SUB OSC, or used with RESONANCE cranked to even emphasize the low and mid range frequencies.
CUTOFF – Controls the cutoff frequency of the high-pass filter, passing all frequency content above the filter cutoff and filtering out all frequencies below the cutoff.
RESONANCE – Controls the amount of filter output fed back into the input – creating a resonant peak at the high-pass filter CUTOFF frequency.
EG AMOUNT – Controls the amount of modulation from the FILTER ENVELOPE to the high-pass filter CUTOFF. FILTER ENVELOPE moves the filter CUTOFF higher when EG AMOUNT is set above noon and moves the filter CUTOFF lower when EG AMOUNT is set below noon.
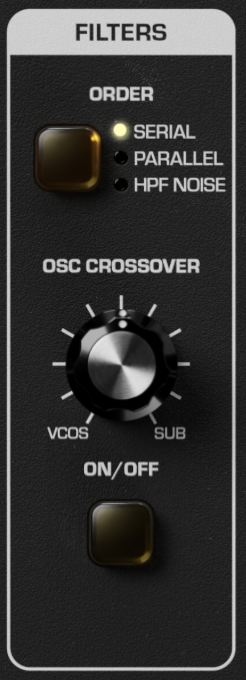
The FILTERS section governs how signal is routed to all three filters and how they are brought together. Routing the LOW PASS FILTER and HIGH PASS FILTER in different configurations can have a huge impact on how the frequency spectrum of your sound is carved up. Further, the CROSSOVER filter brings together the filtered VCOs with the filtered SUB and can be used for even deeper tonal control and animation.
ORDER – Sets the order of the low-pass and high-pass filters. After the MIXER, the mix of OSC 1, OSC 2, and NOISE can take one of three paths:
SERIAL: The OSC 1, OSC 2, NOISE mix is sent first through the LOW PASS FILTER, and then through the HIGH PASS FILTER.
NOTE: You can completely disable the LOW PASS FILTER by opening it up fully (CUTOFF to 20k) or the HIGH PASS FILTER by opening it up fully (CUTOFF to 16).
PARALLEL: The OSC 1, OSC 2, NOISE mix is sent through both the LOW PASS FILTER and HIGH PASS FILTER independently, and the result is then mixed together.
HPF NOISE: The OSC 1, OSC 2 mix is sent only to the LOW PASS FILTER and the NOISE is sent only to the HIGH PASS FILTER.
TIP: This can be a useful sound design tool – creating percussive hi-hats or cymbal sounds with NOISE and the HIGH PASS FILTER while still using the DUAL OSCILLATOR with the independent LOW PASS FILTER.
OSC CROSSOVER – Controls the crossover filter, which can spectrally crossfade between the dual oscillators and the sub-oscillator. Turned counter-clockwise the OSC CROSSOVER applies a low-pass filter to the SUB OSC while turning OSC CROSSOVER clockwise simultaneously applies a high-pass filter to the OSC/NOISE mix. OSC CROSSOVER can be useful for isolating the SUB OSC for low-end content and filtering out any of its high frequencies while at the same time removing low-end content from the OSC/NOISE mix.
TIP: Stereo information at the lowest frequencies can sometimes result in muddy bass lines and will also lead to playback issues if cut on vinyl. With OSC CROSSOVER you can use the DUAL OSCILLATOR and the DUAL OSC SPREAD control to have stereo content while preserving a mono bass sound from the SUB OSC in frequencies below the CROSSOVER.
ON/OFF – Turns the CROSSOVER filter on or off.
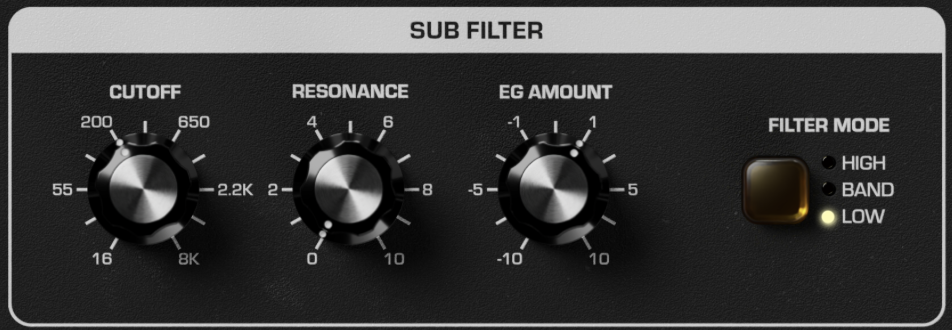
Mariana contains a separate filter for the SUB OSC, giving you completely independent tonal control over the SUB OSC harmonic spectrum. Use it to heavily filter the SUB OSC for focused low-end duties, or use EG AMOUNT in the opposite direction from the LOW PASS FILTER to let the SUB OSC play dynamically off the Dual Oscillator.
CUTOFF – Controls the cutoff frequency of the SUB FILTER.
RESONANCE – Controls the amount of filter output fed back into the input – creating a resonant peak at the SUB FILTER CUTOFF frequency.
EG AMOUNT – Controls the amount of modulation from the FILTER ENVELOPE to the SUB FILTER CUTOFF. FILTER ENVELOPE moves the filter CUTOFF higher when EG AMOUNT is set above noon and moves the filter CUTOFF lower when EG AMOUNT is set below noon.
FILTER MODE – Sets the filter type for the SUB FILTER – either a LOW pass filter, HIGH pass filter, or BAND pass filter.
NOTE: A bandpass filter filters frequencies both above and below the CUTOFF setting for surgical tonal control. Try cranking the resonance and modulating the SUB FILTER CUTOFF for interesting timbral movement!
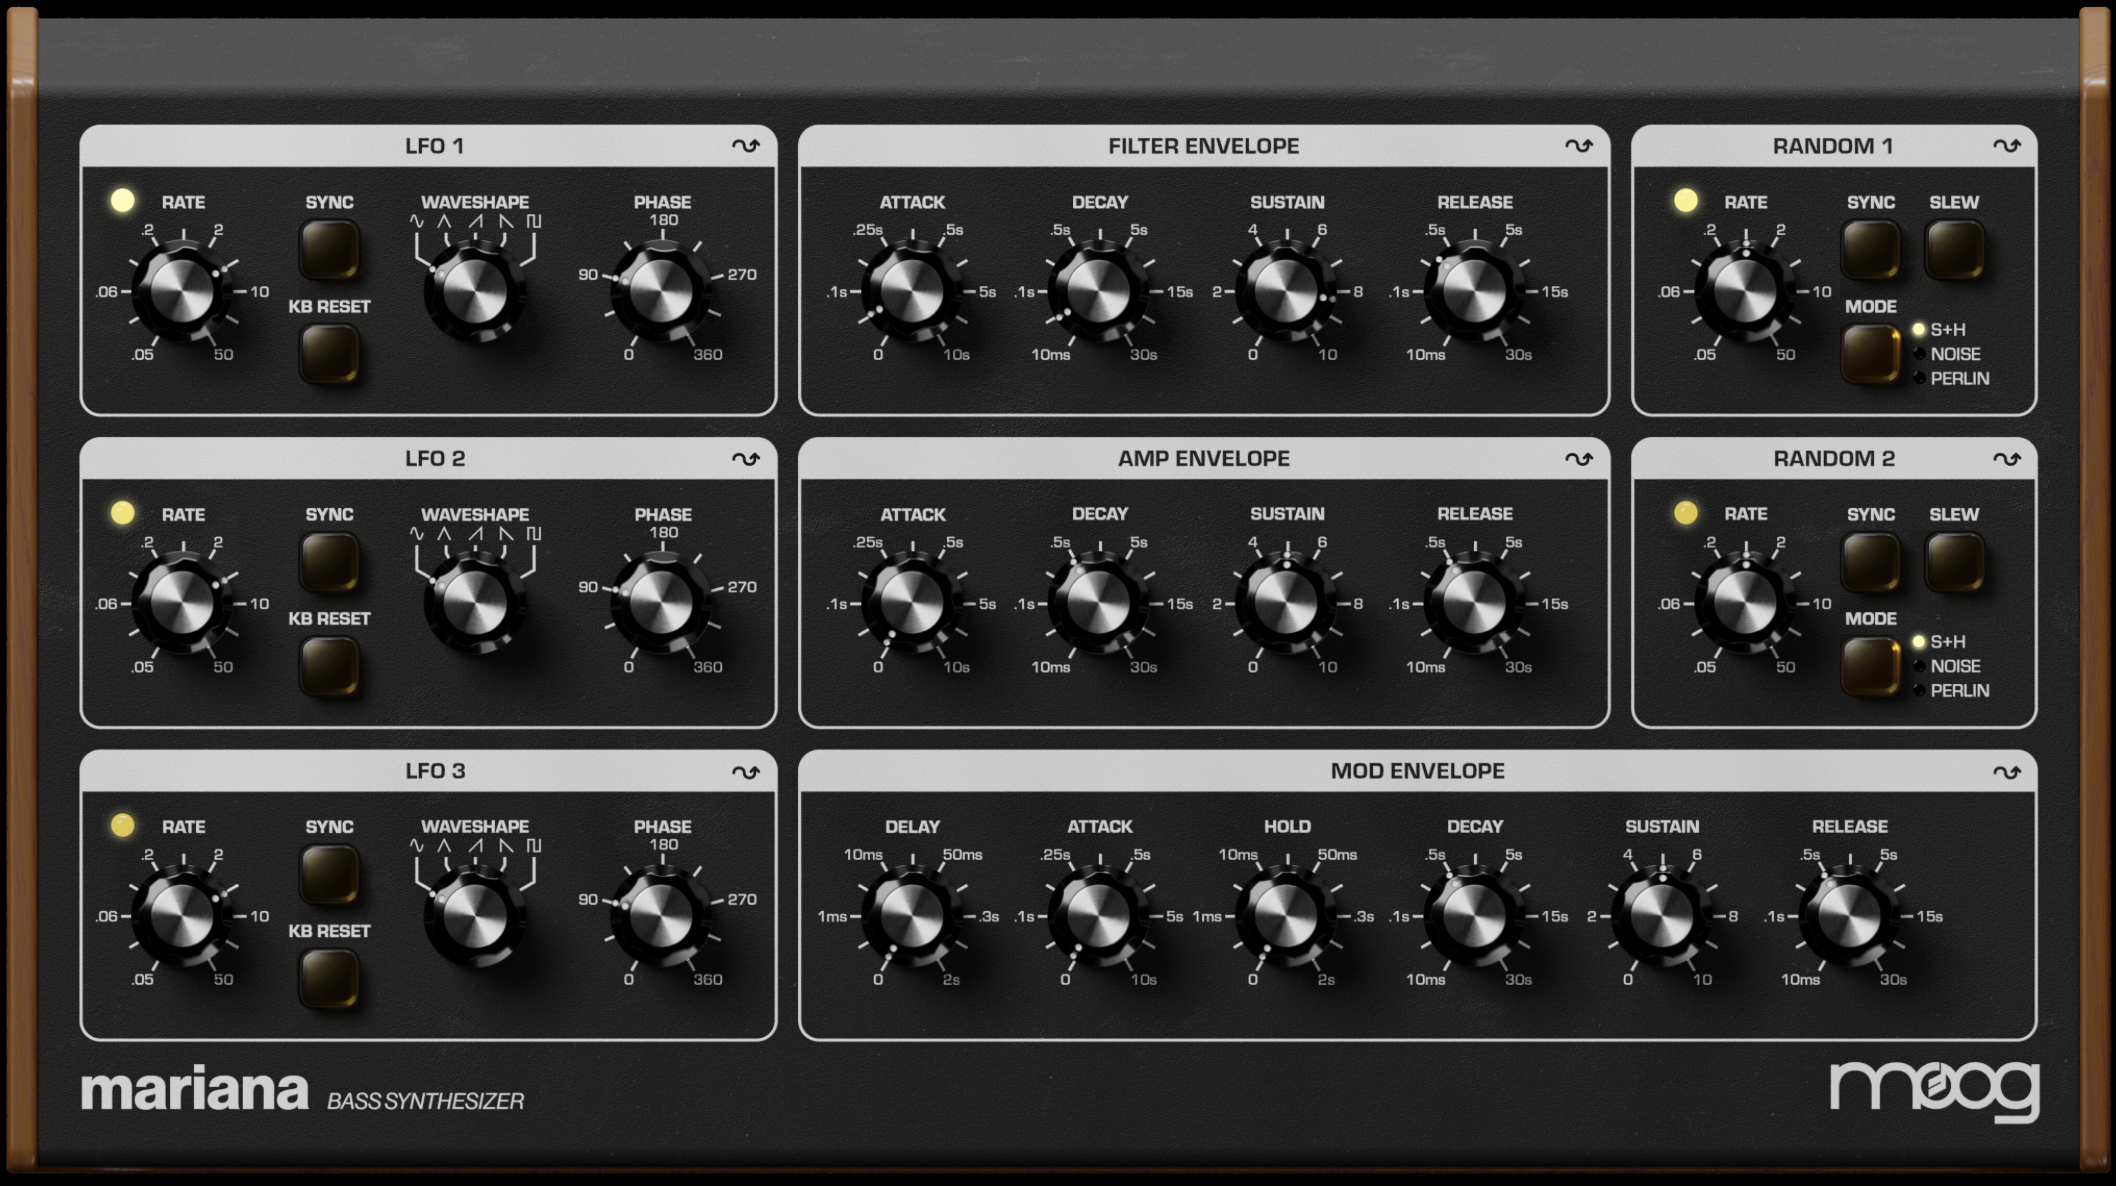
The CNTRL view is where you will find all of the modules that create modulation in Mariana. Each SYNTH layer of Mariana contains its own completely independent CNTRL section. The CNTRL section contains three identical LFOs (Low Frequency Oscillators) for adding periodic modulation, two dedicated ENVELOPES for controlling the FILTERs and AMPLIFIER, a six-stage MOD ENVELOPE which can be routed anywhere you chose, and two independent RANDOM generators.
TIP: While the layers are set up to be independent panels, Mariana's modulation editor allows CNTRL 1 parameters to modulate SYNTH 2 and vice-versa. This can be used to craft very intricate and detailed modulation arrangements between your layers.
In the top-right hand corner of every module in the CNTRL view you can click the MOD SUMMARY icon to bring up the Mod Summary page showing every modulation routing that is used across the synth. See MODULATION EDITOR section for more information about assigning modulation.
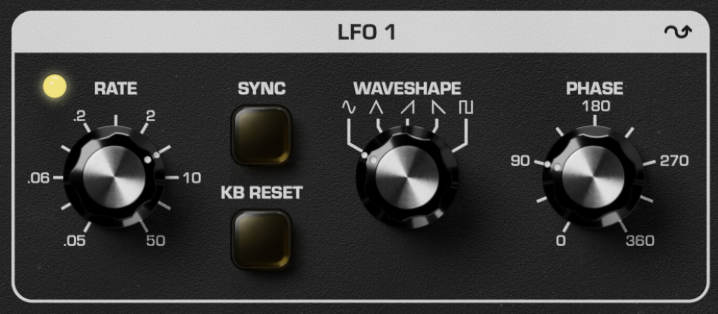
A Low Frequency Oscillator (LFO) is an oscillator that operates at frequencies too low to be heard directly by the human auditory system. They are used to add modulation to any parameter of a sound and create movement, bringing a static sound to life. Modulating FREQUENCY with an LFO will generate vibrato while modulating LEVEL will create tremolo – modulate anything from filter RESONANCE to DELAY TIME and see what happens!
Mariana contains three LFOs per SYNTH – each is completely independent and identical.
RATE – Controls the rate of the LFO, from 0.05 Hz up to 50 Hz.
TIP: While the LFO panel controls allow for frequencies of up to 50Hz, using the modulation editor Constant source it's possible to further push the LFOs up into the audio rate
SYNC – When enabled, SYNC will synchronize the LFO to be multiples or divisions of your project’s current tempo, an external MIDI clock, or Mariana’s own internal tempo. Multiples/divisions will display around the RATE knob.
KB RESET – Resets the LFO with each new note, which can be used to create consistency across all notes played. (KB refers to Keyboard)
WAVESHAPE – Selects the waveshape for the LFO, which may be sine, triangle, ramp, sawtooth, or square.
PHASE – Controls the phase of the LFO. When KB RESET is engaged, PHASE can be used to dial in the precise point in the wave cycle that the LFO begins at when every new note is played.
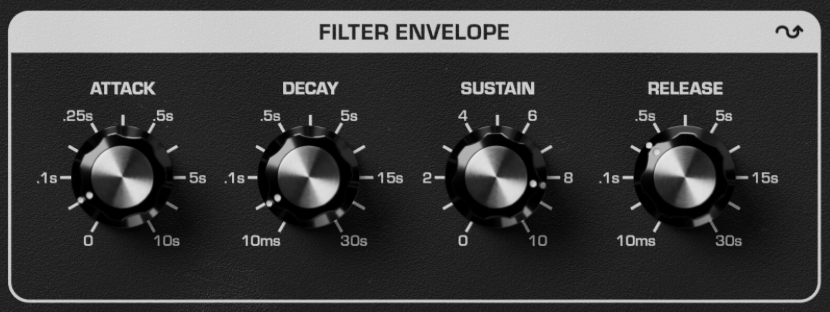
An envelope is a signal that rises and falls over time – typically in response to a note played on a keyboard – and used to shape the dynamics of a sound. An ADSR envelope will rise to a maximum level at a time set by ATTACK, fall to the SUSTAIN level at a time set by DECAY, hold at the SUSTAIN level for as long as a key is held, and then fall back down to zero at a time set by RELEASE. The FILTER ENVELOPE is a dedicated ADSR envelope that is routed to all three filters (LOW PASS FILTER, HIGH PASS FILTER, SUB FILTER) via their respective EG AMOUNT knobs. This envelope controls the movement of the filters over time and responds to any new note played (configurable via LEGATO MODE).
ATTACK – Sets the time it takes for the envelope to ascend to its maximum level.
DECAY – Sets the time it takes for the envelope to decay from its maximum level to the SUSTAIN level.
SUSTAIN – Sets the level the envelope decays to, holding the SUSTAIN level for as long as a note is held.
RELEASE – Sets the time it takes for the envelope to release from the SUSTAIN level to zero once a note is released.
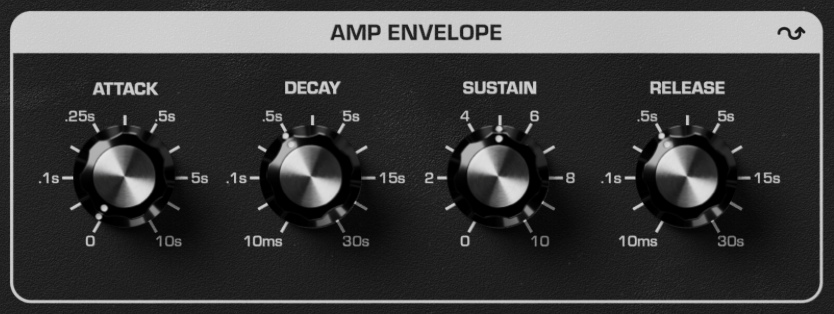
The AMP ENVELOPE is a dedicated ADSR envelope identical to the FILTER ENVELOPE but which is routed to control the volume of the current SYNTH. This envelope controls the movement of the amplifier (final output of the SYNTH after the OSC CROSSOVER) over time and responds to any new note played (configurable via LEGATO MODE).
ATTACK – Sets the time it takes for the volume to ascend to its maximum level.
DECAY – Sets the time it takes for the volume to decay from its maximum level to the SUSTAIN level.
SUSTAIN – Sets the level the envelope decays to, holding the SUSTAIN level for as long as a note is held.
TIP: Route a RANDOM generator here with low modulation amount to randomly change the level at which each note sustains for more dynamic playing possibilities!
RELEASE – Sets the time it takes for the volume to release from the SUSTAIN level to zero once a note is released.
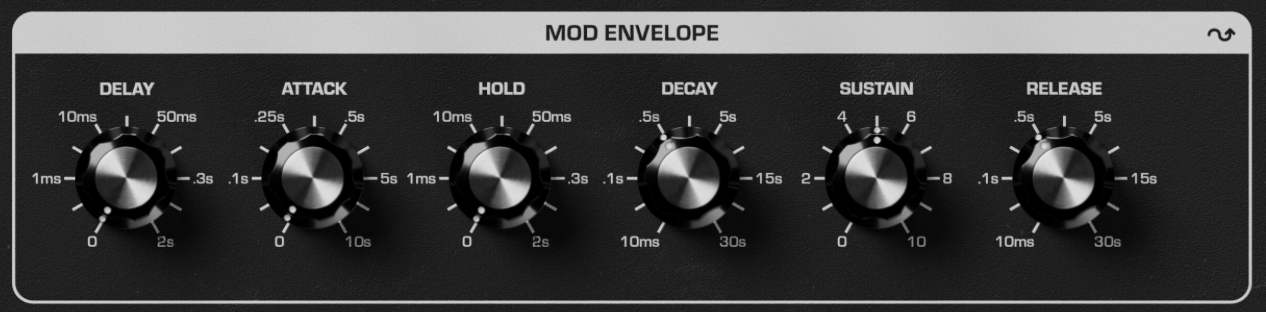
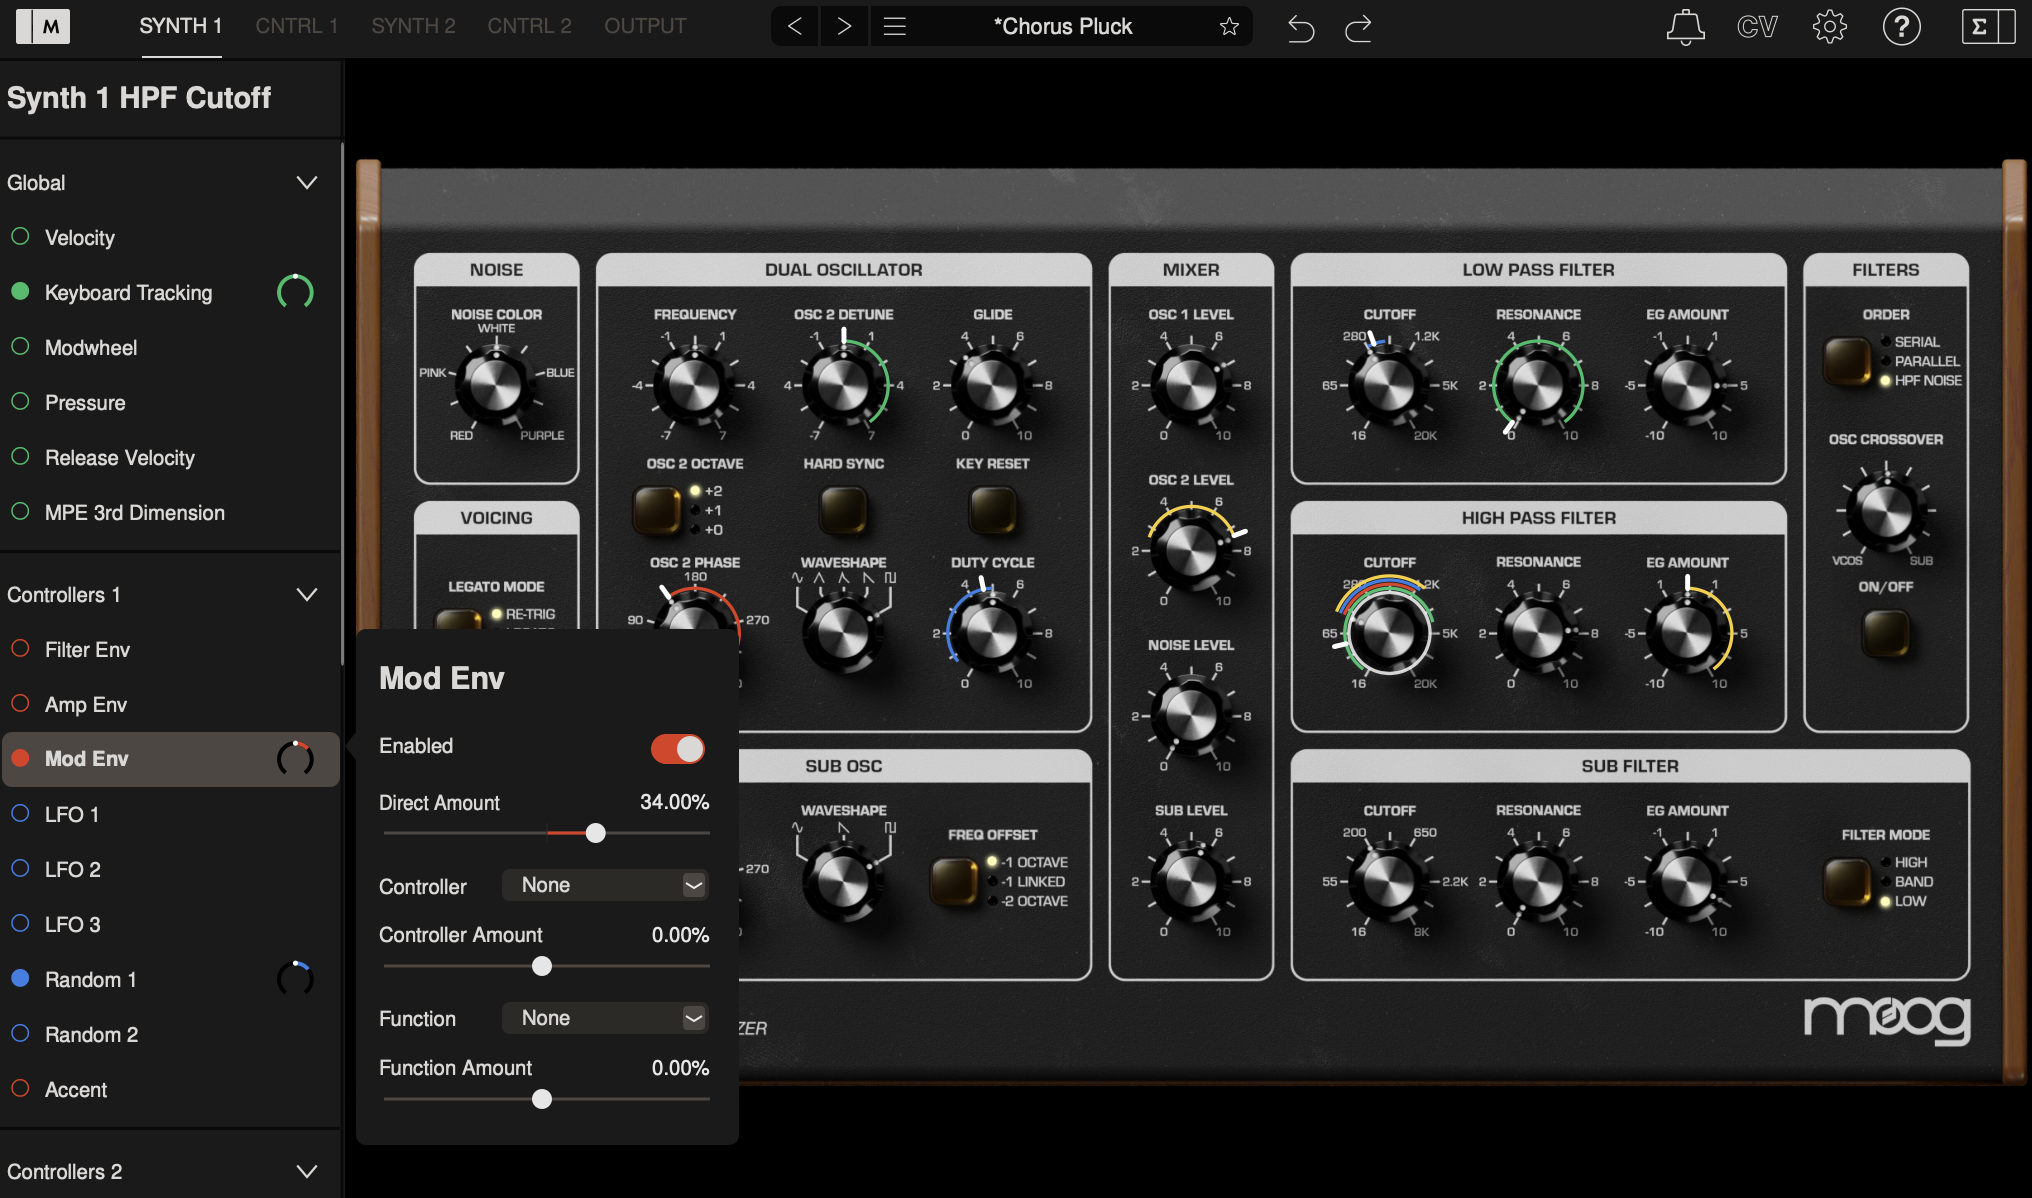
The MOD ENVELOPE contains two additional stages to the typical ADSR, allowing you to DELAY when the envelope begins its attack phase, and allowing the envelope to HOLD at the max level before it begins to DECAY down to the SUSTAIN level. The MOD ENVELOPE can be used for slower and evolving sounds, function as a separate envelope for distinct modulation of different filters, or be used as a modulation controller to dynamically shape modulation signals over time. Responds to any new note played (configurable via LEGATO MODE).
DELAY – Sets the amount of time it takes for the attack phase to begin after a note is played – from instantly (0s) up to two seconds.
ATTACK – Sets the time it takes for the envelope to ascend to its maximum level.
HOLD – Sets the amount of time the envelope holds for at its maximum level before beginning the decay phase – from 0 seconds up to 2 seconds.
DECAY – Sets the time it takes for the envelope to decay from its maximum level to the SUSTAIN level.
SUSTAIN – Sets the level the envelope decays to, holding the SUSTAIN level for as long as a note is held.
RELEASE – Sets the time it takes for the envelope to release from the SUSTAIN level to zero once a note is released.
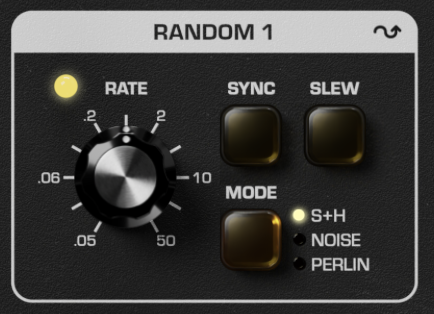
Random generators are useful to randomly modulate any parameter on a synthesizer. Mariana contains two RANDOM generators per SYNTH – they are completely independent and identical. Use a RANDOM generator in S+H mode to modulate envelope DECAY for randomly shorter or longer notes, or use it in NOISE mode to modulate filter CUTOFF for DFAM-style crispy filter sounds.
RATE – Controls the rate of the RANDOM generator, from 0.05 Hz up to 50 Hz.
SYNC – When enabled, SYNC will synchronize the RANDOM generator to create a new random value at multiples or divisions of your project’s current tempo, an external MIDI clock, or Mariana’s own internal tempo. Multiples/divisions will display around the RATE knob.
SLEW – Applies SLEW to the RANDOM generator. In S+H and PERLIN mode this will smooth out and slow down the random value changes. In NOISE mode SLEW will low-pass filter the noise.
MODE – Switch to determine the RANDOM generator type:
S+H: Creates a new RANDOM value at the time set by RATE, resulting in stepped random values similar to a Sample + Hold module on an analog synthesizer.
NOISE: Outputs audio rate NOISE as a modulation source.
PERLIN: Uses a Perlin noise generator to create a smoothly fluctuating random signal based on the RATE time.
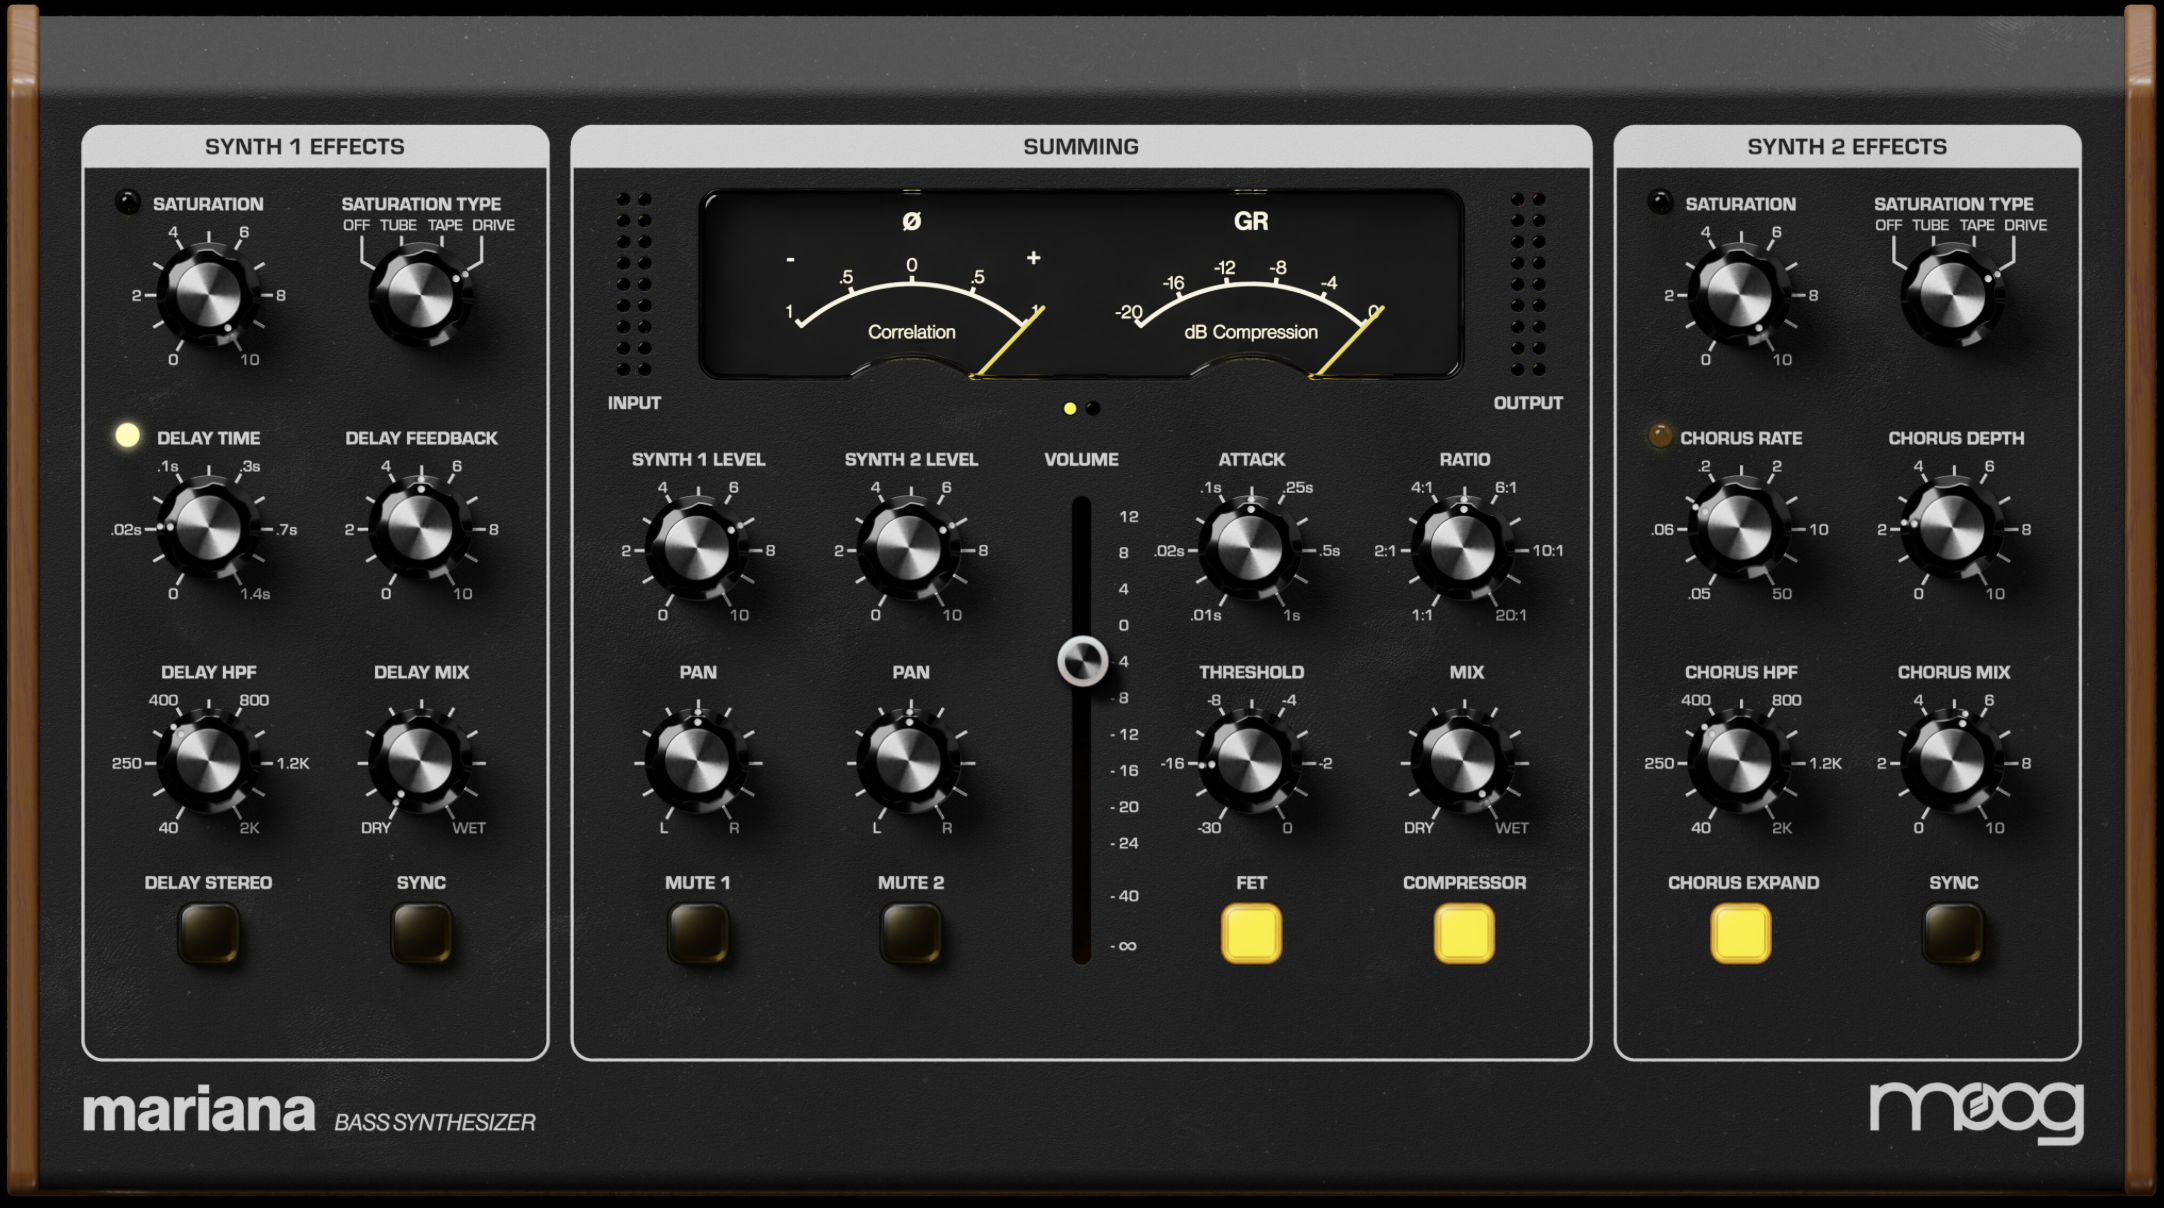
The OUTPUT view contains the mixing and dynamics controls for Mariana. The SUMMING section allows you to mix and pan both SYNTH 1 and SYNTH 2 as well as apply dynamic compression to the sum. It also contains meters for visual indication of left and right RMS levels, stereo correlation, and compressor gain reduction. The EFFECTS sections allow you to apply effects separately to SYNTH 1 and SYNTH 2 – with DELAY for SYNTH 1, CHORUS for SYNTH 2, and independent SATURATION for both.
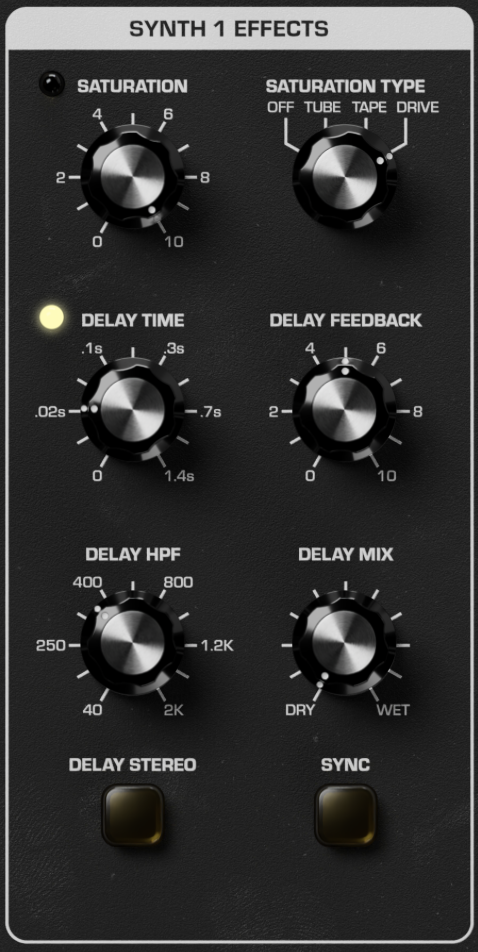
Saturation adds both a volume boost and tonal grit by overdriving the input signal. Mariana features a saturator with three different types of vintage saturation which will all add unique distortion to your sound.
SATURATION – Adjusts the amount of SATURATION applied to SYNTH 1.
SATURATION TYPE – Switches between three SATURATION types:
OFF: Saturation is turned off.
TUBE: Emulates an overdriven vacuum tube, such as those used in guitar amplifiers or tube-based hi-fi systems.
TAPE: Emulates saturation that comes from recording too loud onto magnetic tape.
DRIVE: Emulates analog transistor-based overdrive.
Delay will delay the input sound and repeat it at a certain time later and is useful for adding musical echoes to your sound. Mariana’s delay is optimized for bass sounds, with a high-pass filter (HPF) for only delaying higher-frequency components so that your bass tones can still hit hard and precise while the top end gets pleasing delay treatment.
DELAY TIME – Sets the delay time for SYNTH 1’s delay effect – from 0 seconds to 1.4 seconds. When SYNC is enabled the time divisions will display around the knob.
DELAY FEEDBACK – Sets the amount of delay output fed back to the input. Feedback is variable from no feedback through slapbacks up to continuous repeats. At maximum setting feedback will not be infinite but will be very long.
DELAY HPF – A gentle high-pass filter on the input to the delay section and in the feedback path, allowing you to add delay only to higher frequencies while leaving lower frequencies unaffected.
DELAY MIX – Crossfader blending between the dry signal and the delayed (‘wet’) signal.
TIP: Modulate this with the MOD ENVELOPE to increase the amount of delay over the duration of a note!
DELAY STEREO – Activates a ping-pong mode, pinging the delay between the left and right channels.
SYNC – Synchronizes the DELAY TIME to multiplications or divisions of your project’s current tempo, an external MIDI clock, or Mariana’s own internal tempo. Multiples/divisions will display around the RATE knob.
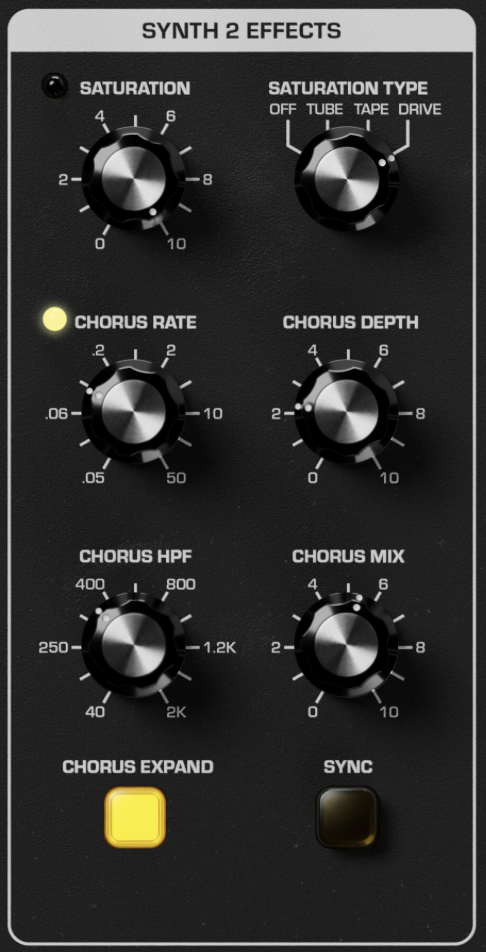
SATURATION – Adjusts the amount of SATURATION applied to SYNTH 2.
SATURATION TYPE – Switches between three SATURATION types:
OFF: Saturation is turned off.
TUBE: Emulates an overdriven vacuum tube, such as those used in guitar amplifiers or tube-based hi-fi systems.
TAPE: Emulates saturation that comes from recording too loud onto magnetic tape.
DRIVE: Emulates analog transistor-based overdrive.
Chorus is a specific type of delay effect that uses very short delay times with modulation of the delay time to mimic the sound of multiple instruments sounding at once. Chorus is a very useful effect to thicken up and add swirling depth to a sound.
CHORUS RATE – Sets the rate of chorusing for SYNTH 2’s chorus effect – from 0.5 Hz to 50 Hz. When SYNC is enabled the time divisions will display around the knob.
TIP: Modulate this with the MOD ENVELOPE for an increasingly fast chorus effect over the duration of a note!
CHORUS DEPTH – Sets the depth of the chorus effect, with subtle chorusing at lower settings and very exaggerated motion at higher settings.
CHORUS HPF – A gentle high-pass filter on the input to the chorus section as well as in the feedback path, allowing you to add chorus only to higher frequencies while leaving lower frequencies unaffected.
CHORUS MIX – Dry/wet control for the chorus, blending the chorused (‘wet’) signal into the dry signal.
CHORUS EXPAND – Expands the space and depth of the chorus effect.
SYNC – Synchronizes the CHORUS RATE to multiplications or divisions of your project’s current tempo, an external MIDI clock, or Mariana’s own internal tempo. Multiples/divisions will display around the RATE knob.
Summing is the final stage in Mariana before the output. It brings together both SYNTHs via a mixer, sets a master output VOLUME, and contains the COMPRESSOR for adding glue and extra control over the dynamics of your sounds. It also contains METERS for visual inspection of the final stereo output from Mariana.
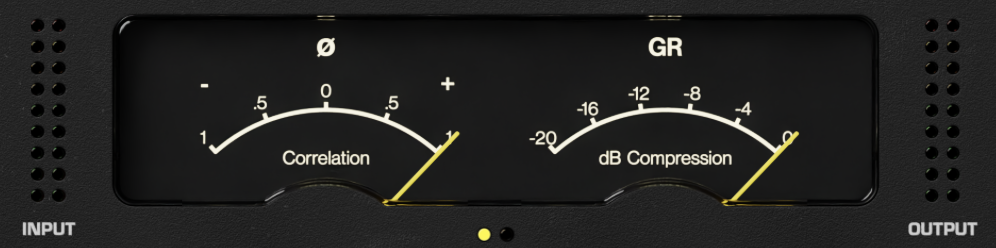
Mariana contains multiple meters for visual indication of different aspects of your sound, allowing you to dial your sound in precisely. By default the Ø and GR meters are shown – clicking on the meters will switch to the L/R meters.
Ø (Correlation) - The Correlation meter displays the phase difference between the left and right channels. When the Correlation meter reads +1 the left and right channels are fully in phase and your sound will play back correctly when summed to mono. If the Correlation meter is at –1 the left and right channels are out of phase and you will encounter phase cancellation issued when your signal is summed to mono. At 0 the left and right channels are uncorrelated indicating a very wide stereo signal where mono compatibility is questionable.
TIP: It is generally a good rule to aim for the correlation meter to be mostly in the 0 to +0.5 range, which indicates some stereo width but largely a mono compatible signal. All the way to the right in the +0.5 to +1.0 range and your sound will be a mostly mono signal with little stereo information, which can be useful for bass sounds that really need to cut through.
GR (dB Reduction) - The GR meter shows the amount of gain reduction applied by the compressor in decibels (dB). For more information see the compressor section below.
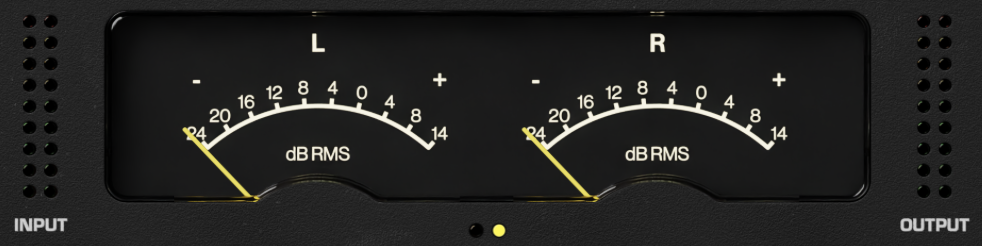
L/R (dB RMS) - The Left and Right meters show the RMS level of the left and right channels individually, allowing you to diagnose any imbalances in your stereo image.
NOTE: Mariana’s RMS meters use the K-14 scale, providing 14 dB of headroom with 0 dB set to –14 dB FS.
INPUT – A stereo meter showing the RMS level of the sum of both SYNTHs coming into the SUMMING section.
OUTPUT – A stereo meter showing the RMS output level post SUMMING.
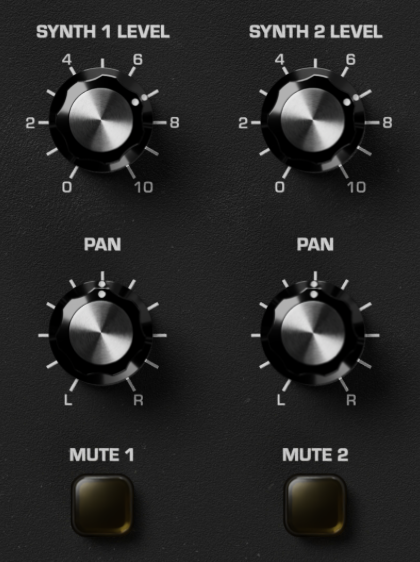
Each SYNTH has controls for the volume of the SYNTH, a PAN pot for stereo placement of each SYNTH, and a MUTE switch for each SYNTH.
SYNTH 1 / 2 LEVEL – Sets the level of each SYNTH in the final mixers – post-effects but before the COMPRESSOR.
PAN – Pan pot for stereo placement of each SYNTH – from fully LEFT to fully RIGHT. Centered with PAN at noon.
MUTE – Switch to fully mute each SYNTH.
TIP: When using Mariana in Duophonic mode please make sure that both synth levels are high enough and that neither is muted. The notes you play with be played by either synth layer, and if one is silent that may mean you need to raise its level in the Mixer.
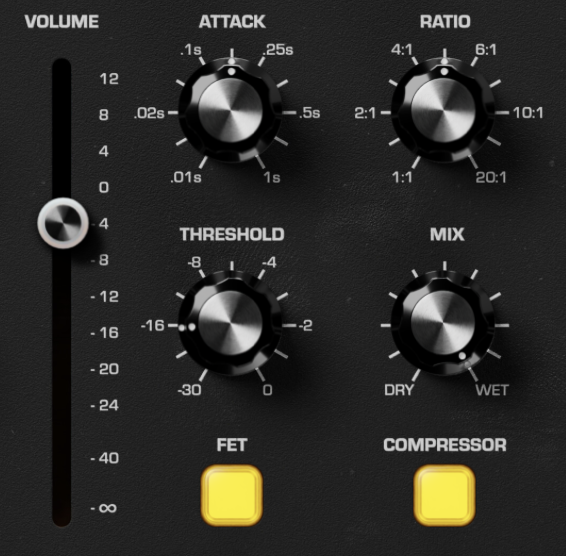
A compressor is a device that responds to an incoming signal and actively turns the volume down if the signal goes above a certain THRESHOLD. Compressors are used to add dynamic punch to a sound by reducing the dynamic range.
ATTACK – Sets the attack time for the compressor to engage after the input goes above the level set by THRESHOLD. Attack time ranges from nearly instantaneous (0.01 seconds) up to 1 second.
RATIO – Sets the ratio at which the signal is compressed above the THRESHOLD. At 1:1 no compression is applied, whereas at 4:1 the strength of the signal above the THRESHOLD is one quarter of what it otherwise would be. At maximum strength (20:1) the portion of the signal above the THRESHOLD is reduced to one twentieth of what it otherwise would be, nearly limiting the output level to be the same as the THRESHOLD level.
THRESHOLD – Sets the level at which compression begins in decibels (dB). Includes intelligent auto-gain compensation to keep your sounds from dropping in volume.
MIX – A crossfader mixing the dry signal with the compressed (‘wet’) signal.
FET – Enables emulation of an analog FET compressor with feedback introduced in the compressor.
COMPRESSOR – Turns the compressor on and off.
VOLUME – Slider which controls the final volume output of Mariana post compressor.
The Modulation Editor of Mariana allows you to modulate most knobs with a variety of modulation sources. Modulation can be scaled or inverted via the Modulation Editor, and any number of modulation routings can be sent to a single knob. Controllers and Functions can be inserted in any modulation routing for even deeper control – turning Mariana into a highly performative software synthesizer with a MIDI controller.
Click the Modulation Editor icon at the top-left corner of Mariana to open the editor. To begin assigning a modulation routing, click any knob to choose that knob as a destination. You will see a list of all possible modulation sources appear: Global sources, modulation sources from each SYNTH’s CNTRL panel, and external Control Voltages (CV).
TIP: Right-clicking on a knob will immediately open it for assignment in the Modulation Editor.
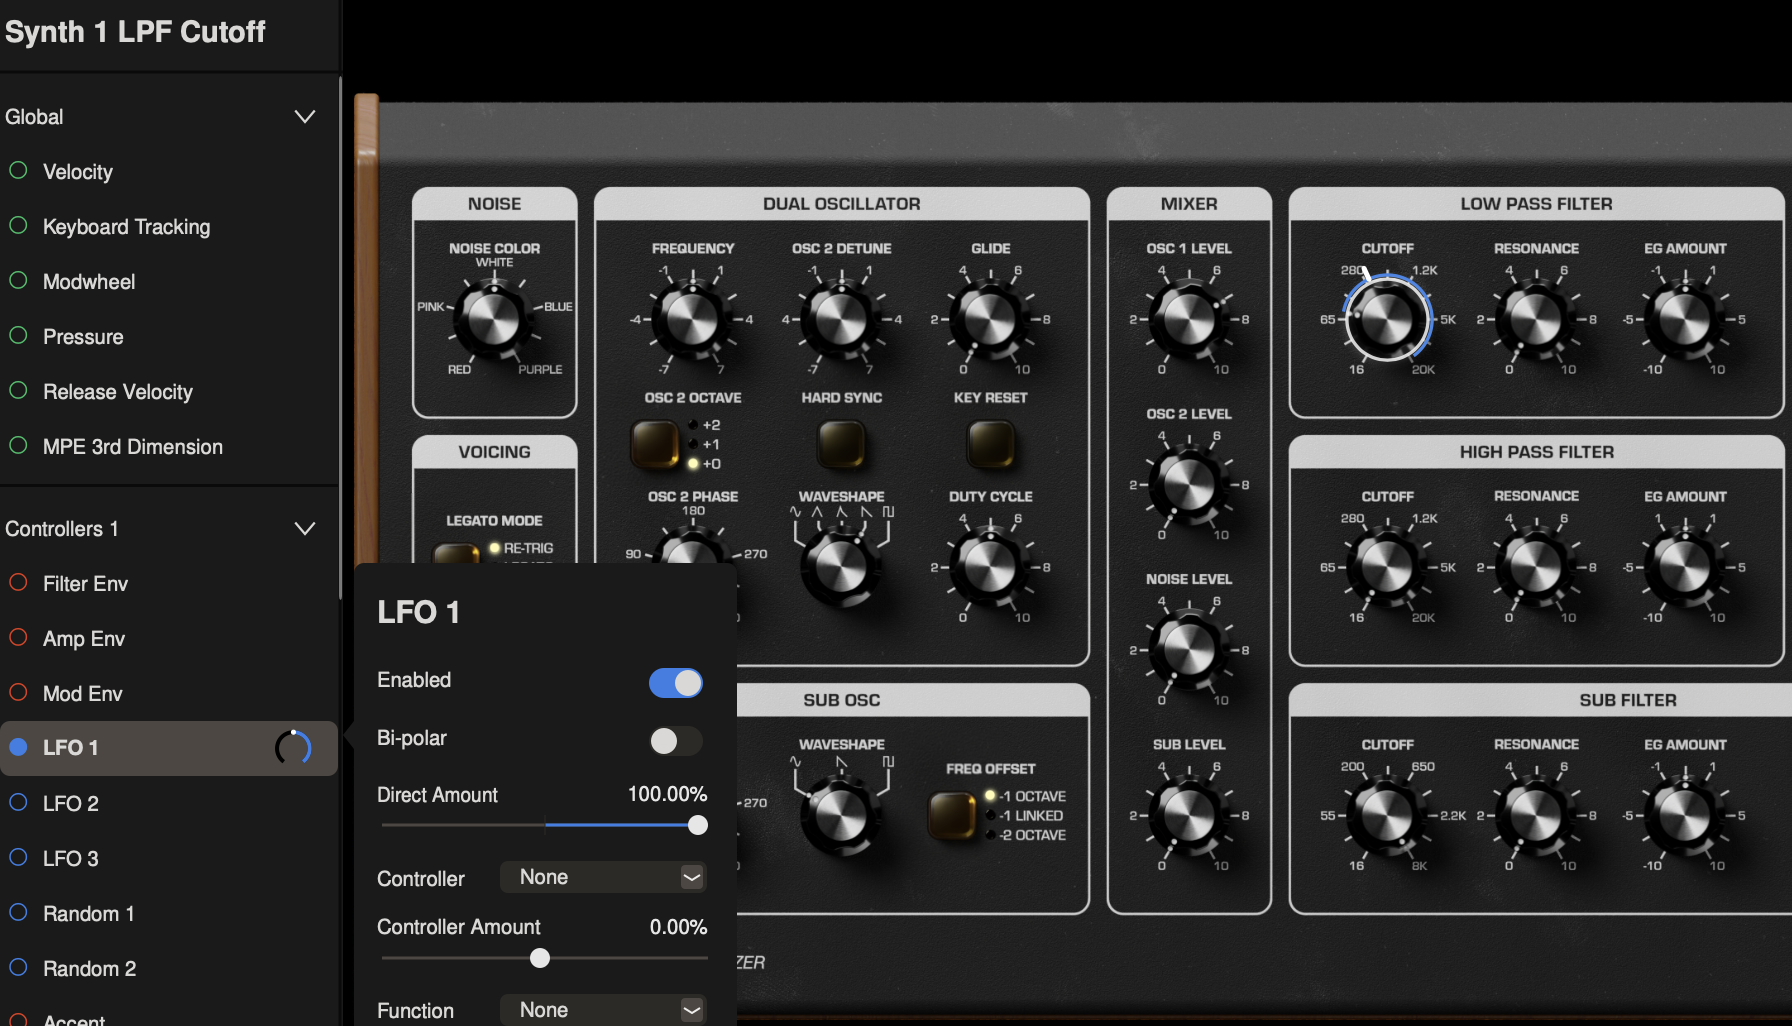
Let’s say we want to use LFO 1 in the CNTRL 1 panel to modulate SYNTH 1’s Low Pass Filter. With the Modulation Editor open, click to the SYNTH 1 view and click the CUTOFF knob in the Low Pass Filter to choose it as a destination.
Next, click LFO 1 under Controllers 1 to assign LFO 1 to modulate CUTOFF. You can toggle modulation on and off via the Enable switch or by clicking the circle next to LFO 1 in the Modulation Editor (will be filled in to indicate modulation is enabled).
VELOCITY - Velocity as sent via MIDI or determined by where a key is struck from top to bottom when using Mariana's built-in keyboard.
KEYBOARD TRACKING - Uses note played on keyboard as control source. Route to the CUTOFF of a filter to emulate traditional keyboard filter tracking.
MODWHEEL - Modwheel from MIDI controller as modulation source or MW slider when using Mariana's built-in keyboard.
PRESSURE - MIDI Aftertouch, or finger movement up or down on a held key with Mariana's built-in keyboard.
RELEASE VELOCITY - MIDI Release Velocity (how fast a held key is released) as modulation source.
MPE 3rd DIMENSION - 3rd dimension of control from an MPE (MIDI Polyphonic Expression) controller.
CONSTANT - All the way down in the CONTROL VOLTAGE section you can route a CONSTANT offset to any control.
TIP: Use CONSTANT to extend panel controls. For example, routed to OSC 2 DETUNE you can extend the range of detuning past +/- 7 semitones. Routed to an LFO RATE you can extend that LFO's frequency above or below its panel limits.
ENABLE – Switch to toggle modulation on and off.
BI-POLAR – Switches between bi-polar (positive and negative signal) or uni-polar (positive only) signals for bi-polar modulation sources (LFOs, Random). Modulation sources that can only be uni-polar (Envelopes, Velocity, Aftertouch, etc.) will not have a BI-POLAR option.
DIRECT AMOUNT – Scales the modulation depth. 100% applies the modulation source to the destination at full strength, whereas 50% will scale the modulation depth back, limiting an LFO (or any other modulation source) to move the destination knob only half as far. Modulation is effectively silenced at 0%, and can also be set negatively – causing uni-polar modulation sources like envelopes to move the knob down from its current position (instead of up) and inverting bi-polar modulation sources.
CONTROLLER – A modulation controller will scale the depth of modulation – acting as a volume knob for the modulation routing. A classic example is the Mod Wheel on a synthesizer, which will silence a particular modulation signal when it's all the way down but increase the modulation effect as it is turned up. Any modulation source in Mariana can also be used as a modulation controller.
CONTROLLER AMOUNT – Sets the amount of effect the controller has on the modulation depth. Set to 100% the controller will pass the modulation effect (as scaled by DIRECT AMOUNT) completely when the controller signal is at its highest and will completely silence the modulation effect when the controller signal is at zero. You can set the CONTROLLER AMOUNT to anywhere between 0% and 100% to scale back the influence the controller has on the modulation routing or turn it negative to invert the controller.
TIP: If using a uni-polar signal such as an envelope as a modulation controller, with positive CONTROLLER AMOUNT the envelope will turn the modulation effect louder and softer as the envelope goes through its cycle. You can set CONTROLLER AMOUNT negative to invert this effect - so that the envelope increasingly silences the modulation effect as it goes higher and lets more of the effect through as the envelope decays.
FUNCTION AMOUNT – Sets the amount of function applied to the modulation source, the effect of which varies depending on each Function (see below).
Functions can be used to transform the modulation source signal for each particular modulation routing. Available functions are:
SCALE: Will scale the modulation source – reducing its amplitude below 0% and amplifying it above. Useful for very precise scaling of modulation depth.
OFFSET: Modulation signals take their starting point as the knob setting, but with OFFSET you can offset where modulation begins, either above or below the knob setting.
LOW CLIP: Clips the bottom of the modulation signal, preventing it from dipping below a certain threshold. Amount sets the clipping threshold.
HIGH CLIP: Clips the top of the modulation signal, preventing it from exceeding a certain threshold. Amount sets the clipping threshold.
EXPONENTIAL: Applies waveshaping to the modulation signal via an exponential function.
NORM EXPONENTIAL: Normalizes the modulation signal and then applies waveshaping via an exponential function. Whereas applying an exponential function can significantly change the min and max values, NORM EXPONENTIAL avoids this and allows for tweaking the signal within its original boundaries.
LOW PASS: Applies a low-pass filter to the modulation signal. Useful for smoothing and softening modulation, reducing fast changes and rejecting noise.
HIGH PASS: Applies a high-pass filter to the modulation signal. Has the interesting property of allowing fast changes while rejecting constant values (DC).
SLEW: Slews the signal coming from the target, smoothing out sudden changes and slowing down movement.
LOW SLEW: Applies slew only to falling (negative going) parts of the modulation signal.
HIGH SLEW: Applies slew only to rising (positive going) parts of the modulation signal.
SAMPLE & HOLD: A free-running random Sample and Hold signal.
BOUNCE: The output of the BOUNCE transform is based on a physics simulation of a falling & bouncing ball. The input signal level sets the initial height of the fall; when the input level decreases, the output starts to free-fall according to the amount setting. If the input goes to zero, then the output will bounce when it hits zero and settle naturally. If the input stays above zero then the output will stick at the input level the next time they cross. You can think of the input level as “catching the ball” if the input is above zero, and then “dropping the ball” if the input goes below the output level.

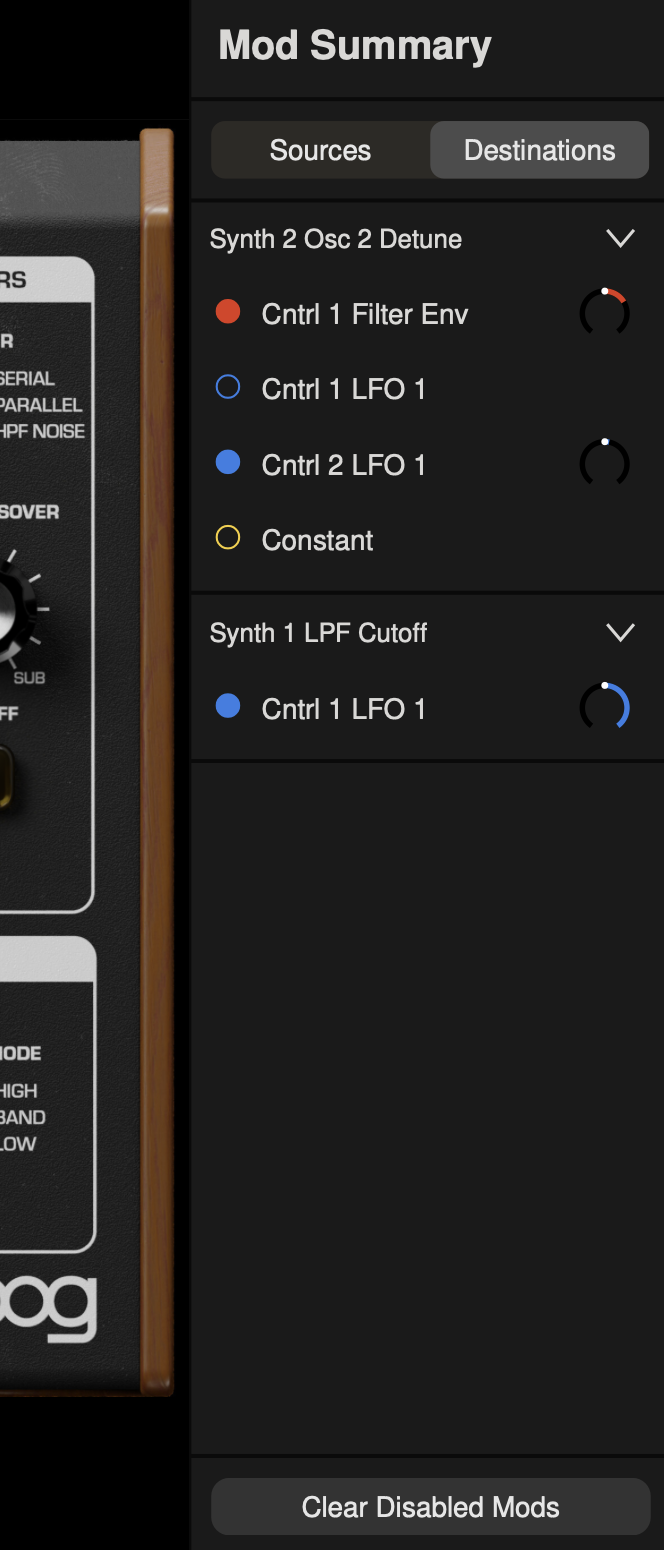
Click the Mod Summary icon in the top-right corner of Mariana to bring up the Mod Summary window, which will show you all currently setup modulation routings and allow you to enable or disable them. You can sort all modulation routings either by Source or by Destination as well as edit those routings directly in the Mod Summary window.
TIP: Use the Clear Disabled Mods button to remove all modulation entries that are currently disabled.
Mariana can combine with the Moogerfooger Effects Plug-ins as well as any other instance of Mariana you have active, communicating back and forth via virtual Control Voltage (CV) to create a modular ecosystem directly in your Digital Audio Workstation.
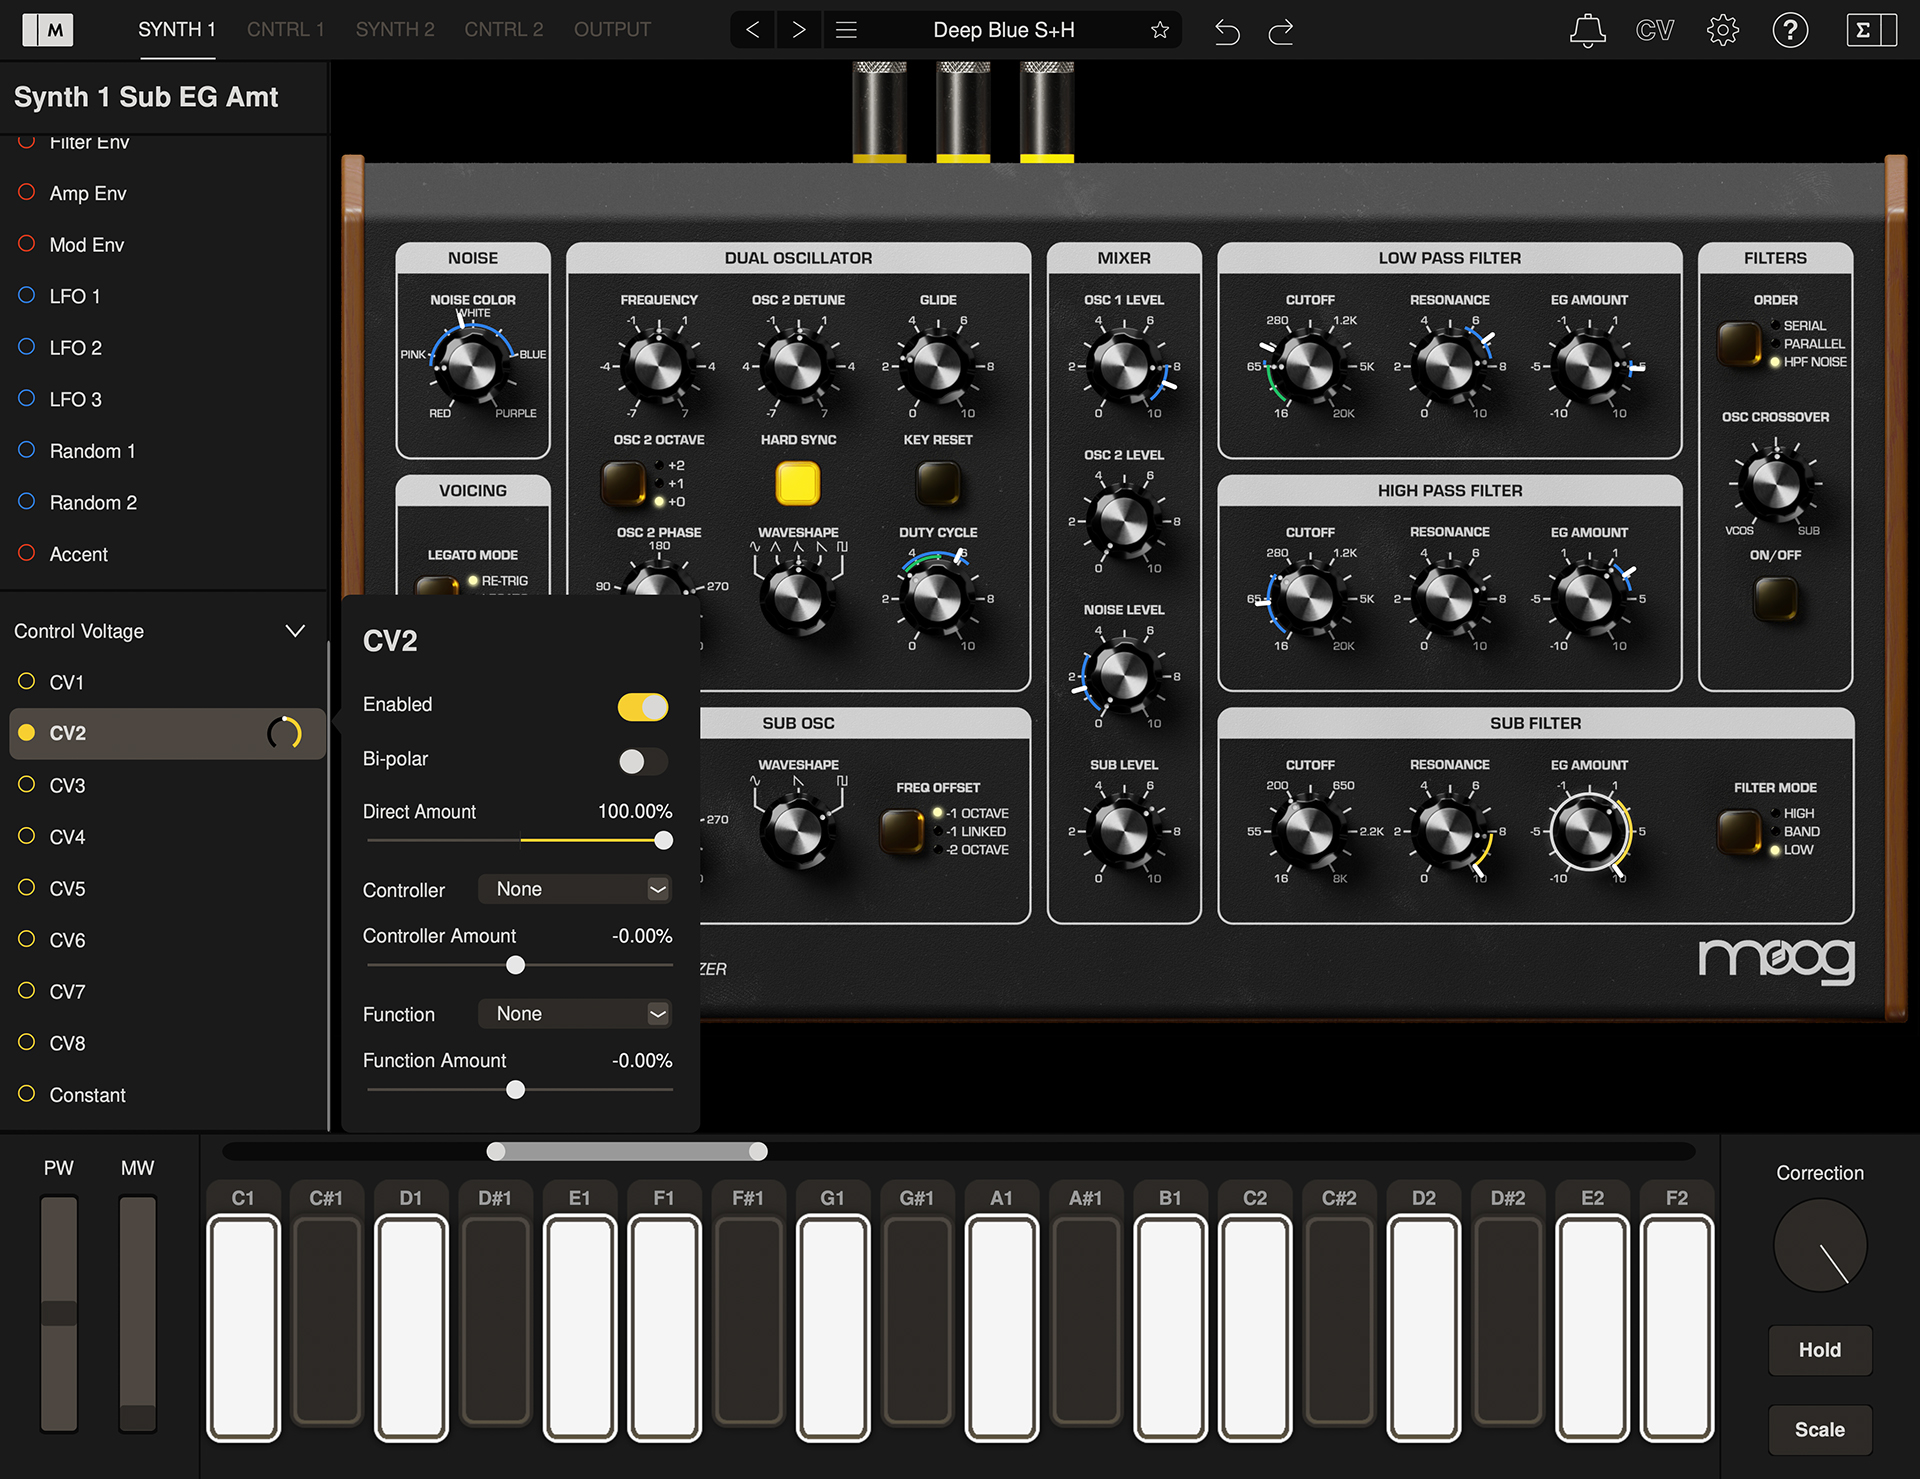
Click the CV icon in the top-right corner of Mariana to open the CV editor panel. Mariana contains eight CV In busses and 8 CV Out busses. At the top is the unique four digit randomly generated code that identifies this particular instance of Mariana from any others you have currently open in your DAW.
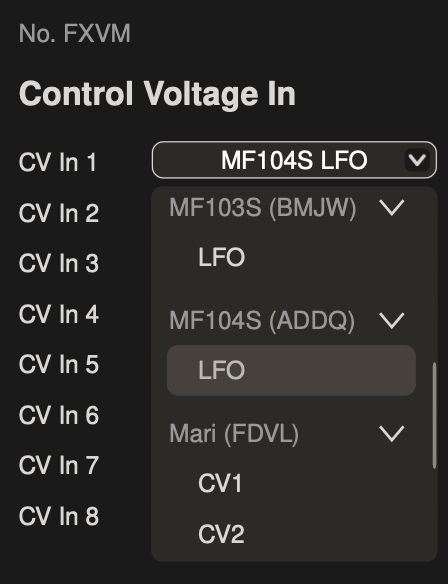
Click the dropdown menu for any of the 8 CV Ins – you will see a list of every Moogerfooger Effect Plug-in and any other instance of Mariana currently open in your DAW in addition to every CV output associated with them. Each plug-in instance is identified by a unique, randomly generated four-letter code – on Mariana this code is displayed on top of the CV Editor Panel and allows you to distinguish between multiple instances of the same plug-in. Choose any modulation source to connect that modulation signal to the CV Input.
Let’s say you wanted to use the LFO of an MF-104S Delay to control the Low Pass Filter CUTOFF knob for SYNTH 1:
1. Open the CV panel and go to the dropdown menu for CV In 1. Find the MF-104S with the unique identifier corresponding to the particular instance you want to use and click LFO to route the MF-104S LFO to Mariana’s CV In 1.
2. Go to the SYNTH 1 view and open the modulation editor. Click on the Low Pass Filter CUTOFF knob and select CV1 as your modulation source. Like any other modulation routing on Mariana, you can scale, offset, apply controllers, and apply functions to this modulation.
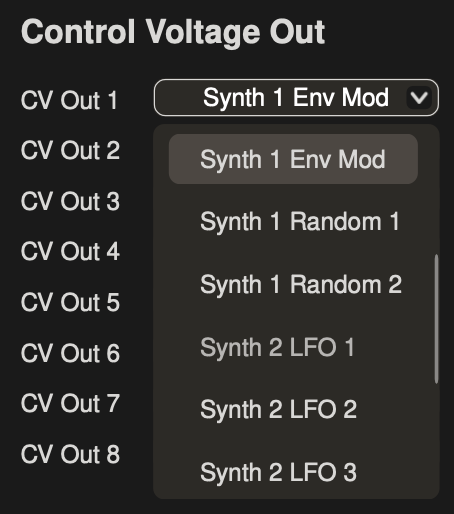
Mariana’s control signals can be sent to any other instance of Mariana or Moogerfooger via the CV Output bus. Click the dropdown menu for any of the 8 CV Outs and you will see a list of every modulation source available in Mariana – all three LFOs, all three Envelopes (Filter, Amp, Mod), and both RANDOMS – for each of Mariana’s two SYNTHs. Select a modulation source to route it to the CV Out.
Let’s say you want to use Mariana’s SYNTH 1 Mod Envelope to control the FEEDBACK of an MF-104S Delay:
1. Open the CV panel and go to the dropdown menu for CV Out 1. Find Synth 1 Env Mod and click it to connect it to CV Out 1.
2. Go to your MF-104S, click the CV panel, and click on the FEEDBACK knob. Find the instance of Mariana with the unique identifier corresponding to the one you want to use and select CV OUT 1 to make the connection.
Click Clear CV Routing at the bottom of the CV Editor Panel to clear all CV In/Out routings.

Click the gear icon in the top-right corner of Mariana to open the Settings panel, which provides a collection of utilities that allow for configuring audio, MIDI settings, accessing and sharing Mariana presets, viewing the Manual, and displaying version information.
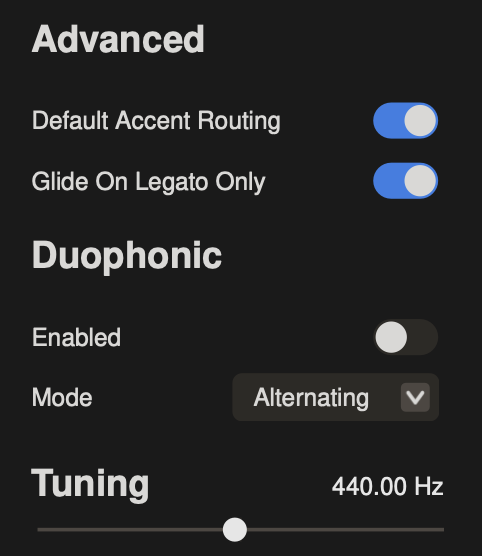
When turned ON, the ACCENT button will drive the envelope generators harder when enabled and when note velocity exceeds 96 – creating an accented note when playing harder and unaccented notes when playing softer. Turned OFF, the ACCENT button can be used as an additional modulation source which will not affect the envelopes.
When turned ON, notes will smoothly glide to the next notes at a time determined by the GLIDE knob only when notes are played in a legato fashion. When OFF, all notes will glide to the next pitch regardless of if played legato or not.
When enabled, every other note will trigger each SYNTH of Mariana individually – allowing it to be used as a duophonic instrument. Hold down two notes on the keyboard and both will sound, each allocated to a different SYNTH layer individually.
Available Duophonic Modes are:
ALTERNATING: Every new note is allocated to the next layer - constantly alternating between SYNTH 1 and SYNTH 2.
FIRST SYNTH 1: Playing a note will always allocate to SYNTH 1 first, with a subsequent key held down being allocated to SYNTH 2. Once all keys are released the next note will allocated to SYNTH 1.
FIRST SYNTH 2: Playing a note will always allocate to SYNTH 2 first, with a subsequent key held down being allocated to SYNTH 1. Once all keys are released the next note will allocated to SYNTH 2.
Sets tuning reference for A4 - Concert pitch is 440 Hz.
Slider to set a global tempo for syncing LFOs, delays, etc. Only available when using Mariana as standalone app or iOS - Mariana as a plug-in follows the global tempo of your DAW session.
When enabled, Mariana will momentarily mute as you change presets and prevent the tails of any notes from continuing to sound using the newly selected Preset.
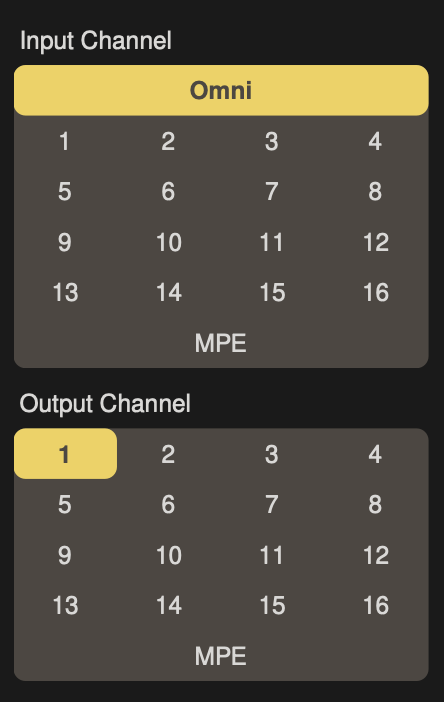
Set the MIDI channel for receiving data - either OMNI (all Channels); 1-16; or MPE (MIDI Polyphonic Expression).
Set the MIDI channel for transmitting data - either 1-16 or MPE (MIDI Polyphonic Expression).
Begins a search for compatible Bluetooth MIDI devices. Available devices will appear in the "Bluetooth MIDI Devices" - select the device you wish to use.
Sends an “All Notes Off” command on every MIDI channel. This will clear any ringing notes or hung commands in your MIDI setup.
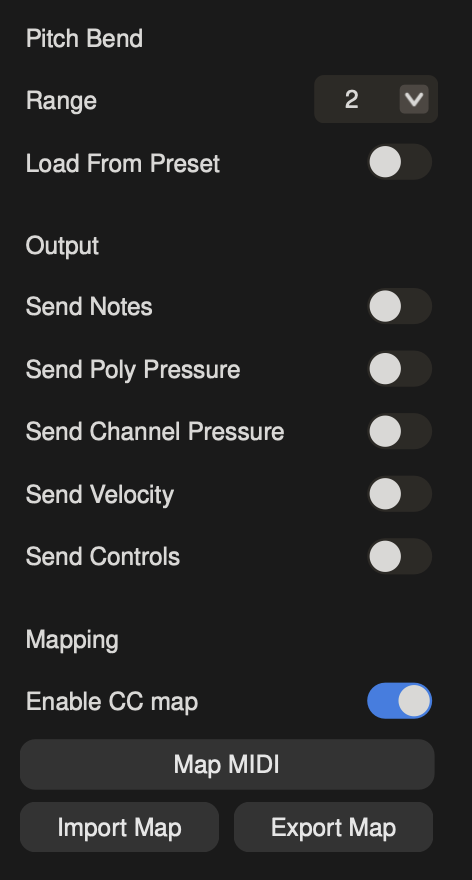
The depth of the effect provided by the PITCH wheel can be set to a musical semitone or Off (no effect) using the RANGE parameter.
The value of the Pitch Bend Range parameter can be saved individually with a specific value for each Preset, or a global value can be chosen that will provide the same depth of effect on every Preset.
Enables/disables MIDI Note output messages from the Mariana keyboard.
Enables/disables MIDI Polyphonic Pressure output messages from the Mariana keyboard.
Enables/disables MIDI Channel Pressure output messages from the Mariana keyboard.
Enables/disables MIDI Velocity output messages from the Mariana keyboard.
Enables/disables MIDI CC output messages from the Mariana panel controls.
Clicking MAP MIDI option will open a Panel Map showing any current MIDI CC (Continuous Controller) assignments. MIDI CC Mapping is useful if you want to operate Mariana from a hardware controller, or for integration with a DAW. By creating and saving a MIDI CC Map, you can specify which MIDI CC numbers will affect which knobs and which features. MIDI CC Maps can be created to optimize a particular Preset for external control, or to provide the highest level of integration with a favored controller. MIDI CC Maps are saved and recalled independently of Presets.
If no MIDI CC is assigned to a specific parameter, the value displayed will be [ - ]. To make a MIDI CC assignment, simply click a knob or switch and then operate the corresponding knob or switch on your MIDI controller. The first MIDI CC number that Mariana detects will be assigned to that parameter. Repeat this process for other knobs and switches.
To manually assign a MIDI CC, double click a knob or switch. This will open the "MIDI CC Assignment" window, where you can enter the desired MIDI CC number. Press SET to save your change.
Use Import/Export Map to either export your current MIDI Map as a .ccmap file to your computer or to import any .ccmap file on your computer as a MIDI Map.
iOS: Shares the currently active Preset using AirDrop, Mail, and other messaging services.
Desktop: Saves the currently active Preset to your computer as a .marianaPreset file.
iOS: Shares a ZIP file of all the currently filtered Presets using AirDrop, Mail, and other messaging services.
Desktop: Saves all currently filtered Presets to your computer as individual .marianaPreset files (they are not zipped together).
SHOW USER MANUAL: Open the online version of this manual.
SHOW QUICK HELP: Open the in-app quick help utility.
SHOW INTRODUCTION: Open the introduction steps that were displayed upon first launch of Mariana.
Manage authorization of Mariana.
LOG OUT to log out of your accounts.
DE-AUTHORIZE to de-authorize Mariana from your account on your current device.
Tap here to view the current software version and information regarding Mariana.
Should you experience any issues with Mariana, please contact [email protected]