moogerfooger
USER'S MANUAL
MuRF
WELCOME
Welcome to the world of the Moogerfooger® Effects Plug-ins, a re-invention of Bob Moog’s classic analog effects modules using DSP artistry to bring the legendary performance and musicality of the original hardware effects to your digital music production environment.
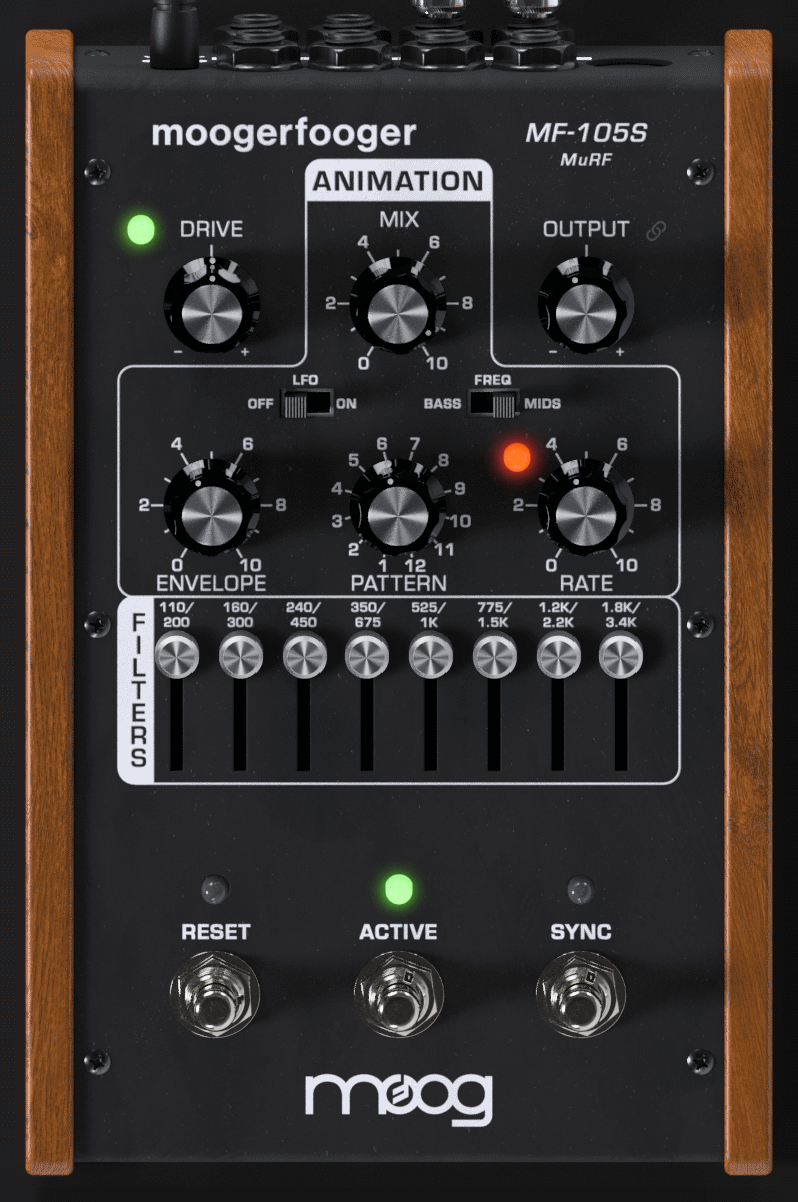
The MF-105 MuRF (Multiple Resonant Filter Array), originally designed by Bob Moog in 2004, was a direct descendent of the original Moog modular synthesizers and professional rack effects. It contained two basic functions: an 8-band array of resonant filters that can be voiced for bass or mid frequency response, and a pre-programmed ANIMATION module that generates sequences of envelopes that modulate the levels of the 8 filters. Several of the performance parameters were voltage-controllable, and the front panel rotary controls and switches could be controlled through the use of MIDI. The patterns of the Animation module could be synced to a MIDI Clock, and the MIDI input allowed for users to customize the internal patterns.
The MF-105S retains this same design, with all parameters able to be played, tweaked, automated and modulated to create lively and truly musical performances. All features available for MIDI control on the original are available in the MF-105S through DAW parameters, clocking, and automation, and features a built-in pattern editor. The MF-105S captures not only the distinctive sound of the original, but also the organic way in which the parameters interact to create a musical playing experience.
GETTING STARTED
In your Digital Audio Workstation (DAW) software, place the MF-105S plug-in on an instrument or audio track.
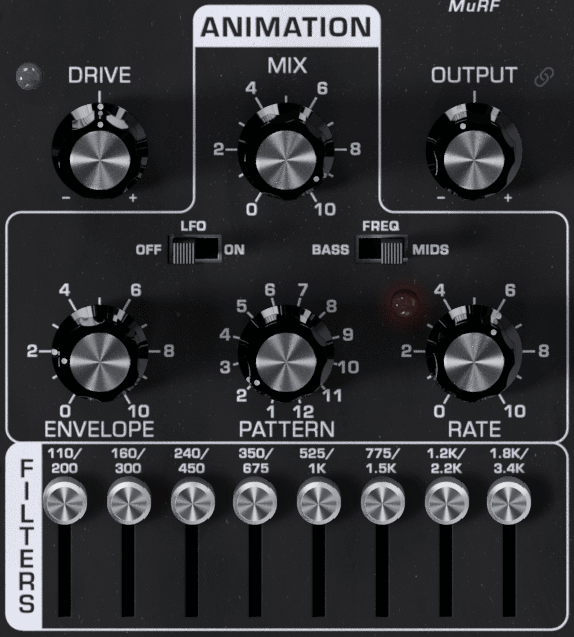
Set the MF-105S panel controls as follows:
PATTERN – 2
ENVELOPE – 2
RATE – 6
MIX – 10
FREQ Switch – MIDS
LFO Switch – OFF
Filter Sliders 1-8 - All the way up
With audio playing on that track so you can hear the effect, listen to how the MF-105S affects the quality of the sound. Low-pitched, sustaining sounds with a bright timbre will work best to learn the sound of the MuRF. Your instrument’s signal is going through the MuRF’s filters. Listen to how it affects the quality of your instrument’s tone. You will hear the level of each of the 8 filters being turned up and down automatically in sequence by the ANIMATION at a tempo determined by the RATE control. Note that changing the ENVELOPE control affects the shape that turns the filters up and down. The PATTERN rotary switch selects different patterns that dictate the sequence that turns the Filters up and down automatically. The MIX control is used to blend the direct sound of your instrument with the effected sound.
In the next sections we'll explain exactly how the MuRF's filters work and how to animate them. For now, get a feel for the controls by experimenting with different settings.
Frequencies and Filters
Let’s start with some definitions. Please read this section carefully, as it will help you to understand the basic ideas behind the MF-105S MuRF’s filters.
Sound is a vibration of the air. The speed of vibration is called the frequency. It is measured in Hertz (Hz). One Hz is one vibration per second. We hear vibrations from 20 Hz to 20,000 Hz.
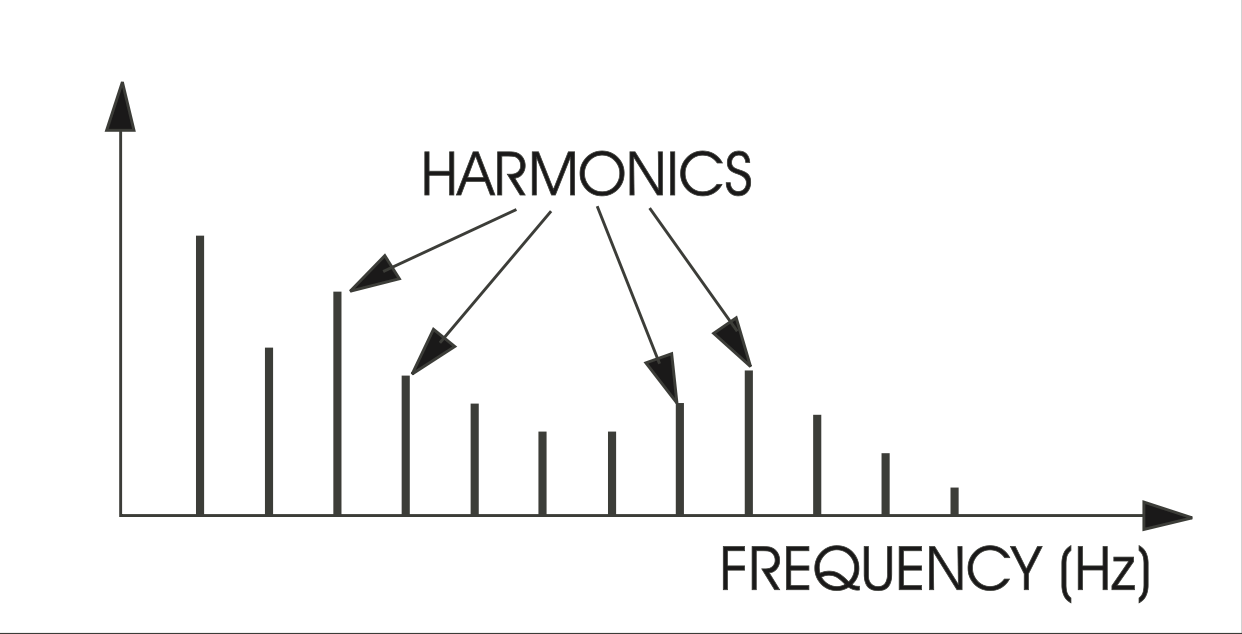
Musical sounds generally have many frequency components. They’re called harmonics, or overtones, or partials. They are what give a sound its characteristic tone color, or timbre. A graph showing the strength of each of a sound’s harmonics is called a spectrum. A typical spectrum of a musical sound is shown in this figure.
In general, bright sounds have lots of strong overtones, while darker, mellower sounds have fewer (and weaker) overtones.
A filter is a signal-modifying device that colors a sound by emphasizing some parts of the audio spectrum and attenuating (cutting down) other parts. In general, a filter has a quality of its own which is superimposed on the tone color of the original sound. Some types of filters (like the bass and treble controls on your sound system) have subtle, gentle effects on a sound’s timbre. Other types of filters have stronger and more dramatic effects, and are frequently used as elements in the music-making and sound design process. Strong filters include phasers, flangers, and wah-type resonant filters.
A graph showing what a filter does is called the filter’s frequency response. The horizontal axis is frequency. The vertical axis is the filter’s gain. A gain of "1" (unity) means that, at that frequency, the output of the filter is just as strong as the input. A gain of less than unity means that the filter’s output is attenuated at that frequency, while a gain of greater than unity means that the output is actually greater than the input.
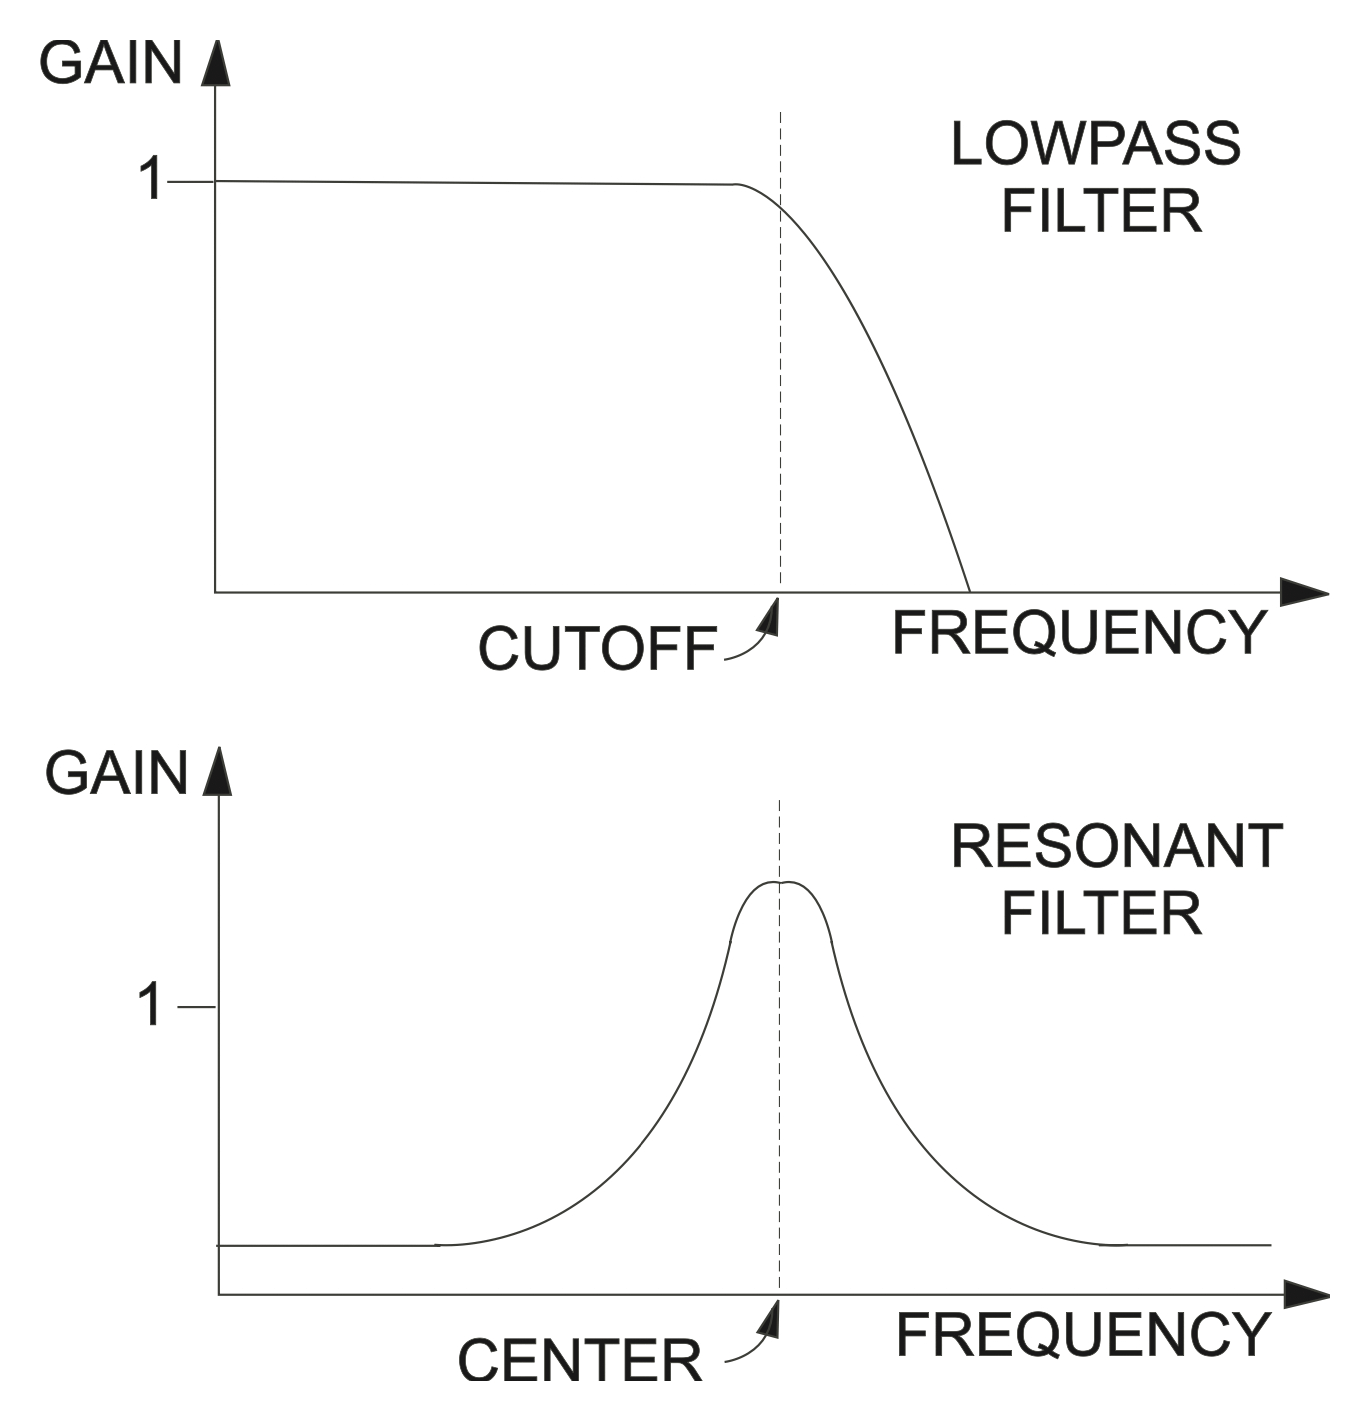
This figure shows examples of the frequency response characteristics of two common types of filters: (a) a lowpass filter, which passes frequencies without attenuation up to a so-called ‘cutoff frequency’, and attenuates the frequencies above cutoff; (b) a resonant filter, which emphasizes frequencies around the filter’s ‘center frequency’.
Both of these filter types are widely used in electronic music. Each of them has its own distinct sound, a large part of which is directly related to the shape of its frequency response graph. The first type is the same as in the Moogerfooger MF-101S Lowpass Filter, as well as the lowest filter in the MuRF’s BASS voicing; the second type is in the top 7 bands of the MuRF’s BASS voicing and all 8 bands of the MIDS voicing.
The MuRF's Filters
The MuRF contains 8 filters that can be configured for bass or mid-frequency voicing by the FREQ slide switch on the front panel.
In the BASS voicing, the lowest filter acts as a lowpass filter with a cutoff frequency of 110 Hz. This is ideal for bass players or bass sounds that need to retain the presence of all their lowest frequencies. The remaining seven filters are resonant filters with center frequencies of 160, 240, 350, 525, 775, 1200 and 1800 Hz.
In the MIDS voicing, all 8 filters act as resonant filters with center frequencies of 200, 300, 450, 675, 1000, 1500, 2200, and 3400 Hz. The MIDS voicing is very good for processing sounds with dense mid- frequency harmonics, including guitars, vocals, or synthesizer pad sounds.
Each filter has a slider that adjusts the gain of that filter. In this respect, the MuRF resembles a graphic equalizer. When a filter’s slider is all the way down, the gain for that filter is zero, and the filter’s output is zero. When the slider is all the way up, the filter’s output is at maximum. However – the resemblance to a graphic EQ ends there. The MuRF’s filters have characteristics that set them far apart from a graphic equalizer. First, they are resonant filters. They boost the signal at the center frequencies of the filters. Second, they are tuned so they don’t overlap. A graphic equalizer will theoretically not color the signal at all when all the sliders are set to the same level. The MuRF’s resonant filters on the other hand color the signal a great deal, adding warm analog resonances at pleasing intervals throughout the frequency spectrum.
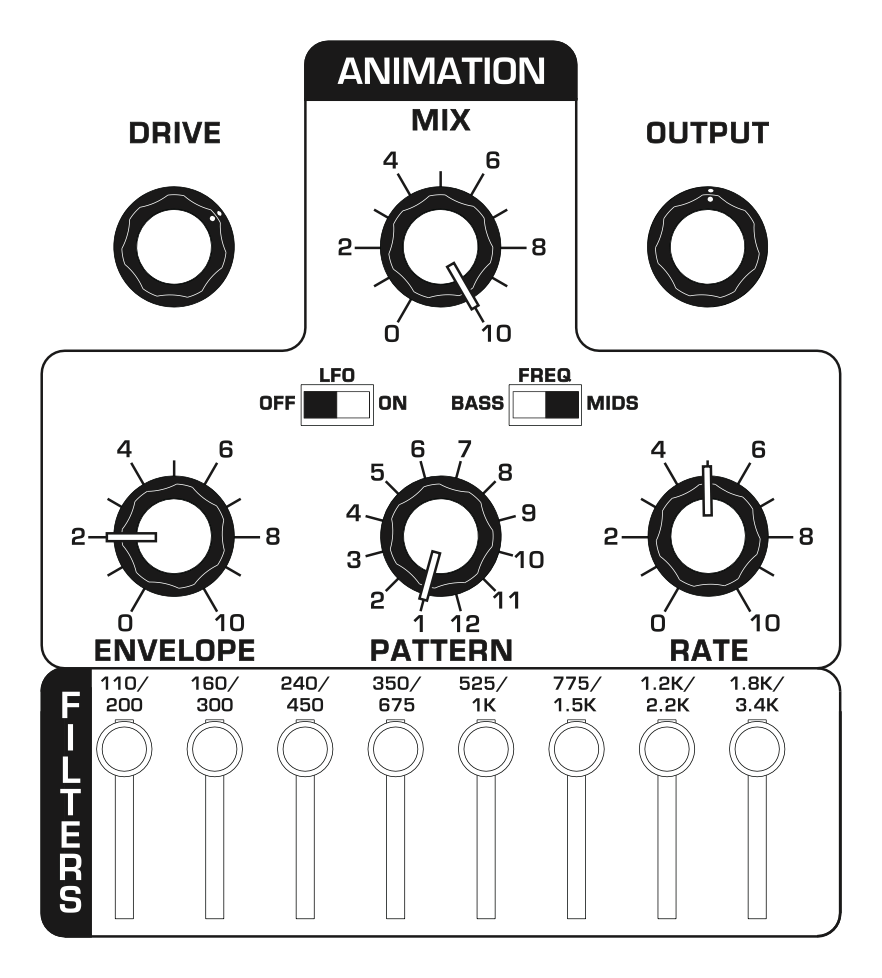
We’ll now show how the MuRF’s filters affect the MF-105S’s frequency response. We will always start with this ‘basic’ panel setup, which is:
- Set each of the filters’ sliders to all the way up.
- With the FREQ switch in the MIDS position, switch the PATTERN to Pattern 1. When Pattern 1 is active, the Animation is turned off so you can hear the effect of just the filters.
- Make sure the effect is on, and MIX is at 10.
-
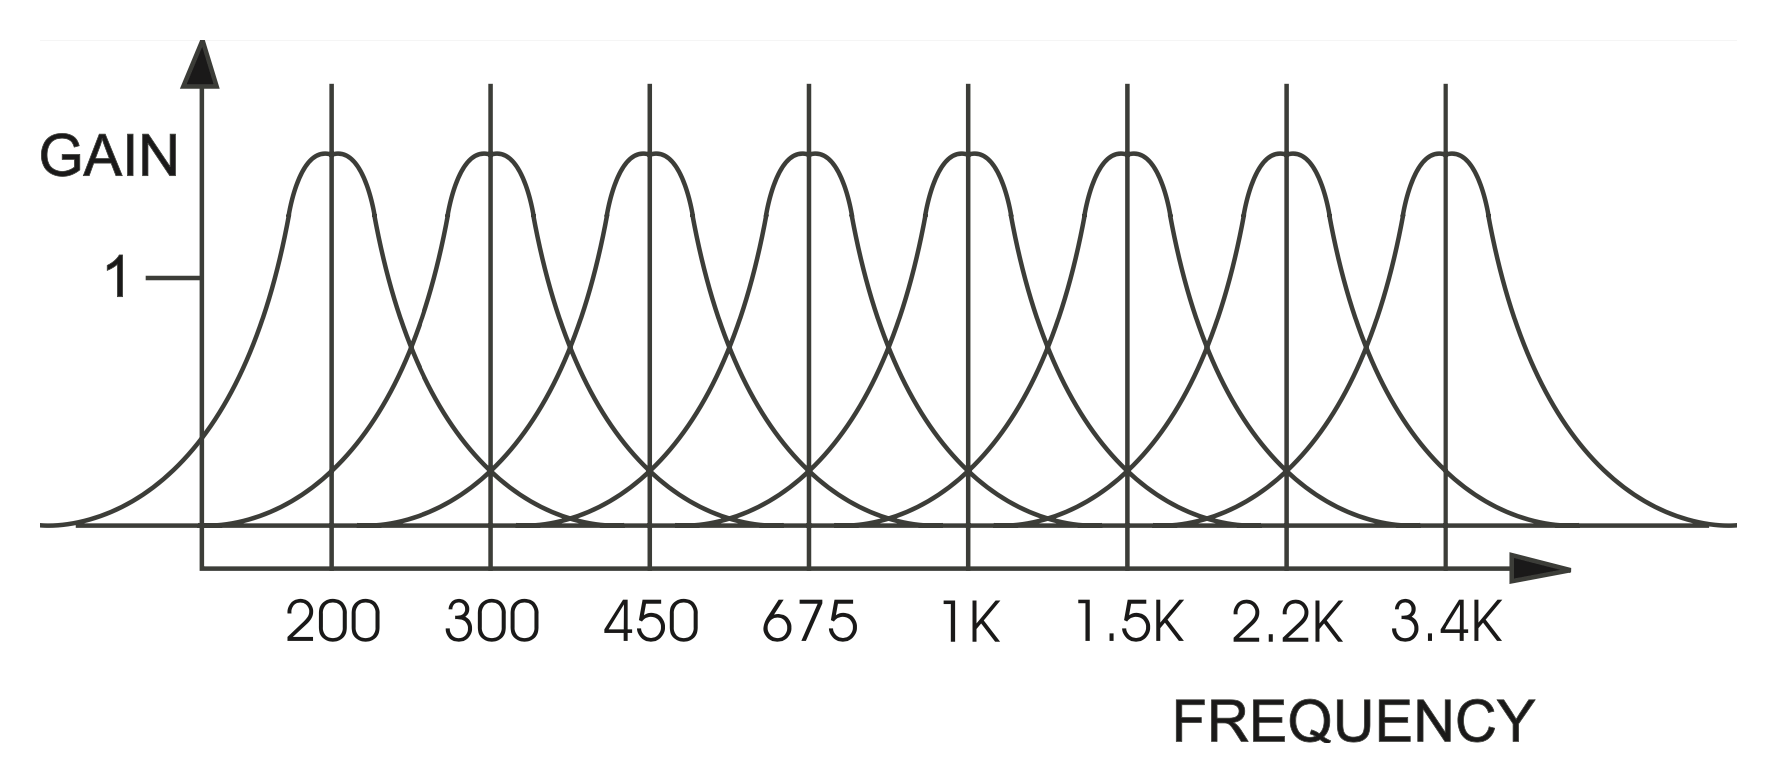
Now, play a bright, sustained sound, preferably of low pitch into the MuRF - keep in mind that filter effects work by removing frequencies, so you must have a bright sound to hear the effect! Figure 6 shows the MF-105S’s MIDS frequency response, the response that you hear when the panel controls are set up as in the basic setup. Note that there are 8 resonances – they impart warmth and color to the sound. For a moment press the bypass switch and turn the effect off. Note the change in character of the sound. Now switch the effect back on.
-
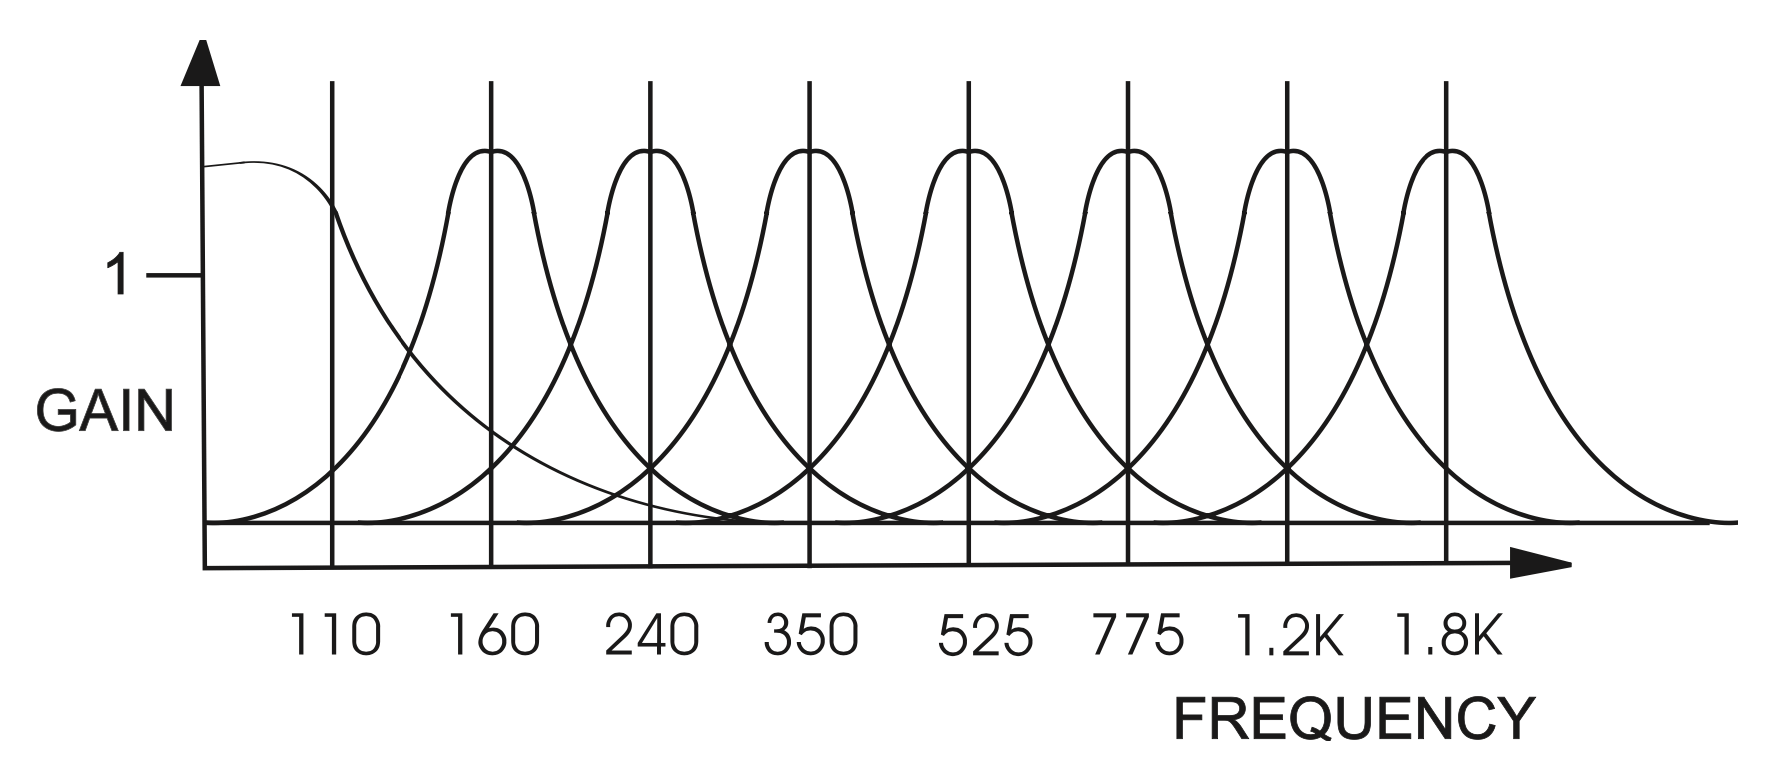
Now turn all the sliders down except the lowest one. While playing your instrument, turn each slider up one at a time, while the rest of the sliders are all the way down. Pay careful attention to the sound of each filter. When you have learned the sound of each individual filter, try various combinations, such as the bottom two and top two. At this point you will want to repeat steps 4 and 5 with the FREQ slide switch moved to the BASS voicing position. This figure shows the frequency response of the 8 filters in the BASS voicing setting. This will familiarize you with the sounds of the two voicings. Note that even without Animation, the MuRF is a VERY POWERFUL filter bank with many possibilities to sculpt your tone!
-
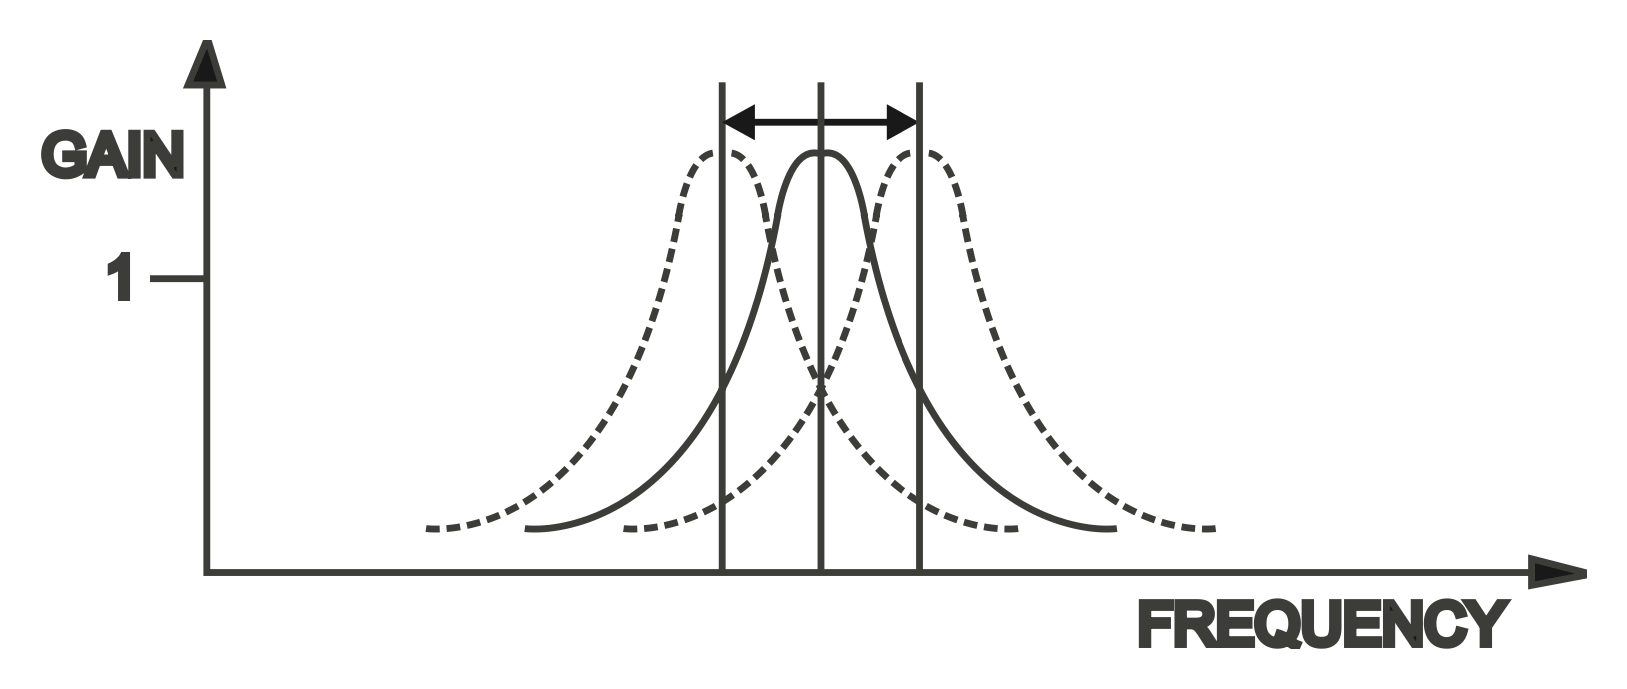
The Filters’ resonant frequencies can be shifted up and down by a small amount to create an effect similar to phasing. This graph portrays the results of shifting a resonant filter’s center frequency. In the MuRF this can be done two ways, depending on the position of the LFO slider switch. When the slider is in the "OFF" position, the filters’ center frequencies can be shifted by CV plugged into the LFO/SWEEP input or by animation in your DAW.
When the LFO slider switch is in the "ON" position, a LFO (Low Frequency Oscillator) shifts the frequencies of the filters as a group up and down automatically. The LFO is a sine wave. The LFO rate is initially determined by the pattern. CV connected to the LFO/SWEEP jack can modify the LFO Rate from .08 Hz to 20 Hz.
To hear the effect of the LFO on the MuRF’s filters, return to the basic setup outlined in figure 5, then move the LFO slider switch to "ON". Now as you play through the MuRF, you’ll hear the filters swept up and down automatically.
Envelope Generators
Now that we have explained the MuRF’s filters, let’s proceed with some more definitions to explain the Animation function.
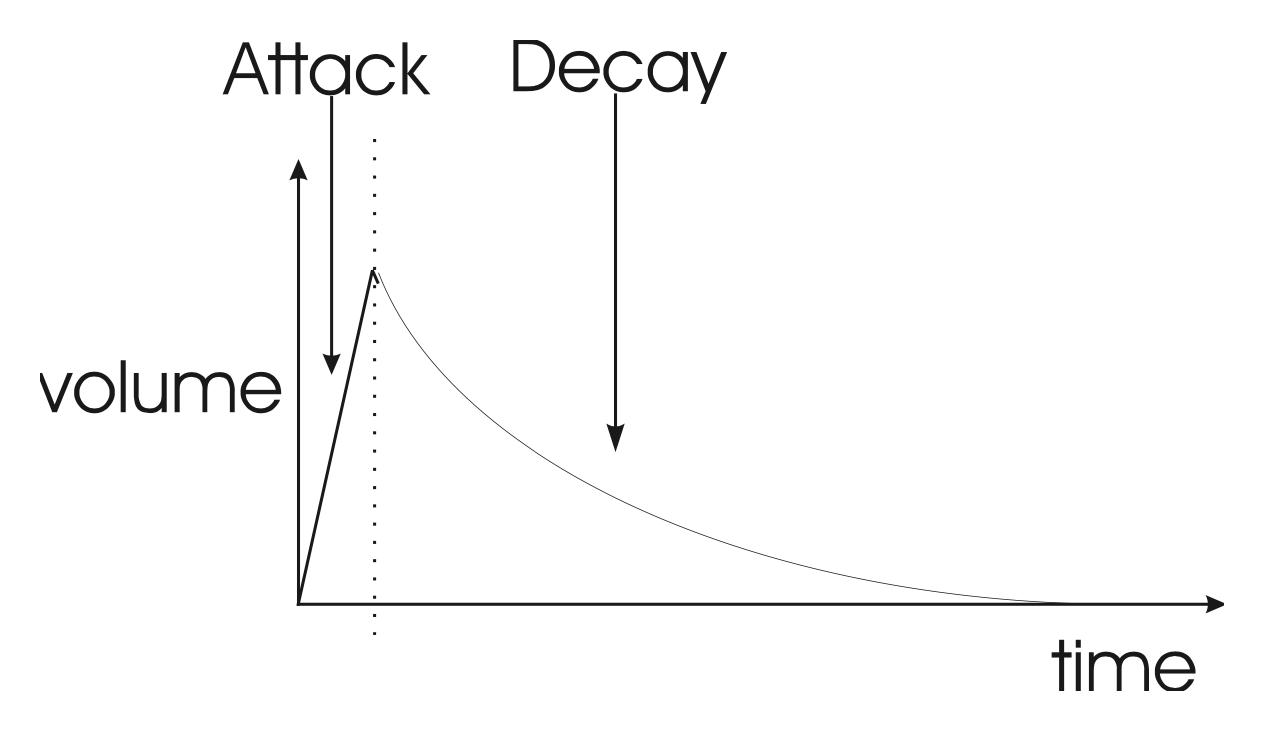
The term "Envelope" is used to describe the changes that occur to a musical sound, from its start to its end. A musical sound can have a rapid onset, like the plucking of a string or the striking of a drum. It can also have a gradual onset, like a slowly bowed violin. With the term "Envelope", the shape of the start of a sound is called the "Attack". The end of a sound can have different shapes as well – it can be abrupt, like on an organ, or it can be very gradual, fading out like a piano note held down. The shape of the end of a musical sound is called "Decay". Both Attack and Decay are time-related, and can be measured in seconds or milliseconds.
An "Envelope Generator" is a circuit that produces a control voltage that corresponds to the shape of a musical sound’s envelope. The signal that comes out of an Envelope Generator is sent to a control, such as volume, and is used to automatically turn up and down the volume to shape the start and end of a musical sound. An Envelope Generator is started by a trigger - a signal used to start the envelope shape.
In the MuRF, there are 8 Envelope generators, one for each filter, that shape the Volume of that Filter’s signal. The shapes of the Envelopes are all determined by the setting of the ENVELOPE Control. The timing and sequence of the Envelopes is determined by the PATTERN selected. To understand that, let’s continue.
Sequencers and Pattern Generation
A Sequencer is used to generate reoccurring rhythmic patterns, often by triggering sequences of notes in synthesizers or drum machines. However, sequencers can be used for purposes other than triggering notes - they can be set up to create reoccurring changes of timbre as well. Vintage sequencers were typically designed so there were a certain number of "steps". The term "step" refers to the individual components of a pattern. For instance in a bar of music in 4/4 you have four quarter notes. If the rhythmic activity is no more complicated than quarter notes, this would correspond to four steps. In vintage analog sequencers, a sequencer typically had eight or sixteen steps available to build a pattern.
In its simplest form, as a sequencer plays back its steps, each step can be programmed to send a trigger signal, or step can be passed over like a musical rest. The trigger signals can then be used to trigger envelope generators according to the way each step is programmed - creating a rhythmically reoccurring pattern.
Animation
The MuRF’s Animation contains a simple 8-channel sequencer, one channel for each filter, each capable of triggering an Envelope Generator that shapes the volume of the filter. In a Pattern, each channel can be up to 64 steps long, and each channel can have a unique number of steps. The MuRF Pattern Editor (in the SETTINGS menu - see below) allows the user to customize most of the Patterns in the MuRF. For each step, on each channel of a pattern, the corresponding filter’s envelope can be triggered or paused. The ENVELOPE control morphs through different envelope shapes as you turn it, creating effects that are highly rhythmic in nature, or are swirling and ethereal. The RATE control sets the speed of the pattern. The patterns, selected by the PATTERN selector rotary switch in conjunction with the FREQ slider switch, have been selected to provide a useful variety of rhythmic timbral effects. There are a total of 24 patterns, arranged in two banks of 12: one bank for the BASS voicing and one for the MIDS voicing. Note that pattern 1 and 13 are fixed as having no Animation and can not be modified by the user.
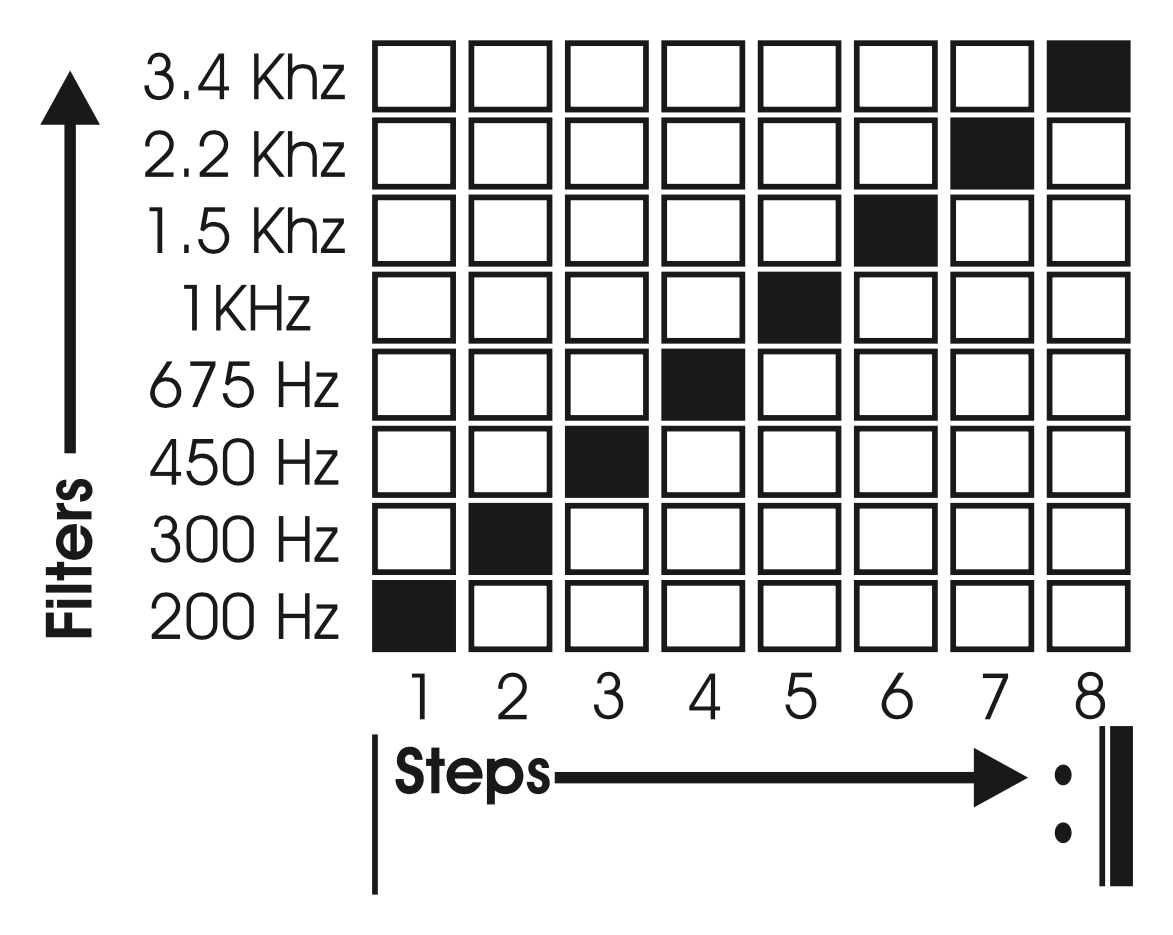
An easy way to understand the Animation is to look at a simple pattern displayed on a grid. This figure shows a graphic representation of pattern 2 in the MIDS setting. The columns going left to right are the steps of the pattern. The rows going from bottom to top are the individual filters.
Return to the basic panel setup at the beginning of the manual, which features Pattern 2. As you play your instrument through the MuRF, pay attention to the sound of the effect and how it corresponds to steps of the pattern. You should hear the Animation "stair-stepping" through the filters. Turn the RATE control up and down and notice how the pattern speeds up and slows down.
Now it’s time to explore the ENVELOPE Control - one of the most powerful parts of the MuRF.
- With the ENVELOPE Control set at 2, you should hear each of the filters with a sharp attack and a decay that fades out smoothly but quickly.
- Turn the ENVELOPE control to 0 as you play through the MuRF. The effect sounds much choppier - the decay time has been decreased.
- Now turn the ENVELOPE control up to 5. The effect now sounds smooth - the attack is the same time as the decay - like a tremolo effect.
- Turn the ENVELOPE control to 6. The effect becomes swirly and the transitions from filter to filter blurred, as the Attack and Decay become so long that the effect is crossfading from one filter to the next.
- Finally, turn the ENVELOPE control up to 8. The effect now sounds "backwards" as the attack time is now smooth but fast, and the decay is abrupt.

What happens as you change the ENVELOPE control is that the shape of the Envelopes controlling the gain of the filters morphs. Figure 11 shows the changes to the envelope times at different settings of the Envelope control. The Envelope times also change as the RATE changes. Faster RATE settings decrease the envelope times and slower RATE settings increase the envelope times. This makes the MuRF capable of both rhythmic and smooth-changing, swirling effects. Spend some time to get to know how this control interacts with the different patterns and you will be rewarded with some very interesting sounds!
The Audio Level Controls
The DRIVE control adjusts the signal level at the MuRF’s input. With this control you can set the right input level for virtually any instrument or line-level signal source. Turn this control counterclockwise for strong input signals, and clockwise for weaker sound sources.
The DRIVE light tells how strong the input signal is after being adjusted by the DRIVE control. As the signal level increases, the light goes from off, to green, to yellow, and finally to red. Very weak signals do not light up this light at all. When the light is green, the signal is below the level that results in audible distortion. When the light is yellow, some low order distortion may be audible, giving the sound a subtle warm analog quality. When the signal is strong enough to drive the light into the red, the distortion at the output becomes stronger and more distinctly audible. Watch this light when you set the DRIVE control for the desired effect. Using the distortion generated by the DRIVE control in some cases can help make the MuRF’s filters sound stronger as distortion adds harmonics to the input signal.
By clicking the LINK button next to the OUTPUT knob, you can link the DRIVE and OUTPUT knobs to move in opposite directions while adjusting one of them. You can turn up DRIVE to distort the input and introduce harmonics, while, with LINK enabled, the OUTPUT will simultaneously turn down to keep the overall level consistent.
The MIX control is used to balance the dry and effected signals when the MuRF is active. At full counter clockwise, the output signal is the dry signal, as modified by the DRIVE control. At mid-position, the balance of dry and wet signals is 50%/50%. At full clockwise position, the output signal comes from only the MuRF’s filters.
The OUTPUT control adjusts the strength of the MuRF’s output signal. Use this control to balance the MuRF’s signals with the bypassed signal. Note that neither the DRIVE nor the OUTPUT controls affect the strength of the bypassed signal.
Switches
RESET – Clicking the RESET switch resets the current pattern in the pattern generator back to step 1.
ACTIVE – Controls whether audio input is sent into the delay line. When the ACTIVE light is green, the delay is active. When the ACTIVE light is off, the audio input is passed directly to the output and is not sent into the delay line.
NOTE: When the effect is not active, the CV outputs still continue working, to fully disable the pedal, use the bypass feature that your DAW provides
SYNC – Enables the MF-105S pattern generator to sync to the project tempo. When the SYNC light is on, the RATE knob selects beat-synchronized divisions of the master tempo for the pattern generator. When the SYNC light is off, the pattern generator is free-running and the RATE knob sets the rate in Hz (cycles per second).
ADVANCED PLUG-IN FEATURES
Modulation Inputs
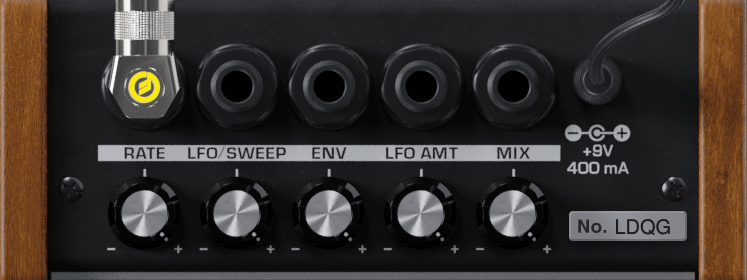
The original Moogerfooger effects provided input jacks for voltage control of the parameters, using expression pedals or other control voltage (CV) sources connected in classic modular synth style. The MF-105S brings this dynamic connection concept to the world of plug-ins, by providing virtual “CV Ins” which you can connect between any instances of any Moogerfooger Effects Plug-ins within your project.
NOTE: CV connections are stored in your DAW project, but not in the presets of each Moogerfooger Effects Plug-in.
The MF-105S offers CV Inputs to modulate Rate [RATE], the rate of the LFO with LFO switch ON (or to sweep the frequencies of the filters when it is OFF) [LFO/SWEEP], LFO Amount when LFO switch is ON [LFO AMT], Envelope [ENV], and Mix [MIX]. Click on one of these CV IN jacks to see the connection options which are available.
TIP: As with the original Moogerfoogers, you can connect a pedal to itself to create more interesting sonic interactions than what's available on the front panel!
A list of all Moogerfooger Effects Plug-in instances which are active will appear in the drop-down menu, as well as the modulation sources they provide. Each plug-in instance is identified on this menu by a unique, randomly generated four-letter code. The same code is displayed on the “back panel” UI of the plug-in itself, in the lower right corner of the CV Input jack panel. This allows you to distinguish between multiple instances of the same plug-in. Choose any modulation source to make a connection.
The strength of the selected modulation is controlled by a bipolar knob below each CV IN jack, with zero (no modulation) in the center, increasing positive modulation if you turn the knob to the right, and increasing negative modulation if you turn the knob to the left.
TIP: Double clicking on the attenuator knob will reset it to zero.
Above the list of Moogerfooger Effects Plug-in instances are a handful of additional options and input sources:
- None - will remove any connections currently made to this CV input.
- Bipolar - will be available as an option if the chosen modulation source (an LFO for example) can be bipolar - centering the modulation around the current knob value.
- DC - provides a DC offset that you can scale with the associated attenuator. Since the CV attenuator itself can be automated or MIDI mapped, you can use this like an expression pedal. It will provide the same range of automation/modulation to a parameter regardless of any presets you choose.
- Side Chain - allows you to use an independent audio signal from another track as a modulation input. You can select either the Left or Right Input from stereo signals. Your host software will see the Side Chain Input as an additional input to the plug-in, which you can connect to the audio source of your choice.
NOTE: The CV side chain is designed to take DC-coupled analog or digital CV signals - regular audio signals might yield surprising results.
Visualizing Modulation
Making a CV connection will insert a virtual 1/4" cable into the top of your Moogerfooger (which can also be seen when you expand to see the back panel by clicking "CV" or the row of jacks across the top of the pedal). The incoming modulation signal will be seen in yellow on the connector. Additionally, the knob corresponding to the parameter being modulated (if present - not all parameters have a corresponding knob) will show a white circle indicating the current value due to modulation.
Settings
MODE
The MF-105S allows for routing of the 8 MuRF filters to the Left and Right channels in alternation fashion - to create stereo effects as in the original MF-105. With output MODE switched to MONO, the outputs for all 8 MuRF filters will appear at both the left and right channels. Switched to STEREO, half of the filters are sent to the Left channel and half to the Right channel. Figure 12 shows the MIDS frequency response of the Left and Right outputs in STEREO. Note that the odd-numbered filters are sent to the Left channel, and the even-numbered filters are sent to the Right channel. This allows for spreading a sound’s frequencies between two speakers.
ENVELOPE PEAKS
SHARP preserves the original envelope shapes of the MF-105. PRONOUNCED adds a very short hold phase after the envelope attack to make the peaks a bit more pronounced.
ENVELOPE MODE
ORIGINAL features the original MF-105 envelope shapes. ALTERNATE provides a different selection of envelopes that opens the MuRF to new sounds.
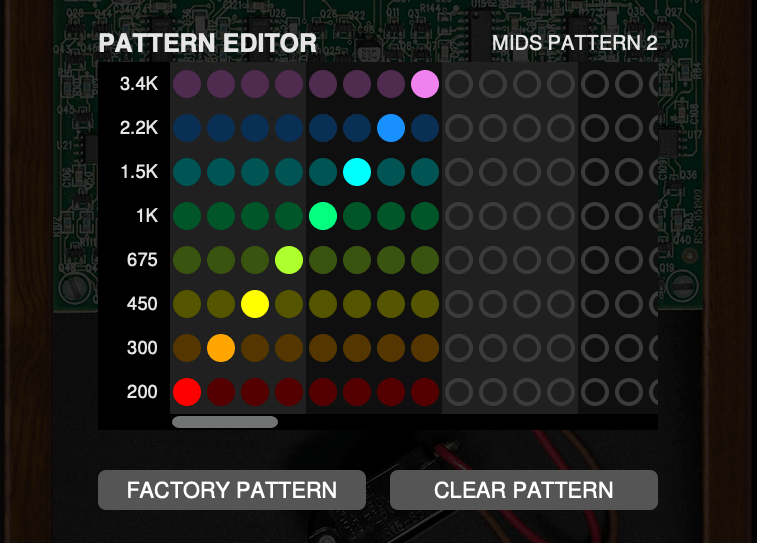
PATTERN EDITOR
The PATTERN EDITOR will show the current animation pattern depending on the FREQ switch and the PATTERN rotary selector. You can edit the pattern by simply enabling or disabling the trigger for each of the corresponding filter on every step of the pattern - left click on the step to toggle it on or off. Right click or CTRL click on a step to set it as the last step for that particular filter band - each band can have an arbitrary number of steps.
Click FACTORY PATTERN to reset your changes back to the stock pattern.
Click CLEAR PATTERN to turn all the steps off.
Additional UI Interactions
Double-click any control to reset it to its default position.
Hold the CTRL key while adjusting any knob for more precise fine-tuning.
PRESETS
In addition to your host software’s plug-in preset management system, the MF-105S provides an easy-to-use, built-in browser for selecting and saving presets.
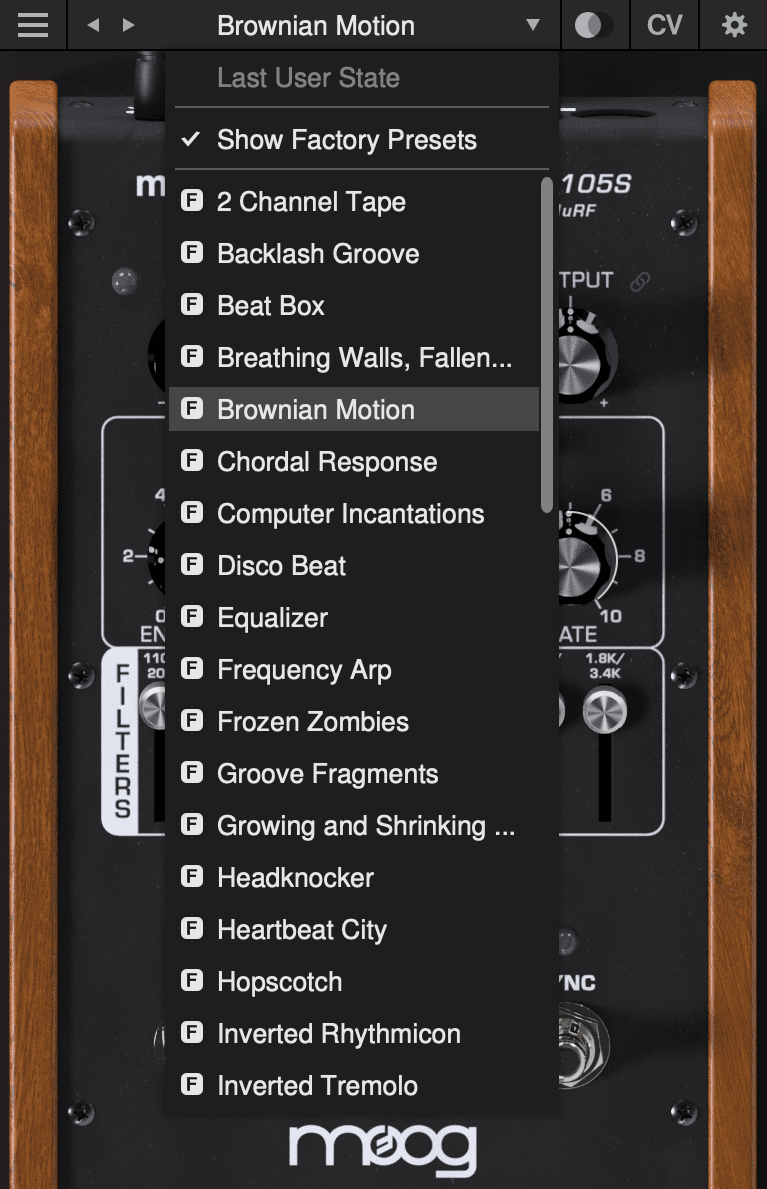
The currently selected preset name is shown at the top of the plug-in UI window. Click the left and right arrows to the left of the preset name to scroll through the preset list. Click the down arrow to the right of the preset name to expand the list and view all presets.
Last User State
The top option on the preset drop-down menu is Last User State. If you load a preset at a time when you had made changes to the plug-in settings which were not saved, your unsaved changes are automatically saved as the Last User State. This allows you to easily compare an existing preset with some new settings which you are still dialing in, or to go back after a preset change without losing your work. Only the most recent unsaved User State is captured in this way. An unsaved User State is indicated by an asterisk (*) to the left of the active preset name.
Show Factory Presets
Some people love the convenience of factory presets; others prefer to use only their own custom settings in their music. You can choose to hide the factory presets and show only your own original presets in this drop-down list by unchecking Show Factory Presets. If Show Factory Presets is checked, then all presets including the factory set will appear in the list. Factory presets are indicated by an F icon to the left of the preset name.
Compare Switch
Directly to the right of the preset drop-down is the Compare switch, which switches between the last loaded state and the last changed state. Load a preset, play around with it, and then click the Compare switch to toggle between the preset loaded and your most recent modifications to it.
Presets Menu
- Init Preset – creates a new INIT preset as a starting point for sound design.
- Save Preset – saves the current state to the currently-active preset. Overwrites the previous state of that preset.
- Save Preset As… – saves the current state as a new preset with a new name.
- Delete Current Preset – deletes the currently-active preset. Factory presets cannot be deleted in this way.
NOTE: You can also drag and drop preset files onto the plug-in UI to import them automatically.
- Export State - allows you to choose any folder in your computer’s file system and save the current plug-in state as a new preset in that location (Save Preset and Save Preset As will automatically place saved presets in the plug-in’s own Presets folder).
- Open Presets Folder - opens the plug-in’s Presets folder on your system’s desktop (Finder or File Explorer).
- Open Manual - opens this manual in your web browser.
- Contact Us For Help - opens the Moog Music customer service website.
SUPPORT
Moogerfooger Effects Plug-ins are designed for macOS 10.13 / Windows 10 systems or newer.
VST3, AudioUnits, and AAX plug-in formats are supported.
Should you experience any issues with your Moogerfooger, please contact [email protected].