moogerfooger
USER'S MANUAL
CLUSTERFLUX
WELCOME
Welcome to the world of the Moogerfooger® Effects Plug-ins, a re-invention of Bob Moog’s classic analog effects modules using DSP artistry to bring the legendary performance and musicality of the original hardware effects to your digital music production environment.
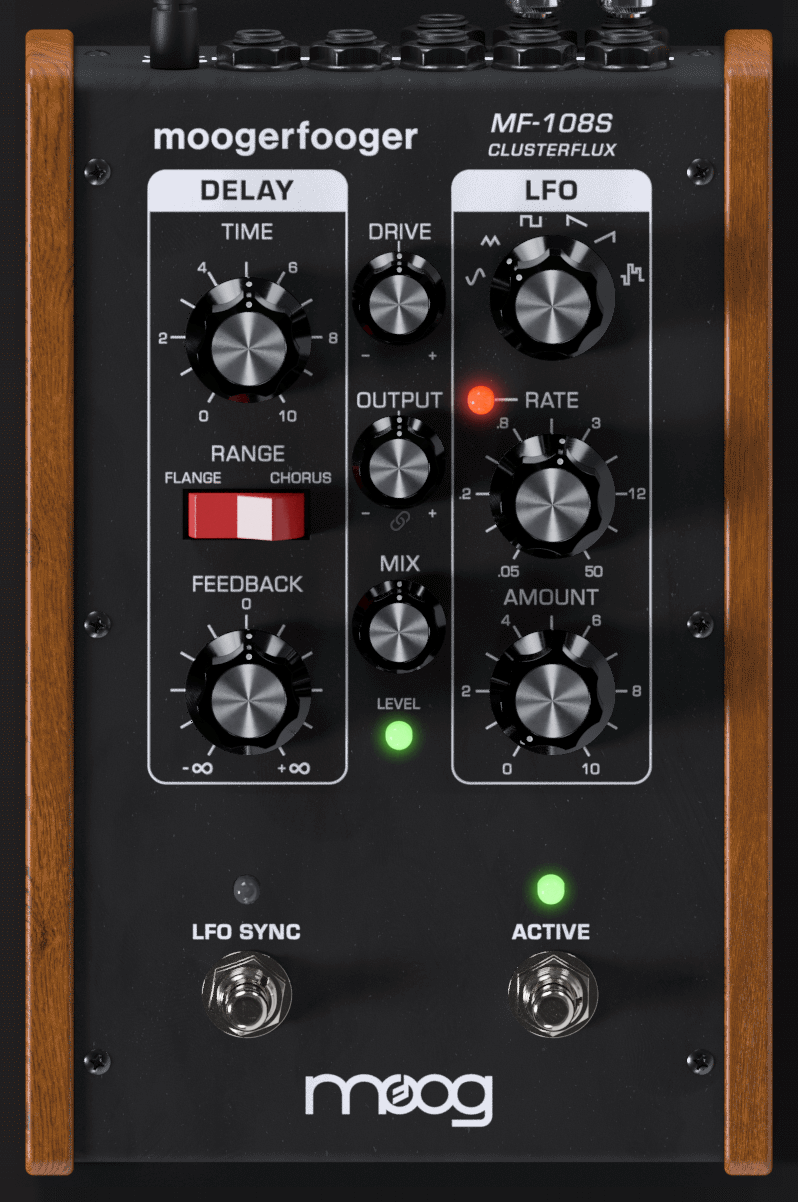
The MF-108M Cluster Flux, introduced in 2011, was a direct descendent of the original Moog modular synthesizers. It contained several complete modular synth functions: a dual-range Bucket Brigade Device (BBD) delay line designed for very short delay times and a multi- waveform Low Frequency Oscillator (LFO) capable of modulating the delay line for a variety of effects including Chorus, Flanging and Vibrato. All performance parameters were voltage-controllable as well as controllable via MIDI, and control voltage outputs meant that the MF-108M could be used with other Moogerfoogers or voltage controlled devices.
The MF-108S retains this same design, with all parameters able to be played, tweaked, automated and modulated to create lively and truly musical performances. The MF-108S captures not only the subtle swirling and intense flanging sounds of the original, but also the organic way in which the parameters interact to create a musical playing experience. Adding a Moogerfooger effect to your sound invites exploration and experimentation to bring your unique musical expressions to life.
GETTING STARTED
In your Digital Audio Workstation (DAW) software, place the MF-108S plug-in on an instrument or audio track. Explore the sounds of your new Cluster Flux with the following examples, and note that low-pitched, sustaining sounds with a bright timbre will work best to learn the variety of sounds available. Because the Cluster Flux was designed with far more range control than traditional Flanger and Chorus devices, you will discover a much larger palette of tones and effects.
Classic Flanging
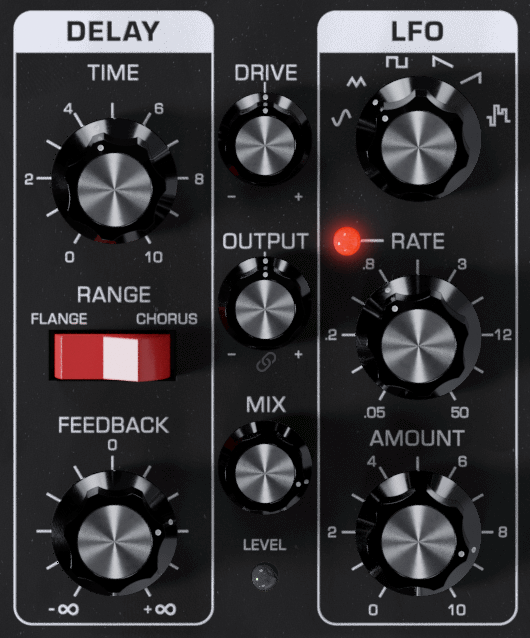
This effect features an up-and-down modulation of the input signal. Some describe it as a whooshing or jet plane sound.
- Move TIME left to raise flanging frequency and right to lower it
- Try negative FEEDBACK for a lower pitched, hollow flange
- For best flanging results MIX control should be mostly wet
- As RATE increases, try decreasing the AMOUNT for more musical results
Classic Chorus
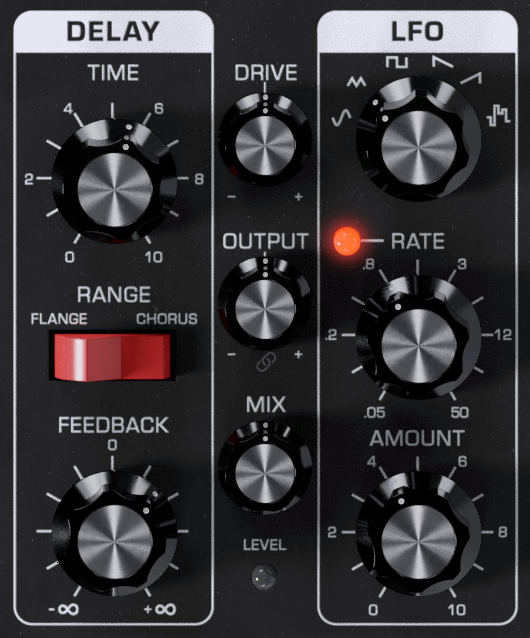
This effect features a subtle up-and-down modulation of the input signal’s pitch. With a 50-50 mix of wet and dry signal, the result is a lush, swirling tone.
- Longer TIME settings cause a more audible pitch modulation
- Adding FEEDBACK to a Chorus effect gives it a metallic edge
- For best results MIX should be set to center position
- As RATE increases, try decreasing the AMOUNT for more musical results
Vibrato
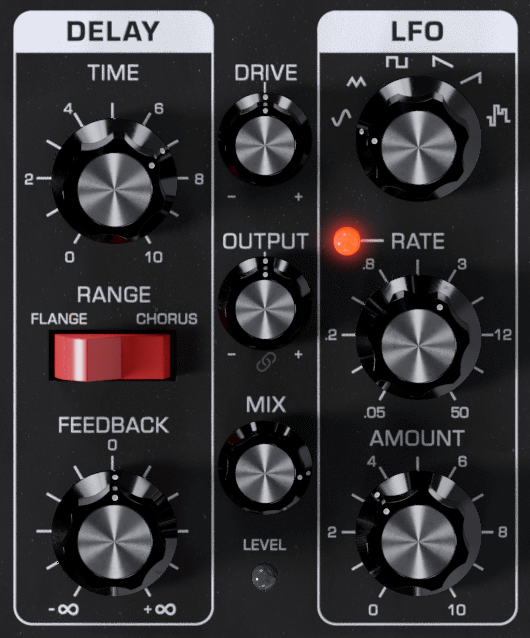
This effect features a slight up-and-down modulation of the input signal’s pitch monitoring only the wet signal.
- Adding FEEDBACK to vibrato gives it a metallic edge
- The sine wave offers the most natural finger vibrato sound
- Increasing the RATE modifies the speed of up and down vibrato. This will also increase the audible pitch modulation
- As RATE increases, try decreasing the AMOUNT for more musical results
Random Flange
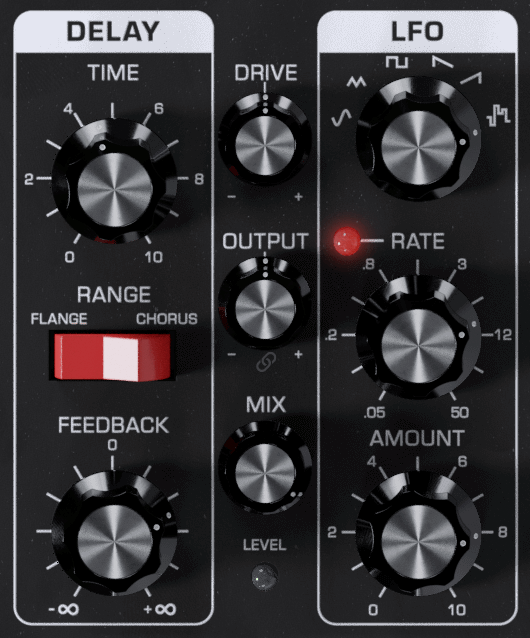
This effect features a rhythmic random LFO step modulation of the flange effect.
- Negative FEEDBACK gives this effect a deeper and more hollow tone
- The LFO waveform rotary switch set to random produces a random level each LFO cycle
- The MIX control should be set to mostly wet for flange effects
Square Wave Chorus
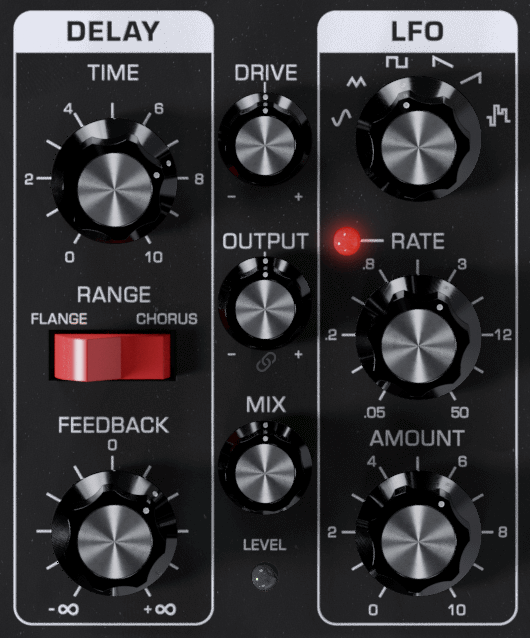
The LFO square wave can be used for creative rhythmic and pitch modulation effects. This effect features a sudden up-and-down modulation of the input signal’s pitch, with a 50-50 mix of wet and dry signal.
- Tune the TIME control in conjunction with the AMOUNT for a harmonic trill effect
- •Adding FEEDBACK will increase retention of pitch modulation with sudden changes of the square wave modulation
- •For best Chorus results, MIX control should be set to center position
Ramp Wave Pitch Mod
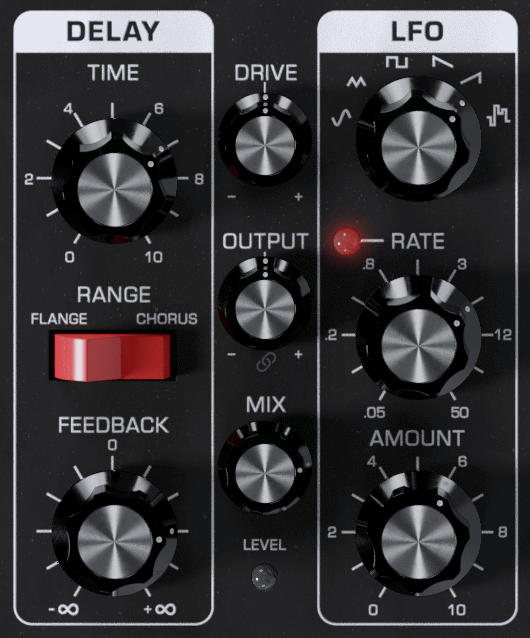
The LFO Ramp wave can be used for creative rhythmic pitch cluster effects. This unusual effect features a rising modulation of the pitch followed by a sudden drop.
- Tune the TIME control in conjunction with the AMOUNT and RATE controls for the desired range of pitch modulation.
- Adding FEEDBACK will increase retention of pitch modulation
- Be sure to try the Sawtooth wave with these settings
- Set MIX to mostly wet
TOURING THE FRONT PANEL
The Delay Section

The TIME control sets the length of Delay from the BBD delay line based on the Range switch setting. In Flange Mode, with AMOUNT set to 0, the Delay Time changes from .5 msec to 10 msec nominal. In Chorus mode this change is 5 msec to 50 msec nominal.
The RANGE switch sets the range of delay times available to the TIME control. Flange selects a range of shorter delay times while Chorus selects a range of slightly longer delay times.
The FEEDBACK control sets the amount of delay output fed back into the input of the delay. In Flange Mode, this is used to increase the sharpness and intensity of peaks in the frequency response of the comb filter. Both Positive and Negative Feedback are available, with zero feedback at mid-position.
In Flange Mode, Positive Feedback emphasizes all the harmonics of a fundamental frequency equal to the inverse of the Delay Time – For instance 10 msec of delay creates a comb filter with a fundamental frequency of 100 Hz and emphasis at 200 Hz, 300 Hz, 400 Hz, 500 Hz, etc. Negative Feedback shifts the frequency response spectrum down by one octave which causes only odd harmonics to be emphasized. For instance, a 10 msec delay time with negative feedback creates a comb filter with a fundamental frequency of 50 Hz and harmonic emphasis at 150 Hz, 250 Hz, 350 Hz, 450 Hz, etc.
In Chorus mode, because the delay time is usually longer than the time period of the fundamental frequency of the input signal, the difference in tone between positive and negative feedback is much less noticeable.
WARNING: The Cluster Flux Feedback control is designed to drive the delay line into self-oscillation. Tones produced by self-oscillating feedback may be much stronger than normal signal levels, so watch your speakers and ears. Oscillation typically begins at the 4th indicator lines both left and right of the Feedback control’s mid position.
The LFO Section

The WAVEFORM control selects the LFO waveform for modulation of the Delay Time. There are six waveforms available: Sine, Triangle, Square, Sawtooth, Ramp and Random Stepped waveforms. Note that with LFO Amount at zero, no modulation will be heard.
The RATE control sets the frequency of modulation of the Delay line by the LFO. The Rate can be varied from .05 Hz to about 50 Hz. The LFO Rate LED indicates both the rate and waveform of the current LFO settings.
The AMOUNT control sets the overall amount of modulation of the delay time by the LFO.
Audio and Level Control

The DRIVE, OUTPUT, and MIX controls and the LEVEL light are all part of the audio level and mixing circuitry.
The DRIVE control adjusts the input gain. With this control you can set the correct input gain for virtually any instrument or audio source. Turn this control counterclockwise for strong input signals, and clockwise for weaker sound sources. High DRIVE levels can also introduce saturation and distortion, with the warm analog crunch of the original Moogerfooger input amplifier stage. The DRIVE circuit also influences the ENVELOPE follower, with higher DRIVE settings resulting in more powerful ENVELOPE follower results.
The LEVEL light tells how strong the input signal is after being adjusted by the DRIVE control. As the signal level increases, the light goes from off, to green, to yellow, and finally to red. Very weak signals do not light up this light at all. When the light is green, the signal is below the level that results in audible distortion. When the light is yellow, some low order distortion may be audible, giving the sound a subtle warm analog quality. When the signal is strong enough to drive the light into the red, the distortion at the output becomes stronger and more distinctly audible. Watch this light when you set the DRIVE control for the desired effect.
By clicking the LINK button below the OUTPUT knob, you can link the DRIVE and OUTPUT knobs to move in opposite directions while adjusting one of them. You can turn up DRIVE to distort the input and introduce harmonics, while, with LINK enabled, the OUTPUT will simultaneously turn down to keep the overall level consistent.
The MIX control crossfades from the input signal (after the DRIVE stage) to the filtered signal. Use this control to get any mixture of filtered and unfiltered sound.
Switches
LFO SYNC – Enables the LFO rate to sync to the project tempo. When the LFO SYNC light is on, the LFO RATE knob selects beat-synchronized divisions of the master tempo for the LFO rate. When the LFO SYNC light is off, the LFO is free-running, and the RATE knob sets the LFO speed in Hz (cycles per second).
ACTIVE – Controls whether audio input is sent into the delay line. When the ACTIVE light is green, the delay is active. When the ACTIVE light is off, the audio input is passed directly to the output and is not sent into the delay line.
NOTE: When the effect is not active, the CV outputs still continue working, to fully disable the pedal, use the bypass feature that your DAW provides
ADVANCED PLUG-IN FEATURES
Modulation Inputs
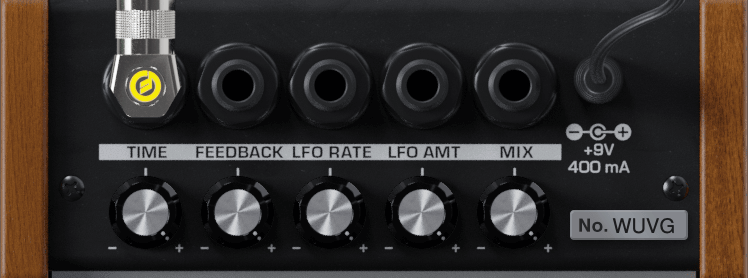
The original Moogerfooger effects provided input jacks for voltage control of the parameters, using expression pedals or other control voltage (CV) sources connected in classic modular synth style. The MF-108S brings this dynamic connection concept to the world of plug-ins, by providing virtual “CV Ins” which you can connect between any instances of any Moogerfooger Effects Plug-ins within your project.
NOTE: CV connections are stored in your DAW project, but not in the presets of each Moogerfooger Effects Plug-in.
The MF-108S offers CV Inputs to modulate Delay Time [TIME], Feedback [FEEDBACK], LFO Rate [LFO RATE], LFO Amount [LFO AMT], and Mix [MIX]. Click on one of these CV IN jacks to see the connection options which are available.
TIP: As with the original Moogerfoogers, you can connect a pedal to itself to create more interesting sonic interactions than what's available on the front panel!
A list of all Moogerfooger Effects Plug-in instances which are active will appear in the drop-down menu, as well as the modulation sources they provide. Each plug-in instance is identified on this menu by a unique, randomly generated four-letter code. The same code is displayed on the “back panel” UI of the plug-in itself, in the lower right corner of the CV Input jack panel. This allows you to distinguish between multiple instances of the same plug-in. Choose any modulation source to make a connection.
The strength of the selected modulation is controlled by a bipolar knob below each CV IN jack, with zero (no modulation) in the center, increasing positive modulation if you turn the knob to the right, and increasing negative modulation if you turn the knob to the left.
TIP: Double clicking on the attenuator knob will reset it to zero.
Above the list of Moogerfooger Effects Plug-in instances are a handful of additional options and input sources:
- None - will remove any connections currently made to this CV input.
- Bipolar - will be available as an option if the chosen modulation source (an LFO for example) can be bipolar - centering the modulation around the current knob value.
- DC - provides a DC offset that you can scale with the associated attenuator. Since the CV attenuator itself can be automated or MIDI mapped, you can use this like an expression pedal. It will provide the same range of automation/modulation to a parameter regardless of any presets you choose.
- Side Chain - allows you to use an independent audio signal from another track as a modulation input. You can select either the Left or Right Input from stereo signals. Your host software will see the Side Chain Input as an additional input to the plug-in, which you can connect to the audio source of your choice.
NOTE: The CV side chain is designed to take DC-coupled analog or digital CV signals - regular audio signals might yield surprising results.
Visualizing Modulation
Making a CV connection will insert a virtual 1/4" cable into the top of your Moogerfooger (which can also be seen when you expand to see the back panel by clicking "CV" or the row of jacks across the top of the pedal). The incoming modulation signal will be seen in yellow on the connector. Additionally, the knob corresponding to the parameter being modulated (if present - not all parameters have a corresponding knob) will show a white circle indicating the current value due to modulation.
Settings
TYPE
The TYPE setting determines how delay feedback is handled between the left and right stereo channels. ECHO gives a normal stereo delay where left and right channels are separate and have the same delay time. PING-PONG creates an effect where the delayed signal seems to bounce alternately between left and right channels.
TONE
The TONE setting affects the EQ, filtering, and grittiness of the delayed audio signal. The original MF-108 hardware used analog Bucket Brigade Devices (BBDs) driven by an analog clock, where the clock frequency was low enough to be in the audible range (around 1.7 to 3 kHz). As a result, heavy filtering needed to be applied to the delayed audio in order not to hear the clock signal bleeding through. This gave the original MF-108 its characteristic tone, which is reproduced in the MF-108S by the LEGACY setting. MODERN gives a bright and crisp, full-bandwidth delay sound, which still behaves in all the other organic and elastic ways we love about an analog effect.
TIMING
The TIMING setting will add slight instabilities to the BBD delay timing akin to analog oscillator drift when set to LOOSE. STRICT will remove those instabilities.
OUT OF PHASE
The Right Output of the original MF-108M Cluster Flux was shipped from the factory having a Mix of Dry signal and phase inverted Wet signal from the output of the BBDs. This is so the Left and Right outputs can be panned hard left and right for a very nice stereo effect. With the MF-108S plugin, you can choose which signal you would like to phase invert for different stereo effects: the RIGHT WET signal (stock MF-108M behavior), the RIGHT DRY signal, the LEFT WET signal or the LEFT DRY signal. BOTH WET will phase invert both the left and right wet signals, while ALL IN PHASE will not phase invert any of these signals.
LFO POLARITY
This setting determines whether the LFO is centered around zero, or if zero is the lowest point and the LFO is only positive. BIPOLAR causes the LFO to bend the delay time both slower and faster, relative to the delay time with no LFO applied. UNIPOLAR causes the LFO to bend the time only faster, such that the delay time when the LFO is at the lowest point in its cycle is the same as the unmodulated delay time (with no LFO applied).
Additional UI Interactions
Double-click any control to reset it to its default position.
Hold the CTRL key while adjusting any knob for more precise fine-tuning.
PRESETS
In addition to your host software’s plug-in preset management system, the MF-108S provides an easy-to-use, built-in browser for selecting and saving presets.
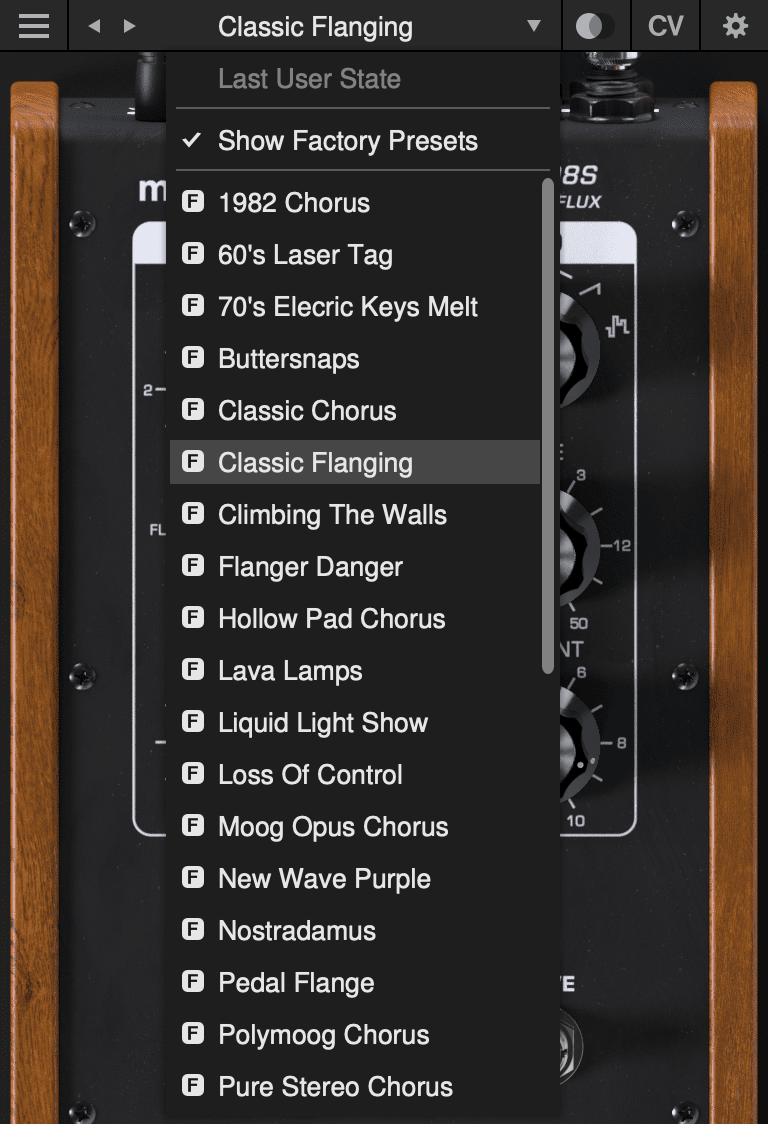
The currently selected preset name is shown at the top of the plug-in UI window. Click the left and right arrows to the left of the preset name to scroll through the preset list. Click the down arrow to the right of the preset name to expand the list and view all presets.
Last User State
The top option on the preset drop-down menu is Last User State. If you load a preset at a time when you had made changes to the plug-in settings which were not saved, your unsaved changes are automatically saved as the Last User State. This allows you to easily compare an existing preset with some new settings which you are still dialing in, or to go back after a preset change without losing your work. Only the most recent unsaved User State is captured in this way. An unsaved User State is indicated by an asterisk (*) to the left of the active preset name.
Show Factory Presets
Some people love the convenience of factory presets; others prefer to use only their own custom settings in their music. You can choose to hide the factory presets and show only your own original presets in this drop-down list by unchecking Show Factory Presets. If Show Factory Presets is checked, then all presets including the factory set will appear in the list. Factory presets are indicated by an F icon to the left of the preset name.
Compare Switch
Directly to the right of the preset drop-down is the Compare switch, which switches between the last loaded state and the last changed state. Load a preset, play around with it, and then click the Compare switch to toggle between the preset loaded and your most recent modifications to it.
Presets Menu
- Init Preset – creates a new INIT preset as a starting point for sound design.
- Save Preset – saves the current state to the currently-active preset. Overwrites the previous state of that preset.
- Save Preset As… – saves the current state as a new preset with a new name.
- Delete Current Preset – deletes the currently-active preset. Factory presets cannot be deleted in this way.
NOTE: You can also drag and drop preset files onto the plug-in UI to import them automatically.
- Export State - allows you to choose any folder in your computer’s file system and save the current plug-in state as a new preset in that location (Save Preset and Save Preset As will automatically place saved presets in the plug-in’s own Presets folder).
- Open Presets Folder - opens the plug-in’s Presets folder on your system’s desktop (Finder or File Explorer).
- Open Manual - opens this manual in your web browser.
- Contact Us For Help - opens the Moog Music customer service website.
SUPPORT
Moogerfooger Effects Plug-ins are designed for macOS 10.13 / Windows 10 systems or newer.
VST3, AudioUnits, and AAX plug-in formats are supported.
Should you experience any issues with your Moogerfooger, please contact [email protected].