moogerfooger
USER'S MANUAL
SATURATOR
WELCOME
Welcome to the world of the Moogerfooger® Effects Plug-ins, a re-invention of Bob Moog’s classic analog effects modules using DSP artistry to bring the legendary performance and musicality of the original hardware effects to your digital music production environment.
The MF-109S Saturator is a new software-only effect which emerged out of the development of the Moogerfooger Effects Plug-ins. A major component of each Moogerfooger is its input drive stage, which is able to add warmth, distortion, and crunch to a sound. During beta testing, it became clear that users wanted dynamic control over the drive circuit of the Moogerfoogers, and so the MF-109S was born.
The Saturator is able to move from tight, dynamic overdrive and analog saturation to smooth compression and expansion by pairing a wide range envelope follower with bipolar control over the unique drive circuit of the Moogerfooger Effects Plug-ins. Further, it models the noise generator circuit of the Minimoog Model D and allows for control of both noise generator level and noise tone with switchable filter type. The MF-109S Saturator's envelope follower and noise CV outputs and multiple CV inputs allow it to speak with all of the other Moogerfooger Effects Plug-ins.
All parameters of the MF-109S are able to be played, tweaked, automated and modulated to create lively and truly musical performances. Adding a Moogerfooger effect to your sound invites exploration and experimentation to bring your unique musical expressions to life.
GETTING STARTED
In your Digital Audio Workstation (DAW) software, place the MF-109S plug-in on an instrument or audio track. To start with, make sure the Envelope AMOUNT and NOISE ENV. AMOUNT knobs are set to zero (centered).
NOTE: In order for the MF-109S Saturator to converse with the rest of your Moogerfoogers via CV, they will need to be updated to version 1.0.2 or later. Please navigate to the Downloads area of moogmusic.com to update your Moogerfooger Effects Plug-ins.
With audio playing on that track so you can hear the effect, experiment with turning the DRIVE knob up and down. As with the other Moogerfooger effects, the DRIVE will amplify the input signal to the point of overdrive. You can turn down the OUTPUT (or use the LINK control - see below) to overdrive your sound while keeping its overall amplitude.
Next, turn the AMOUNT knob in the ENVELOPE section up to 6. You will notice that as the input level gets louder, the Saturator overdrives the input more. If the ENV LED is weak, raise the SENSITIVITY control - this will amplify the input into the envelope follower without affecting the audio signal in the effect chain, resulting in stronger, more pronounced envelope following as SENSITIVITY is raised. Watch the ENV LED as you play with the SENSITIVITY control until you see the envelope is nicely capturing the dynamics of the input signal. Experiment with the FOLLOW RATE - slower settings will result in a smoother following of the input, while faster settings will see the envelope follower ride the input much tighter.
With SENSITIVITY adjusted to get a nice, strong envelope follower signal out of the ENV LED, now try turning the AMOUNT knob counter-clockwise below zero - setting it to -6. Turn up the DRIVE knob a bit and you will now notice that as the input signal gets louder, the DRIVE is turned down, while during quieter parts of the input audio the DRIVE is turned up. This allows the Saturator to act as an overdriven compressor! Playing with the FOLLOW RATE will again provide lots of dynamic variation - similar to the DECAY setting on a compressor.
Now look to the NOISE section and increase the noise ENV. AMOUNT control above 0. Switch the rocker switch to WHITE and ensure the TONE control is fully clockwise - as you increase the noise ENV. AMOUNT you will hear white noise added to the signal and controlled by the envelope follower. In its initialized state the TONE filter is a lowpass filter, so play with the TONE control to roll off some of the high end, or switch to RED noise to hear the different characteristic sound of red noise. You can also go into the SETTINGS menu to switch the TONE filter to be either Lowpass, Bandpass, Notch, or Highpass and experiment with different TONE knob settings for each filter type.
TOURING THE FRONT PANEL
The Envelope Section
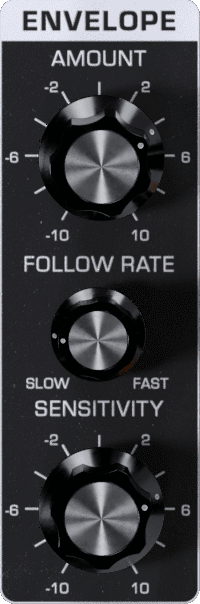
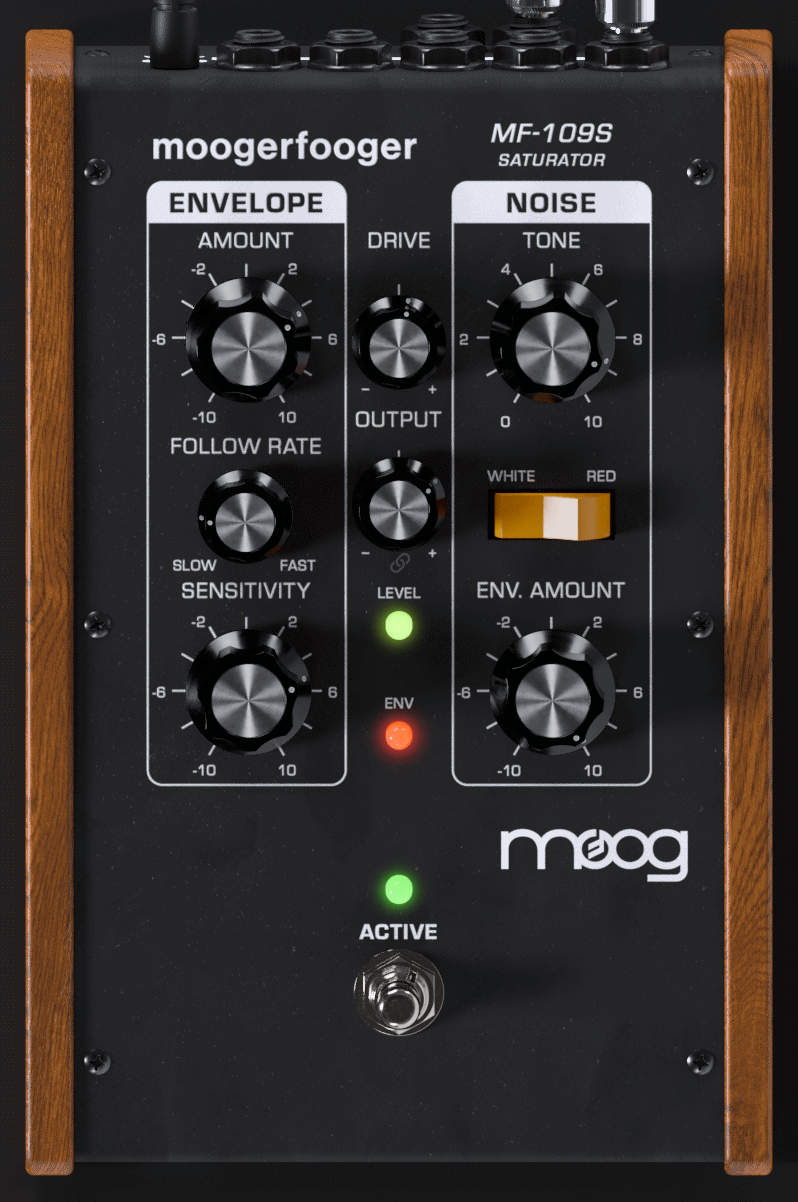
The AMOUNT knob, the FOLLOW RATE knob, the SENSITIVITY knob, and the ENV LED are all part of the ENVELOPE follower section.
The AMOUNT knob determines how much the envelope signal is used to open and close the DRIVE control. When AMOUNT is centered, the envelope signal has no effect on the drive. When the knob is clockwise, the envelope signal opens the filter the maximum amount when the envelope is strongest. When AMOUNT is negative (counterclockwise from center), the envelope acts in reverse, closing the drive in response to audio and opening again when the audio level decreases.
The FOLLOW RATE knob controls the smoothness of the envelope follower response. Some sounds (like guitar chords) have long, rough envelopes, and they often sound better if the envelope is smoothed out using the SLOW setting before going to the filter. Other sounds (like snare drum) are quick and sharp, and sound really good with the knob turned towards the FAST setting. The FOLLOW RATE is similar to the control on the MF-101S Lowpass Filter, but with a much wider range - going twice as slow as well as twice as fast (and everywhere in between).
TIP: By playing with the envelope follower rate, you can also capture and emphasize the "wrong" parts of your signal - shaping transients, or introducing fast dynamic motion on slow-moving pad sounds.
The SENSITIVITY knob controls how sensitive the envelope follower is to incoming audio. Whereas on the MF-101S you must increase the DRIVE to increase the signal into the envelope follower, on the MF-109S the SENSITIVITY control amplifies the audio signal going to the envelope follower without affecting the audio passing through the pedal. The SENSITIVITY knob is bipolar - amplifying the signal above 0 and attenuating it below 0. The resulting envelope signal is then sent to the envelope AMOUNT knob to scale how much the envelope opens and closes the DRIVE. The ENV LED shows how strong the envelope signal voltage (post SENSITIVITY control) is at any one time. The stronger the audio input, the brighter the ENV light will be.
The Drive Section

The DRIVE control sets the input sensitivity of the Saturator. The available gain is from -21dB to +21dB. The resulting envelope from the ENVELOPE section moves the DRIVE either up or down from the position of the DRIVE knob based on the envelope AMOUNT setting. The DRIVE is only active when the effect is ACTIVE.
The OUTPUT control sets the strength of the Saturator output at both the Left and Right Audio Outputs. This control is only active when the effect is ACTIVE. The Output Level control (-21dB to +21 dB) is designed so a boost, attenuation or no change can be achieved with any Drive setting.
By clicking the LINK button next to the OUTPUT knob, you can link the DRIVE and OUTPUT knobs to move in opposite directions while adjusting one of them. You can turn up DRIVE to distort the input and introduce harmonics, while, with LINK enabled, the OUTPUT will simultaneously turn down to keep the overall level consistent.
The linked output control will NOT respond to internal modulation of DRIVE via the ENVELOPE section - it will only move when the DRIVE knob is moved manually.
The LEVEL led indicates clipping when red. Yellow indicates the nominal signal level for best signal-to-noise ratio. Green indicates the presence of signal below the nominal level.
The ENV led displays strength of the envelope follower - from low (LED off) to high (LED bright red). This LED reflects the strength of the envelope after the SENSITIVITY control.
The Noise Section
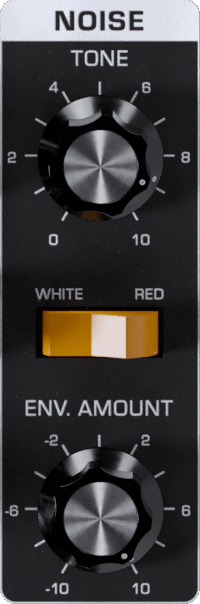
The noise section takes the Minimoog Model D noise generator and adds it on top of the signal (post DRIVE) - providing crispy high end or rumbling low end. The TONE knob, COLOR switch, and ENV. AMOUNT knob are all part of the noise section.
The TONE circuit is a 2 pole passive filter whose function depends on the filter type chosen in the SETTINGS menu - either Lowpass, Bandpass, Notch, or Highpass. Depending on the filter type, the TONE knob controls the filter frequency.
The COLOR switch chooses the color of noise sent to the TONE section. It is based on the Minimoog Model D noise generator, which provided WHITE noise in the audio path and RED noise when used in the modulation section. WHITE noise has a flat spectrum, while RED noise falls off by 6dB per octave (resulting in a noise signal with accentuated lower frequencies).
The ENV. AMOUNT knob controls the amount of the envelope follower signal sent to the noise generator VCA. The noise generator by default is silent - moving the ENV. AMOUNT knob clockwise above zero will use the envelope (post SENSITIVITY control) to raise and lower the amplitude of the noise. If the noise level is above zero due to external modulation into the NOISE CV jack on the rear, setting the ENV. AMOUNT knob counter-clockwise below zero will use the envelope follower to attenuate the noise level.
Switches
ACTIVE – Controls whether audio input is sent into the delay line. When the ACTIVE light is green, the delay is active. When the ACTIVE light is off, the audio input is passed directly to the output and is not sent into the delay line.
NOTE: When the effect is not active, the CV outputs still continue working, to fully disable the pedal, use the bypass feature that your DAW provides
ADVANCED PLUG-IN FEATURES
The MF-109S offers additional functionality beyond the panel controls. To access, click the Settings icon ![]() in the top right of the plugin window. Click the row of CV jacks across the top of the pedal or the "CV" button next to the Settings icon to display the “back panel” of the MF-109S, showing the modulation input controls.
in the top right of the plugin window. Click the row of CV jacks across the top of the pedal or the "CV" button next to the Settings icon to display the “back panel” of the MF-109S, showing the modulation input controls.
Modulation Inputs
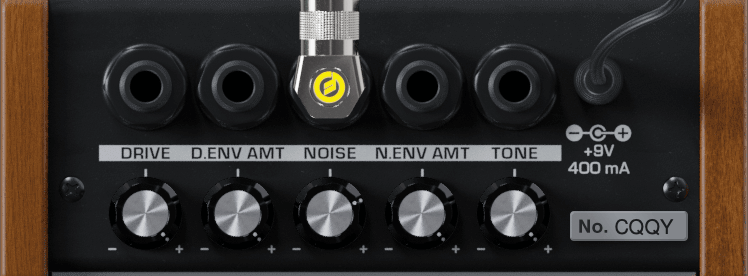
The original Moogerfooger effects provided input jacks for voltage control of the parameters, using expression pedals or other control voltage (CV) sources connected in classic modular synth style. The MF-109S brings this dynamic connection concept to the world of plug-ins, by providing virtual “CV Ins” which you can connect between any instances of any Moogerfooger Effects Plug-ins within your project.
NOTE: CV connections are stored in your DAW project, but not in the presets of each Moogerfooger Effects Plug-in.
The MF-109S offers CV Inputs to modulate Drive [DRIVE], Drive Envelope Amount [D. ENV AMT], Noise Level [NOISE], Noise Envelope Amount [N. ENV AMT], and Tone [TONE]. Click on one of these CV IN jacks to see the connection options which are available.
TIP: As with the original Moogerfoogers, you can connect a pedal to itself to create more interesting sonic interactions than what's available on the front panel!
A list of all Moogerfooger Effects Plug-in instances which are active will appear in the drop-down menu, as well as the modulation sources they provide. Each plug-in instance is identified on this menu by a unique, randomly generated four-letter code. The same code is displayed on the “back panel” UI of the plug-in itself, in the lower right corner of the CV Input jack panel. This allows you to distinguish between multiple instances of the same plug-in. Choose any modulation source to make a connection.
The strength of the selected modulation is controlled by a bipolar knob below each CV IN jack, with zero (no modulation) in the center, increasing positive modulation if you turn the knob to the right, and increasing negative modulation if you turn the knob to the left.
TIP: Double clicking on the attenuator knob will reset it to zero.
Above the list of Moogerfooger Effects Plug-in instances are a handful of additional options and input sources:
- None - will remove any connections currently made to this CV input.
- Bipolar - will be available as an option if the chosen modulation source (an LFO for example) can be bipolar - centering the modulation around the current knob value.
- DC - provides a DC offset that you can scale with the associated attenuator. Since the CV attenuator itself can be automated or MIDI mapped, you can use this like an expression pedal. It will provide the same range of automation/modulation to a parameter regardless of any presets you choose.
- Side Chain - allows you to use an independent audio signal from another track as a modulation input. You can select either the Left or Right Input from stereo signals. Your host software will see the Side Chain Input as an additional input to the plug-in, which you can connect to the audio source of your choice.
NOTE: The CV side chain is designed to take DC-coupled analog or digital CV signals - regular audio signals might yield surprising results.
Visualizing Modulation
Making a CV connection will insert a virtual 1/4" cable into the top of your Moogerfooger (which can also be seen when you expand to see the back panel by clicking "CV" or the row of jacks across the top of the pedal). The incoming modulation signal will be seen in yellow on the connector. Additionally, the knob corresponding to the parameter being modulated (if present - not all parameters have a corresponding knob) will show a white circle indicating the current value due to modulation.
Settings
ENVELOPE
The MF-109S is a true stereo effect, but if ENVELOPE is set to MONO (default), the drive on the left and right audio channels will be affected identically by the envelope follower. If ENVELOPE is set to STEREO, then the left and right audio channels will have their own separate envelope followers, each one following the dynamics of that channel. This provides independence to the motion of the stereo drive in response to the envelope follower.
RESPONSE
The RESPONSE setting controls the curve of the envelope follower as it rises and falls in response to the dynamics of the audio passing through the Saturator. EXPONENTIAL gives a sharper, faster response, while SMOOTH gives a slower, more rounded response. Different responses will work better or sound differently depending on the character of the sound you are running through the Saturator; experiment to find the motion that works best for your sound.
TONE
The TONE setting switches between four different filter types for the noise generator TONE shaper - Lowpass, Bandpass, Notch, and Highpass. All filters are modeled after 2 pole passive filters, giving a very smooth and non-resonant character to the noise shaping circuit. The TONE control acts as a filter cutoff frequency control depending on which filter type is selected.
NOISE
The NOISE setting, in mono, routes the same noise signal to both the left and right channels. If switched to STEREO, the noise signal is flipped 180 degrees out of phase between the left and right channels, giving a very interesting and pleasing stereo noise sound.
Additional UI Interactions
Double-click any control to reset it to its default position.
Hold the CTRL key while adjusting any knob for more precise fine-tuning.
PRESETS
In addition to your host software’s plug-in preset management system, the MF-109S provides an easy-to-use, built-in browser for selecting and saving presets.
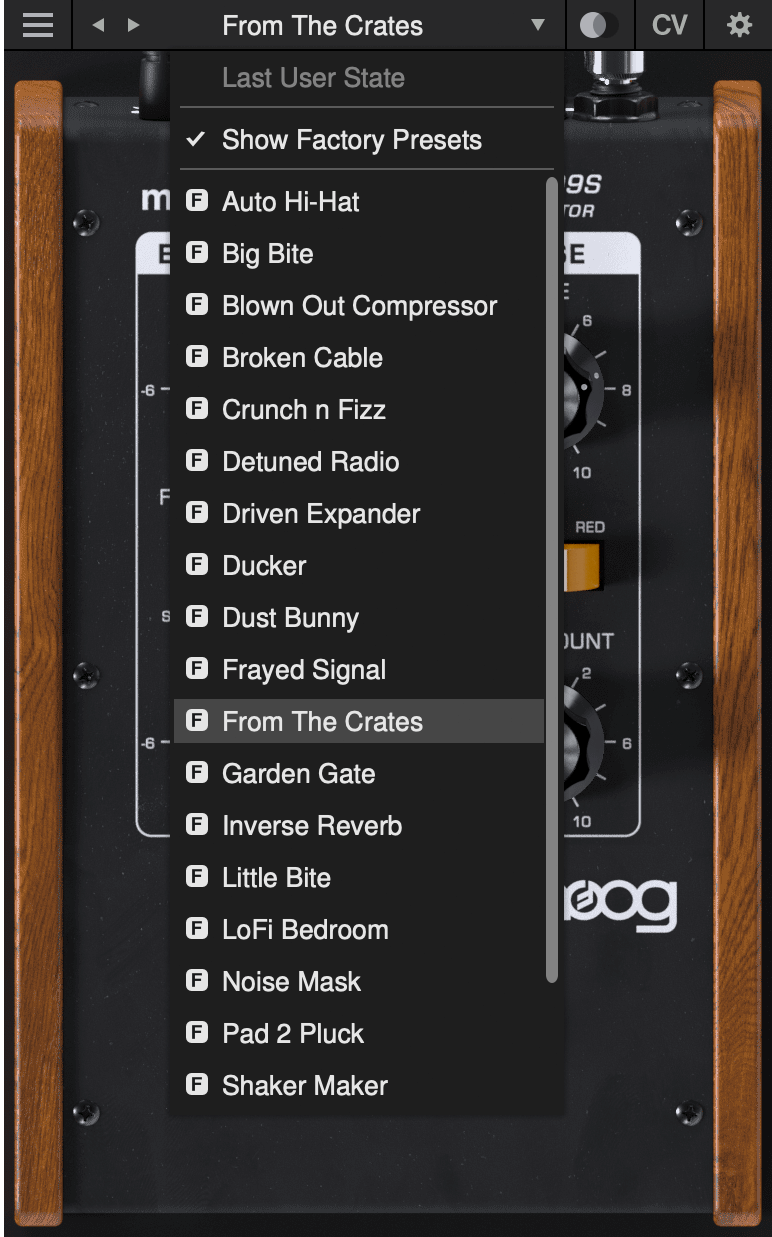
The currently selected preset name is shown at the top of the plug-in UI window. Click the left and right arrows to the left of the preset name to scroll through the preset list. Click the down arrow to the right of the preset name to expand the list and view all presets.
Last User State
The top option on the preset drop-down menu is Last User State. If you load a preset at a time when you had made changes to the plug-in settings which were not saved, your unsaved changes are automatically saved as the Last User State. This allows you to easily compare an existing preset with some new settings which you are still dialing in, or to go back after a preset change without losing your work. Only the most recent unsaved User State is captured in this way. An unsaved User State is indicated by an asterisk (*) to the left of the active preset name.
Show Factory Presets
Some people love the convenience of factory presets; others prefer to use only their own custom settings in their music. You can choose to hide the factory presets and show only your own original presets in this drop-down list by unchecking Show Factory Presets. If Show Factory Presets is checked, then all presets including the factory set will appear in the list. Factory presets are indicated by an F icon to the left of the preset name.
Compare Switch
Directly to the right of the preset drop-down is the Compare switch, which switches between the last loaded state and the last changed state. Load a preset, play around with it, and then click the Compare switch to toggle between the preset loaded and your most recent modifications to it.
Presets Menu
The Presets Menu is located in the top left corner of the plug-in UI window. Click the ![]() icon to show the Presets Menu. The following options are available:
icon to show the Presets Menu. The following options are available:
- Init Preset – creates a new INIT preset as a starting point for sound design.
- Save Preset – saves the current state to the currently-active preset. Overwrites the previous state of that preset.
- Save Preset As… – saves the current state as a new preset with a new name.
- Delete Current Preset – deletes the currently-active preset. Factory presets cannot be deleted in this way.
NOTE: You can also drag and drop preset files onto the plug-in UI to import them automatically.
- Export State - allows you to choose any folder in your computer’s file system and save the current plug-in state as a new preset in that location (Save Preset and Save Preset As will automatically place saved presets in the plug-in’s own Presets folder).
- Open Presets Folder - opens the plug-in’s Presets folder on your system’s desktop (Finder or File Explorer).
- Open Manual - opens this manual in your web browser.
- Contact Us For Help - opens the Moog Music customer service website.
SUPPORT
Moogerfooger Effects Plug-ins are designed for macOS 10.13 / Windows 10 systems or newer.
VST3, AudioUnits, and AAX plug-in formats are supported.
Should you experience any issues with your Moogerfooger, please contact [email protected].